
User Guide
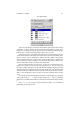

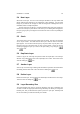
Table Of Contents

CHAPTER6
Channels
6.1 Channels Introduction
This chapter will explain the use of channels.
6.2 The Channels Dialog
Channels The Channels tab displays the three RGB channels, showing the current red,
green, or blue color values of each pixel in your image. The RGB channel thumbnails
are grayscale representations of each color channel with white representing 100color
and black representing no color.
The RGB channels each have an icon, so you can look at your image in a single
color channel. Click off the eye icon in the Blue and Green channels, so that only the
Red channel is visible. Bright red in the red channel is the equivalent of a maximum red
value for that pixel; black means that the pixel has no red at all in it. You will see bright
red for areas that are white or bright red. If all three channels have maximum values for
an area, that area is white in the actual image.
The RGB channels are always active when a layer is active. They display the color
values of all visible layers, not just the active one. Unlike layers, the RGB channels
can all be active at the same time. You can also choose to work in one or two specific
color channels by clicking on the appropriate channels to activate the ones you want
and deactivate the ones you don’t want.
You can create new channels by clicking the button. This will bring
up theNew Channel dialog where you can set name, color, and fill amount of the new
channel. If you want to alter the values later on, you just double click on the channel
which will bring up theEdit Channel Attributes dialog. Normally you don’t work with extra
channels, but they can be very handy for creating and storing selections.
If you right click on the layer name you will be able to access the layer menu. In the
layer menu you have access to several other layer commands, see 47.
An experienced user can also use them to create patterns and advanced colored
images. The channel stack tools and are more or less only useful when
you work with those kind of images.
47