
User Guide
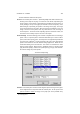
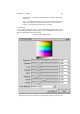
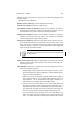
Table Of Contents

CHAPTER 13. FILTERS 151
To its right is a button group that allows choosing English (inch) units or metric
(centimeter) units. Below these are four boxes that allow entry of the left, top,
right, and bottom of the image. These positions are relative to the top left of the
paper
3
. There are two additional boxes that allow specification of the right margin
and bottom margin if you prefer; these are relative to the bottom right corner of
the paper. Any of these may have values entered into them. The preview image
will be moved appropriately.
These entries do not resize the image.
Finally, there is a pick box for orientation (landscape or portrait). There is an
Auto mode that picks the orientation that best matches that of the image to be
printed.
Scaling The Scaling pane contains a slider that allows scaling of the image. The
image can be scaled in either percent of the printable area (NOT the page in this
case) or pixels per inch ( PPI) via a radio button below the slider. PPI allows
matching image resolution to printer resolution. The image may be scaled using
either method to between 5 and 100% of the imageable area. It is not possible to
crop with the Print plugin. In Percent mode, the image is scaled so that neither
axis will be longer than the percent of the printable area specified. For example, if
you print an image at 20%, it will be possible to tile the image 5 times on one axis
and at least 5 times on the other. To the right of the radio button is a button called
Set Image Scale. This sets the scaling to PPI, and sets the resolution as closely
as possible to the resolution stored in the image. To the right of the Set Image
Scale button are two boxes that allow entry of width and height of the image.
These set the scaling mode to PPI. Specifying one automatically sets the other,
and the image is repositioned as needed to prevent it from falling off the edge of
the page.
Image Settings The Image Settings pane allows choice of Line Art, Solid Colors,
Photograph, or Monochrome image type. Line art or Solid Colors should be
used for graphics containing mostly solid areas of color. They’re very similar to
each other. Photograph mode dithers more slowly, but produces more accurate
colors. Finally, Monochrome mode can be used to print absolute black and white
very quickly. To the right of these four radio buttons is a button called Adjust
Color. This pops up a new window that controls various output quality settings.
That will be described separately. Finally, there is a choice of Black and White
and Color output.
Action Buttons The last pane contains four action buttons:
• Print and Save Settings – immediately print the image (or, if the File printer
is chosen, display a file selection window to pick the output file), and save
all current settings for all printers.
3
again, that’s relative to the paper corner, not the printable area, which is usually smaller