
User Guide
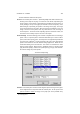
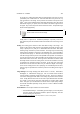
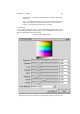
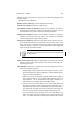
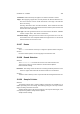
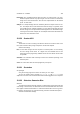
Table Of Contents

CHAPTER 13. FILTERS 150
The main window is divided into five panes:
Preview The Preview pane contains a positioning widget that allows interactive po-
sitioning of the output on the page. It contains an outer border, representing the
sheet of paper; an inner border, representing the printable area of the printer; an
arrow, pointing to the top of the page (the end that is fed into the printer); and a
black rectangle, representing the position of the image on the page. The image
can be moved around on the paper. When the left left mousebutton is used, the
image is moved in screen pixels; when any other button is used, the image is
moved in points
1
. The arrow resizes depending upon the media size chosen; the
shaft of the arrow is always equal to one inch on the output.
Printer Settings The Printer Settings pane contains a dropdown menu for selecting a
printer. There is a special “printer” named File that allows you to choose a file to
print to, rather than a printer queue. The Setup box to the right allows specification
of a printer type, a PPD file
2
, and the command to be used to print. Each distinct
printer in the Printer list can have different settings applied to it. Below that is a
combo box allowing choice of media size. The choices are constrained to those
that the printer supports. Below that are dropdown menus for choosing media
type (what kind of paper), media source (what input tray), ink type, and resolution.
All of these settings are printer-specific.
The Printer Setup Dialog
Position The Position pane contains various widgets to place the image on the paper.
These widgets work in conjunction with the Preview pane. At the top left of the
pane is a button to center the image on the paper (not on the printable area).
1
the output resolution of the plug-in
2
for Postscript printers