
User's Manual
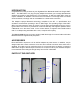
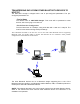

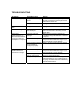

Table Of Contents
- Bluetooth? Serial Port Dongle GWT-SPP1
- INTRODUCTION
- ACCESSORIES
- PARTS OF THE GWT-SPP1
- INSTALLATION PROCEDURE
- TRANSFERRING DATA FROM OTHER BLUETOOTH DEVICES TO HOST PC
- USING THE LIGHT EMITTING DIODES (LEDS)
- USING THE PAIRING SWITCH
- TROUBLESHOOTING
- SPECIFICATIONS
- USEAGE & SAFETY CONSIDERATIONS
- APPENDIX A:LIMITED PRODUCT WARRANTY
- COPYRIGHT NOTICE
- REGULATORY COMPLIANCE NOTICE
- LIFE SUPPORT POLICY

Once the other device is installed, let it discover the GWT-SPP1 dongle.
NOTE: If there is more than one GWT-SPP1 dongle in the vicinity for it to discover, you may
want to note the Bluetooth device address of your dongle the product label.
Select the GWT-SPP1 dongle from the list of discovered devices by its name “GWT SPP Dongle”
(and when necessary checks the Bluetooth device address) and double-click it to initiate the process
of connecting to the dongle. The dongle provides the service "SPP Slave".
Double-click on the "SPP Slave" service icon and the local device will connect to the GWT-
SPP1 and set up the serial port service. At this instance, the green LED of the GWT-SPP1
will become fast flashing.
At the other Bluetooth device, make a note of the COM port number assigned to this serial
port service selected.
Data transfer can now begin between the other Bluetooth device using the virtual COM port
(at any baud setting up to 115.2kbps) and the PC hosting the GWT-SPP1 dongle.
USING THE LIGHT EMITTING DIODES (LEDS)
There are two LEDs on the GWT-SPP1. The status indications provided by these LEDs are
as follow:
Colour Indication Status
Red Flash No RS232 signal detected at the connector. Check
for proper connection.
Fast flash Dongle has on-going Bluetooth connection (busy). Green
Slow flash Dongle is operational and in Discoverable and
Connectable mode
USING THE PAIRING SWITCH
The Pairing Switch is located at the side of the GWT-SPP1. This switch is catered for future
firmware release that supports secured mode operation. For this current release, the Pairing
Switch functionality is not implemented.