
User's Manual
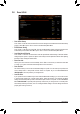

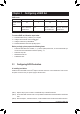
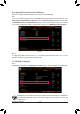
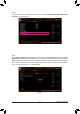


Table Of Contents
- Box Contents
- Optional Items
- X299X AORUS MASTER Motherboard Layout
- X299X AORUS MASTER Motherboard Block Diagram
- Chapter 1 Hardware Installation
- Chapter 2 BIOS Setup
- Chapter 3 Configuring a RAID Set
- Chapter 4 Drivers Installation
- Chapter 5 Unique Features
- Chapter 6 Appendix
Conguring a RAID Set
- 66 -
The BIOS Setup menus described in this section may differ from the exact settings for your motherboard.
The actual BIOS Setup menu options you will see shall depend on the motherboard you have and
the BIOS version.
Step 2:
TocongureUEFIRAID,followthestepsin"C-1."Toenter thelegacyRAIDROM,referto"C-2"formore
information. Finally, save the settings and exit BIOS Setup.
Figure 1
B.ConguringSATAcontrollermodeinBIOSSetup
MakesuretoconguretheSATAcontrollermodecorrectlyinsystemBIOSSetup.
Step:
Turn on your computer and press <Delete> to enter BIOS Setup during the POST (Power-On Self-Test). Under
Settings\IOPorts\SATAAndRSTConguration, make sure SATA Controller(s) is enabled. To create RAID,
set SATA Mode Selection to Intel RST Premium (Figure 1). Then save the settings and restart your computer.
(IfyouwanttouseNVMePCIeSSDstocongureRAID,makesuretosetNVMe RAID mode to Enabled.)
C-1.UEFIRAIDConguration
Step 1:
In BIOS Setup, go to Boot and set CSM Support to Disabled (Figure 2). Save the changes and exit BIOS Setup.
Figure 2