mesa — RTE 4 Table of Contents Foreword 6 Part! Installation 4 1. Package Contents. 2 Wounting/Suspending. Wall-Mount: Bracket: Suspending 3 Powering the Device: 4 Configuring the Device. Offline Configuration i. Language and Sound Date de Ties. Online Configuration Ethernet Configuration Elba net Direct Esther Direct Scarification Ethernet Via Switch. Pimpernel Vid Switch Confiscation Partly Operation 1. Admin Registration... Adrian 1D and PW. Admin FR Admin Card... Admin £P + Card.
Hardware Manual index 0 FCC Warming Statement The device complies with Pare 15 of the FOU Rules: Cow ration is subject to the following two conditions: 11) his device wiry hot chastise Sacroiliac interference, and (2) tir device must toecap any Interference received, including interference they av cis ides operation, Trinidadian
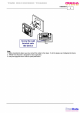
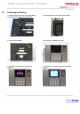
Hardware Manual 14 1.2 1.24 Installation This-part scabies the matting of TRADER, powering up and Connecting it off aid online for configuration Package Contents The: TR4O8O Time Recorder standard package consists. of User Card Note: The following Gina-Tms make network adapters will supplicate ordered additionally: 1. RE232-USB Adapter 2. RS485-USH raptor Mounting/Suspending TRAUMA: can be: mounted-or suspended oi the: wall. Wall-Mount Bracket 1: Using the Template in the package mark finding poach.
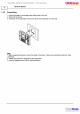
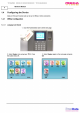
mecca Sa Installation. Screw the wall bracket onto the device Note: 1. Before mounting the device you may connect the tables to the device’ To do this please Ses Configuring the: Dace 2: TRAPDOOR Time Recorders designed for corridor application. 3.
Hardware Manual 1.2.2 Suspending 1. Using the template In the package mark filing paints on the wall, 2: Trill and fix: the screws: 3.The device can be suspended on the screws by the screw orderings on ifs rear side. Note: 1. Before suspending the device connect the cables to the device. Please see Connecting the Dee for cable suggestions: 2. TREE Time Recorder is designed for indoor application. 3.
Hardware Manual 14 Configuring the Device Date and Tine:and Oldness level can be set In Offing or Online correction. 14.4 Offline. Configuration 1.4.44 Language and Sound 1, -Bean the Administrator Card to enter main page: 2. Select System: oon using Keys 9B Press 3. Befitted System again on the fixture page and press the button below OK. OK.
Installation. 4 Press keys £08 chancellery of the sifted languages. 6. Press key using keys i sets, rand select Number Set and then k. choose the any of the sifted B. Press Key: ® and select Volume dnd then sing keys 4. get required volume level. 5, Press key abandon select Filename ext. And then using keys (4B choose any of the listed formats, 7. Press Key |® and select Voice and then using keys 16 BSW iL OFF.or ON Latent 8: Press key '® and select: Key beep and then using: Keys: 4B Rich if OFF or ON.
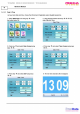
prs Hardware Manual 14.42. Date & Time set your local date and time, clotheshorse format and if applicable select daylight saving time 1. Select Date/Time confusing key 1 ¥ Press the: button below OK. 2 Using keypad nu hers and keys a BK 0 tare Date and Time. Late Time. 3, Press key F selectman Date Format using 4. Press Key learning's Time Format using Revs Ar 5 Press key ® and select DST using keys & Therein time and date will be displayed.
7 Hardware Manual THA Hernandez! Direct Configuration 1.
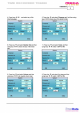
mesa Sp Installation. 3. Click:Change adapter settings wo CHARLES PL daring en nti ce yp tic Er SR gin he spp Rtn SHS $6 en oon A or $k REE Tr Ai En hen Dag eit abo iy Egg Danae ii Bd PRE 4.
meG Hardware Manual 5. Select Internet Protocol Version 4{TCPAPYA) and click Properties.
mesa Sp Installation.
prs Hardware Manual 8. Power ain STRABO dnd when the. clock dishy appears, follow the fixture steps. 10.00 {he rain bags, select Comm, and SICK OK. 12. Use: ior [Biers and set CPD 16. Disable, 18; Enter the values shown as-shown below.and 14; Keep clicking ESC to: exit main page. clix: OK.
mesa BEE Installation. 17 18. Open sin web browser (Internet Explorer, Mozilla: etc) and typing the address bar the IP address: and press Enter tab devour PC.
mica —— 28 5. Erse that ion the General tab Obtain IP adder 38 automatically is. defected. Click-QC gE on iin ART SR Thirteen WARSAW i is on Ane heats Pan oss nS Mid Sin a hs thd eet TORE.
oh Hardware Manual TF Power an TRAIT. "When 'the clack display appears, do the following the'steps’ 9. the main page, select Comm, and click OK: 10-00 the next page select Network and click OK. HH, FDHCP fs enabled, skip to:step. Tf not Use. ar keys and set CPD to Enable and click OK: 12; Click OK on the Network page and again 13. Note IP Address ahd then click BSG: enter SHOP page.
Installation. 14. Click Against. 15, Click: ESC again to exit, 16. Open any web browser (renter Explorer, Moe. freehand typed the 19 address! 192:168: 100.
mecca BEE Hardware Manual i i GbE Ghetto Ses Ho .
Hardware Manual Gem gadded Be Dal Fir Deter Duse Format | SUM Date Fate wy Tie Farmer 2a Haw HO Ber oe Sve Heed Indochinese 22. STRABO display. will change to the new time h.
Hardware Manual 24 244 Operation This section will detest how to register user fingerprints and operate. jolter clinicians. Admin Registration This section describes steps to register: 1. Admins: 1D and Password 2. Admins:Fingerprint 3, Admins Lard 4. Admin's Fingerprint + Card and 5: Verification of the above. Admin 1D and PW The Administrator should have an [Number and password for online access of TREATED The steps to.
Operation 3 Triter password 1 passed 4 ME OK ESC 8. Fist success registering of ID will be confirmed 6. Next, successive registering of password will be by the appearance of a Right mark: confirmed by the appearance of key bunch icon next fo Enroll PW button, Jf your want fo register FP, Dare sic. rider this: samey ID number you may follow from step 4 in the next section. Alternately yao nay press ESC 10 exit now and register them later but.you have to then choose another 1D number.
Hardware Manual 21:2 You fay of course register Frederic willy a ng Nonmember, Admin FP 1. To register Administrators fingerprint; scan 2:0 the ext page, Using key “Bi select Admin the Admin Card {provided with the product package) icon and press OK. and enter the ain page Select User icon and reds OK. 3. Enter: Admin ID number. Using key % select 4. Fingerprint $cal page open. Enroll Panda then press-OK.: you enter an already registered I peripheral direr Message.
Hardware Manual 8. On 'successful registration the page will appear showing number:1 next” to-Br roll FP button. To. register your tiger fingers repeat the steps ony number 44 10: To register card for the same Dauber low footstep 4 onward in the next: Section Alternately you: iay press: ESC. exit row and register he card later by ‘choosing another number. Olen FP. . Error message if 10 number was already taken! registered; Prior Enron No.
21.3 Operation Admin Card 1. To register Administrators Card, scan the Admin Capek provided with the: product package And enter the malt page: Select User icon and press OK: Enter your Divine 1D number: Next, using key, # select Endocarditis 8nd press OK. Eo] Can 5. Take a blank user card provided with the product package and scan. 8. The Registration page. will r-opeénand a ‘Right! mark will also appear next to Bu roll Card -button 2.