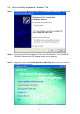
2-5. Driver & Utility Installation - Windows® XP Step 1: When the Found New Hardware Wizard screen appears, click Cancel to exit. Step 2: Insert the GN-WIKG Installation CD into the CD-ROM drive. The GIGABTYE GN-WIKG Wireless Mini-PCI Adapter setup screen appears. Step 3: Drag your mouse over Install Wireless LAN Utility and click on it to start the utility installation program.
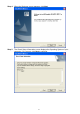
Step 4: When the Welcome screen appears, click Next. Step 5: The Check Setup Information screen displays the Operating System of your computer. If it is correct, click Next to continue.
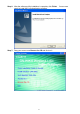
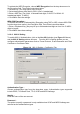
Step 6: After the software utility installation is complete, click Finish. You are now ready to install 802.1x authentication software. Step 7: Drag your mouse over Browse the CD and click on it.
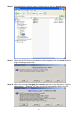
Step 8: The Windows file explorer opens. Double-click on the file “AegisI5.exe”. Step 9: When the AEGIS Protocol Installation window appears click the Install button to begin installing program files. Step 10: When the message Installed Successfully appears in the dialog box, click the Close button. Windows® XP may or may not automatically reboot your PC.
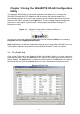
Chapter 3 Using the GIGABYTE WLAN Configuration Utility The Gigabyte WLAN Utility is a powerful application that helps you to configure the GN-WIKG Wireless Mini-PCI Adapter as well as monitor the network status link. It automatically appears as an icon in the system tray at the bottom right corner of screen whenever the card is operating (see Figure 3-1). The icon displays signal strength (one green box = weak signal, 4 green boxes = strong signal) and double-clicking on it launches the utility.
Profile Name Name associated with specific wireless parameters and settings. The the currently active profile. icon indicates SSID – Displays the Service Set Identity (wireless network name) associated with active profile. Channel – Displays which channel the profile is operating on. Authentication – Displays authentication type associated with profile. Encryption – Four encryption types currently used in the profile include “None”, “WEP”, “AES” and “TKIP”.
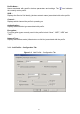
Profile Name – Type in a unique profile name, set the corresponding parameters and click the Apply button to add profile. SSID – Select a defined Service Set Identity detected by the system from the drop-down list or input a new SSID (32-character maximum). Power Saving Mode – Select the PSM option to enable power saving feature (when no data will be transmitted) or the CAM option to have device always on.
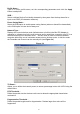
3-1-2. Add Profile - Authentication and Security If an authentication or security setting is configured in a wireless access point or wireless router, it is necessary for the Wireless Mini-PCI Adapter profile to match the security parameters in order to obtain access and establish a connection. Both WEP Encryption and 802.1X Authentication protocols are supported. Figure 3-5.
To activate the WEP Encryption, choose WEP Encryption from the drop-down menu in the Encryption field. Then follow instructions below: 1. Select a Key. (You may specify up to 4 Keys) 2. Select data type as either Hex or ASCII. (Hex = hexadecimal) 3. Enter a WEP key. [For 64-bit: 10 hexadecimal digits, 5 ASCII; For128-bit: 26 hexadecimal digits, 13 ASCII] 4. Click OK to save the settings.
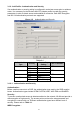
Use Client Certificate – Check the Use Client Certificate box to confirm if the Client Certificate is correct in the authentication process. This applies only to TLS and TTLS authentication types. Tunnel Authentication – PEPA and TTLS use two-step authentication method. The first step is that Server sets up a Tunnel with its authentication. No option is need to be set for Station with WLAN card. The second step is to confirm the validity of Station with assigned authentication type in the Tunnel.
The CA Server is enabled only when TLS, TTLS or PEAP authentication is selected. The Client can verify if such server is reliable and then transmit Client Certificate after the verification is confirmed. (NOTE: Only available if Use Client Certificate is checked.) Verify CA Server 1. Confirm if the Server Certificate is issued by an assigned certificate issuer. If Allow Intermediate Authentication box is checked, the server certificate can be issued by one intermediate certificate issuer. 2.
3-2. The Link Status Tab The Link Status tab displays information on the current wireless network connection. Figure 3-9. Link Status Status – Displays the SSID and MAC address of the associated access point when GN-WIKG is configured in infrastructure mode. Current Channel – Displays the wireless channel currently in use ONLY when GN-WIKG is configured in Ad-Hoc mode.
3-3. The Site Survey Tab The Site Survey” tab shows you the list of available access points and/or peer-to-peer stations. You can double click SSID that you want to connect or highlight the access point and click the Connect button. Figure 3-10. Site Survey BSSID – Displays the MAC address of the access point. Signal Strength – Displays the access point signal strength. Channel – Displays the current broadcast channel used by the access point. Encryption – The security method used by the access point.
3-4. “Statistics” Setting The Statistics tab shows you the number of packets sent and received by the Wireless PCI Adapter. Figure 3-11.
3-5. The Advanced Tab The Advanced tab includes fields of various parameters to review or change drivers. Just click “Apply” button to apply any parameter change to the driver in the tab. A reboot is not needed for the WLAN card (see Figure 3-12) Figure 3-12. Advance Wireless Mode: Sets infrastructure Protocols, including 802.11 B/G mix and 802.11 B Only. Ad Hoc Wireless Mode: Sets Ad Hoc Wireless Protocols, including 802.11 B/G mix, 802.11 B Only and 802.11 G Only.
3-6. The About Tab The About tab displays information about current drivers and physical MAC address. Figure 3-13.
Chapter 4 Troubleshooting This troubleshooting guide lists questions and possible solutions to some common problems which you may encounter while installing or using GIGABYTE Wireless Mini-PCI Adapter. Cannot Enable 802.1x, WPA or WPA-PSK Windows XP / 2000: 1. Run the AegisI5.exe file found on the GN-WIKG installation CD. 2. Click “Install”. Windows 98SE / ME: 1. Run AegisI2.exe file found on the GN-WIKG installation CD. 2. Click “Install”.
Chapter 5 Hardware Specifications 1. System Host Interface Mini-PCI Type III B Operating Voltages 3.3V+-5% 2. RF Characteristics Frequency Bands 2412-2484 MHz (subject to local regulations) Modulation Technology OFDM and DSSS Modulation Techniques 64QAM, 16QAM, QPSK, BPSK, CCK, DQPSK, DBPSK Date Rates 54, 48, 36, 18,12, 9, 11, 6, 5.