
User's Manual


AirCruiser G Desktop Router
3
Chapter 2 Installation
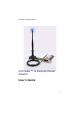
This chapter covers the installation of the AirCruiser G Desktop Router. The
AirCruiser G Desktop Router uses standby power from your PC to stay ‘always
on’, and receives power from the PCI bus – even with your computer off – when
working normally; you should see the power LED become steady green. Please
take note of this as you reach Step 3.
AirCruiser G Desktop Router - Factory Default Settings
SSID (Network Name) GIGABYTE
Broadcasting SSID YES
Wireless Security Open System (OFF)
IP Address of Web Configuration Utility 192.168.1.254
Configuration Utility Username/Password admin/admin
Installing the Router
Step 1: Power off your PC.
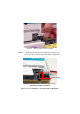
Step 2: Plug the AirCruiser G Desktop Router into an open PCI slot
on the motherboard and press gently until the card edge
connecter is fully inserted into the PCI slot.
Step 3: If working normally, you should see a green power LED
(see figure 2-1 below) and installation is complete! If
there is no green power LED please continue with Step
4.