
User Manual

Note: It will be Automatic operation mode when the No. 10 switch is turned down.
Effect choice (button switch No.1 to No.4):
1, Push No.1: Automat cycling. 2, Push No. 2: Seven-color gradual cycle changing.
3. Push No.1 &2:
RGB Fade in and out
4. Push No.3: Severn color jumping
5. Push No.1 & 3: RGB jumping. 6. Push No.2 & 3: Single color fade
7. Push No. 1 & 2 & 3:Single color left scan 8. Push No.4: Single color right scan
9. Push No.1 & 4: Single color left pile up 10: Push No.2 & 4: Single color right pile up
11. Push No.1 & 2 & 4: Single color left and right scan 12. Push No.3 & 4: Single color left and right pile up
13. Push No.1 & 3 & 4: single color red 14. Push No.2 & 3 & single color green
15. Push No.1 & 2 & 3 & 4: single color blue
Speed Choices (Button Switch No.5 to No. 8)
1.
Push No.5: 0.5 second. 2. Push No.6: 1 second. 3. Push No.7: 1.5 second. 4. Push No.8: 2 second.
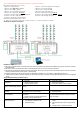
Schematic for System Connection:
Installation Notes:
※ This kind of controller works only under DC5V-24V, which is provided by the matched controllable main power, or else the controller
will be damaged.
※ The UTP wire is connected hand in hand to make the cable, when two or more controller connected.
※ The power supply should be off when connecting the electric wires, and it can be turned on till making sure the wires are connected
correctly and the indicator of main power in red is lighting.
※ Controller should work under the environment of adequately ventilated, dry, not corroded, no flammable gas and rust.
※ Please check the wires connection regularly so that the wires of aged, rust-eaten, and damaged insulation spacer can be replaced
timely
Simple troubleshooting and maintenance:
Symptom
Reason Analysis
Solution
NO lighting
1、No power
2、Wrong connection of wire
3、Power protection setting
1、check power supply
2、check wire connection
3、check power failure, power on again
Red indication light is on,
green indication light not flash
Didn’t make dip switch or dip switch is not in
correct
Follow up the instruction to reset dip switch
The Light color is not show in
correctly
1.RGB LED is not connection correctly
2.Dip switch is not in correct place
1、 Re-connect the RGB and wire
2
、 Reset dip switch
Can’t be
synchronization
1、The RJ45 cable is not connected or wrong
connection
2、master and slave controller setting failure,
The slaver is set dip switch effects
1、re-connect the RJ cable
2、reset master and slave controller to ensure
only one master
Led brightness is different at
beginning and end
1、 Output line is too long
2、 The diameter of wire is too thin
3、 Overload working
1、 Use annular electric supply or shorten
circuit
2、 Calculate electrical current, change strong
wire
3、 Change power or increase controller