
Installation guide
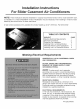


Installing the Unit in a Casement
Window
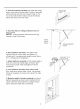
NOTE: Open the window the maximum amount to
allow for clearance of the cabinet. The crank handle
should be removed to allow the platform to be
fastened to the jamb. If the window cannot open far
enough (more than 15-1/2 inches)for the cabinet to
clear the window, remove the window entirely by
drilling out the rivets. Bolts can serve as the pivots in
the future.
To avoid crank handle and window clearance
problems, the unit can be installed in a stationary
sash section. However, the horizontal mullion and the
2 glass panels must be removed before installation.
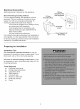
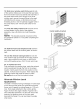
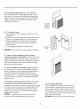
1. Attach support brace to platform as shown. Use
the adjustment bolt and hex flange nut to complete
the assembly. Choose the slot and adjustment bolt
hole locations that will create a 45 degree angle
between the platform and the support brace. Try the
assembly in the window to determine if the platform
wilt rest properly, and allow the proper slope (3/16-
inch lower on outside).
NOTE: If you are planning to use a siding-
protection board (see Step 6) on the outside of your
house, hold the board in place when testing the
assembly in the window.
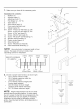
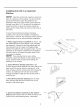
2. Drill a 9/64-inch diameter pilot hole in the
window jamb an equal distance from each side of the
jamb, and 3/16-inch up from the window sill. If the
hole coincides with the window lever slot in the jamb
bottom, an additional hole wilt have to be drilled
through the platform edge and the window jamb to
miss this slot.
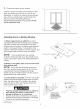
3. Peel off the protective backing from the track
seal, and stick the seal to the window silt on the
outside of the bottom jamb.
I/4" (6mm) HEX FLANGE NUT
Equal distance from both sides
8 _/_ Fnches
Apply track seal to the outs de
edge of the bottom window jamb
Platform Assembly
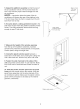
4. Screw the platform assembly to the window
jamb through the pilot hole you drilled in Step 2. Use
a #8x3/4-inch self-threading screw. (continued)
Track seal
Screw_
Window