
manual


GFI Network Server Monitor General options • 135
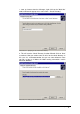
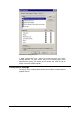
Screenshot 120 - built in Web Server settings
To configure the built in web server:
1. Right Click on the ‘General Options’ node, select ‘Properties’ and
click on the ‘Web Server’ tab.
2. Configure the following parameters:
• ‘Enable in-built web server on port….’ – Enable this flag and
specify the port which the built in web server will listen on (by
default set to 11695).
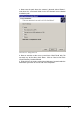
• ‘Allow anonymous access to the web server’ – Enable this flag to
indicate that no authentication is required on the web server.
• ‘Allow only the following users to log on to the web server’ –
Enable this flag to grant web server access only to the specified
users.
• To specify users that have access to the web server, click on
‘Add’. Then, specify the user’s authentication details (User name
and Password) and click on ‘OK’.
Configuring IIS as the web server
Using IIS as the web server gives you more advanced authentication
features and the possibility to secure the connection via SSL. The
integration with IIS is very straightforward. GFI Network Server
Monitor updates an XML file, from which the 2 views are rendered.
These files are stored in the GFI Network Server Monitor\Server\web
folder. You need to create a virtual directory in IIS, which points to the
GFI Network Server Monitor\Server\Web folder. To do this: