
User Manual
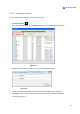
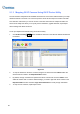
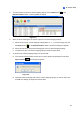
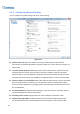
Table Of Contents
- Important Notes
- Contents
- Chapter 2
- Chapter 3
- Video Analysis
- 3.1 Object Counting and Intrusion Alarm
- 3.2 Object Index
- 3.3 Automatic Video Snapshots
- 3.4 Face Detection
- 3.5 Face Count
- 3.6 Privacy Mask Protection
- 3.7 Panorama View
- 3.8 Video Defogging
- 3.9 Video Stabilization
- 3.10 Wide Angle Lens Dewarping
- 3.11 Advanced Motion Detection
- 3.12 Crowd Detection
- 3.13 Advanced Scene Change Detection
- 3.14 Advanced Unattended Object Detection
- 3.15 Advanced Missing Object Detection
- 3.16 Text Overlay
- 3.17 Fisheye View
- 3.18 Specifications
- Video Analysis
- Chapter 4
- Chapter 5
- Chapter 6
- Chapter 7
- Chapter 8
- Chapter 9
- Useful Utilities
- 9.1 Dynamic DNS
- 9.2 Watermark Viewer
- 9.3 Windows Lockup
- 9.4 Authentication Server
- 9.5 Fast Backup and Restore
- 9.6 Bandwidth Control Application
- 9.7 Language Setting
- 9.8 Skype Video Utility
- 9.9 GV-SDSyncCard Utility
- Useful Utilities

IP Camera Setup
2
[General Setting]
Camera Name: Changes the camera name.
[Stream Setting] Select a stream from the drop-down list. Settings for Main Stream will be used for
recording. Live view can use either Main Stream or Sub Stream depending on the On Demand settings.
For details, see the On Demand Display section later in this chapter.
Codec Selection: Set the codec to MJPEG or H.264.
FPS: Set the number of frame per second.
GOP: Set the number of seconds between each key frame. For example, when the FPS is set to
30, a GOP of 0.5 means there will be 1 key frame among every 15 frames.
Quality and Bitrate: When using the H.264 codec, you can select between VBR and CBR.
~ VBR (Variable Bitrate): The quality of the video stream is kept as constant as possible at the
cost of a varying bitrate. Set the image quality to one of the 5 standards: Standard, Fair,
Good, Great and Excellent. Set a Max. Bitrate if needed, or select Auto if you do not want to
enable this function.
~ CBR (Constant Bitrate): CBR is used to achieve a set bitrate by varying the quality of the
H.264 stream. Select one of the bitrates from the drop-down list.
Resolution Change the display ratio and resolution.
[Video Lost / Connection Lost]
Trigger Output: Trigger the specified output module upon video lost or connection lost until the
output device is manually turned off. Use the drop-down lists to select the output module and pin
number to perform this function. To configure the output device, see I/O Device Setup in Chapter
6.
~ Right-Arrow button: Set the counting time between 0 and 1000 seconds to delay the
activation of the specified output module.
[Camera Lens] Select Wide Angle if you want to correct warping toward the edge of the camera
image. See Wide Angle Lens Dewarping in Chapter 3 for details.
If you are using third-party fisheye cameras, select IMV1 Panorama for cameras installed with an
ImmerVision IMV1 Panorama Lens, and select Fisheye for other third-party fisheye cameras. Refer to
Setting Up a Third-Party Fisheye Camera in Chapter 3 for details.
85