
User Manual
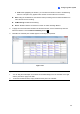
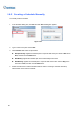
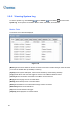
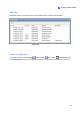
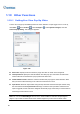
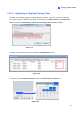

Table Of Contents
- Important Notes
- Contents
- Chapter 2
- Chapter 3
- Video Analysis
- 3.1 Object Counting and Intrusion Alarm
- 3.2 Object Index
- 3.3 Automatic Video Snapshots
- 3.4 Face Detection
- 3.5 Face Count
- 3.6 Privacy Mask Protection
- 3.7 Panorama View
- 3.8 Video Defogging
- 3.9 Video Stabilization
- 3.10 Wide Angle Lens Dewarping
- 3.11 Advanced Motion Detection
- 3.12 Crowd Detection
- 3.13 Advanced Scene Change Detection
- 3.14 Advanced Unattended Object Detection
- 3.15 Advanced Missing Object Detection
- 3.16 Text Overlay
- 3.17 Fisheye View
- 3.18 Specifications
- Video Analysis
- Chapter 4
- Chapter 5
- Chapter 6
- Chapter 7
- Chapter 8
- Chapter 9
- Useful Utilities
- 9.1 Dynamic DNS
- 9.2 Watermark Viewer
- 9.3 Windows Lockup
- 9.4 Authentication Server
- 9.5 Fast Backup and Restore
- 9.6 Bandwidth Control Application
- 9.7 Language Setting
- 9.8 Skype Video Utility
- 9.9 GV-SDSyncCard Utility
- Useful Utilities

60
1.8.2 Creating a Schedule Manually
To manually create a schedule:
1. In the Schedule dialog box, click Plan and click Add. A dialog box appears.
Figure 1-52
2. Type a name for the plan and click OK.
3. Click Schedule and select an option below:
Edit Special Day: Applies the schedule plan to a specific date each year. Select a Date and a
Plan, and then click the Add button.
Edit Weekly: Applies the schedule plan to the selected days each week.
Edit Monthly: Applies the schedule plan to a specific date each month. Select a Day of the
month and a Plan, and then click the Add button.
4. Double-click the Plan to edit the schedule timeline. Refer to Creating a Schedule with Setup
Wizard earlier in this section for details.