
User Manual

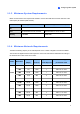

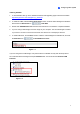
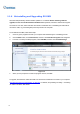
Table Of Contents
- Important Notes
- Contents
- Chapter 2
- Chapter 3
- Video Analysis
- 3.1 Object Counting and Intrusion Alarm
- 3.2 Object Index
- 3.3 Automatic Video Snapshots
- 3.4 Face Detection
- 3.5 Face Count
- 3.6 Privacy Mask Protection
- 3.7 Panorama View
- 3.8 Video Defogging
- 3.9 Video Stabilization
- 3.10 Wide Angle Lens Dewarping
- 3.11 Advanced Motion Detection
- 3.12 Crowd Detection
- 3.13 Advanced Scene Change Detection
- 3.14 Advanced Unattended Object Detection
- 3.15 Advanced Missing Object Detection
- 3.16 Text Overlay
- 3.17 Fisheye View
- 3.18 Specifications
- Video Analysis
- Chapter 4
- Chapter 5
- Chapter 6
- Chapter 7
- Chapter 8
- Chapter 9
- Useful Utilities
- 9.1 Dynamic DNS
- 9.2 Watermark Viewer
- 9.3 Windows Lockup
- 9.4 Authentication Server
- 9.5 Fast Backup and Restore
- 9.6 Bandwidth Control Application
- 9.7 Language Setting
- 9.8 Skype Video Utility
- 9.9 GV-SDSyncCard Utility
- Useful Utilities

Configuring Main System
1
Installing G
V-VMS
1. To download GV-VMS, go to the Software Download and Upgrading page of GeoVision Website:
http://www.geovision.com.tw/english/5_8_VMS.asp
.
2. To install GV-VMS, find the Primary Applications section under the Video Management Software
tab and click the Download icon
of GV-VMS.
3. Double-click GVVMSInstaller.exe and follow the instructions in the wizard to complete installation.
4. If you are using a USB dongle, insert the dongle to your computer. The GV-USB dongle is needed
if you want to connect to more than 32 channels of IP devices or to third-party IP devices.
5. To install USB driver, find the Driver section under the Video Management Software tab, and click
the Download icon
of GV-USB Devices Driver.
Figure 1-1
If you are using the GV-USB dongle, verify that the driver is installed correctly after the steps above.
Go to Windows Device Manager and expand DVR-Devices. You should see the GV-Series USB
Protector.
Figure 1-2
7