
User Manual


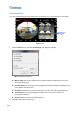
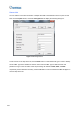

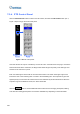


Table Of Contents
- Important Notes
- Contents
- Chapter 2
- Chapter 3
- Video Analysis
- 3.1 Object Counting and Intrusion Alarm
- 3.2 Object Index
- 3.3 Automatic Video Snapshots
- 3.4 Face Detection
- 3.5 Face Count
- 3.6 Privacy Mask Protection
- 3.7 Panorama View
- 3.8 Video Defogging
- 3.9 Video Stabilization
- 3.10 Wide Angle Lens Dewarping
- 3.11 Advanced Motion Detection
- 3.12 Crowd Detection
- 3.13 Advanced Scene Change Detection
- 3.14 Advanced Unattended Object Detection
- 3.15 Advanced Missing Object Detection
- 3.16 Text Overlay
- 3.17 Fisheye View
- 3.18 Specifications
- Video Analysis
- Chapter 4
- Chapter 5
- Chapter 6
- Chapter 7
- Chapter 8
- Chapter 9
- Useful Utilities
- 9.1 Dynamic DNS
- 9.2 Watermark Viewer
- 9.3 Windows Lockup
- 9.4 Authentication Server
- 9.5 Fast Backup and Restore
- 9.6 Bandwidth Control Application
- 9.7 Language Setting
- 9.8 Skype Video Utility
- 9.9 GV-SDSyncCard Utility
- Useful Utilities

256
7.3.4 PTZ Control Panel
Click the Camera Select button to select one PTZ camera, and click the PTZ Control button (No. 7,
Figure 7-20) to bring up the PTZ control panel.
Figure 7-22 PTZ control panel
One PTZ camera can only be controlled by one user at a time. If several users are trying to control the
same PTZ camera at the same time, the Single View viewer will give the priority to the first login user
and then to the next user in queue.
Each user will be given 60 seconds to control the PTZ camera. The Timer at the upper right corner
informs the user of the remaining time of control or the total waiting time. The supervisor is given the
highest priority to control the PTZ camera and won’t be restrained by 60-second time limit. When the
supervisor logs on the WebCam server, the Timer shows 999.
Click the
button to access additional PTZ functions such as changing PTZ speed, starting
Auto Scan and setting preset points. The functions available vary depending on the PTZ models.