SATSURV User Manual Eyr GNSS RTK System User Manual www.satlab.com.
SATSURV User Manual Manual Revision SATLAB GEOSOLUTIONS AB Revision Date Revision Level Description April, 2022 1 Eyr GNSS RTK System User Manual www.satlab.com.
SATSURV User Manual Eyr GNSS RTK System User Manual www.satlab.com.
SATSURV User Manual Preface Introduction Welcome to the Satlab Eyr receiver. This introduction describes how to use this product. Experience requirement To help you use the Satlab series products better, Satlab suggests that you read the instructions carefully. If you are unfamiliar with the products, please refer to www.Satlab.com.cn Tips for safe use Notice: The contents here are special operations and need your special attention. Please read them carefully.
SATSURV User Manual Satlab is committed to constantly perfecting the product’s functions and performance, improving its service quality, and reserves the right to change these operating instructions without notice. We have checked the contents of the instructions and the software & hardware without eliminating the possibility of deviation. The pictures in the operating instructions are for reference only. In the case of non-conformity with products, the products shall prevail.
SATSURV User Manual Contents Preface ............................................................................................................................... 4 Introduction ............................................................................................................................................. 4 Experience requirement....................................................................................................................... 4 Tips for safe use..........................
SATSURV User Manual Overview ......................................................................................................................... 9 1.1 Foreword ............................................................................................................................................ 9 1.2 Features ........................................................................................................................................... 10 1.3 Use and precautions .......................
SATSURV User Manual 2.5 Tilt Survey ....................................................................................................................................... 31 2.5.1 Calibration-free Tilt Survey ............................................................................................... 31 2.6 Firmware Upgrade ....................................................................................................................... 32 2.6.1 Upgrade by USB Cable ................................
SATSURV User Manual Chapter 1 Overview This chapter contains: - Foreword - Features - Use and precautions 1.1 Foreword The Eyr receiver brings superior performance and high efficiency and will support your field work with a reliable solution. The new generation of image RTK incorporates two cameras, a main camera that greatly increases the usable range of the receiver through non-contact image www.satlab.com.
SATSURV User Manual measurement. The other lower camera provides great convenience for AR Stakeout and increases the speed of Stakeout. It deploys an advanced RTK engine and ultra IMU module, which makes tilt measurement much easier, while the new generation GNSS chip guarantees fixing speed and accuracy. So you can count on Eyr to provide you with better productivity. 1.2 Features 1. Its more durable and portable with plastic box. 2.
SATSURV User Manual Notice:This equipment complies with radiation exposure limits set forth for an cont rolled environment. This equipment should be installed and operated with minimu m distance 1m between the radiator and your body. This transmitter must not be co-located or operating in conjunction with any other antenna or transmitter. Notice:Recommend a separation distance of 0.31m or more should be maintained between this device and persons during device operation.
SATSURV User Manual 200m around the station, such as TV towers, microwave stations, and high-voltage transmission lines. To avoid or reduce the occurrence of multipath effects, the station should be away from terrain and features with strong reflectors, such as high-rise buildings, water, etc. www.satlab.com.
SATSURV User Manual Chapter 2 Product introduction This chapter contains: - Overall appearance - Button & LED - WEB management system - Static survey - Tilt survey - Firmware upgrade www.satlab.com.
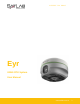
Eyr GNSS RTK System User Manual 2.1 Overall appearance The product’s appearance is divided into three parts, including the upper cover, bottom cover and control panel. Figure 2-1-1 2.1.1 Upper cover Figure 2-1-2 2.1.2 Bottom cover The bottom cover includes the SMA antenna interface, Type-C USB interface. www.satlab.com.
Eyr GNSS RTK System User Manual 2 3 4 1 Figure 2-1-3 1. Type-C USB interface 2. Connection screw 3. Speaker 4. SMA antenna interface ◇ Type-C USB interface: To upgrade the firmware and download static data. ◇ SMA antenna interface: Connect the radio antenna while using the Internal UHF mode. ◇ Protective plug: Used for dustproof and waterproof sockets. Notice: 1.If you don’t use the SMA antenna interface and USB interface, please cover the rubber plug to protect them from dust and water. 2.
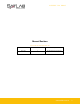
Eyr GNSS RTK System User Manual Figure 2-1-4 1. Satellite LED 2. Data LED 3. Power button 2.2 Button & LED 2.2.1 Button function Table 2-2-1 Button function description Function Power-on Power-off Description Long press the power button for 1 second. In the power-on state, long press the power button for more than 3 seconds but less than 6 seconds. Forced shutdown (use when the device Press the power button for at least 12 seconds.
Eyr GNSS RTK System User Manual Flash Long-term Power LED(green) lighting The power ≤10%. 1. RTK mode: No correction data. 2. Static mode: Sampling has not started. 1. RTK mode: Flashes at the frequency of the correction transmit and Data LED Flash receives. 2. Static mode: Sampling interval >1s: Flashes at the sampling interval. Sampling interval ≤1s: Flashes once per second. Off Long-term lighting Satellite LED Flash 1. RTK mode: No correction data. 2. Static mode: Sampling has not started.
Eyr GNSS RTK System User Manual Figure 2-3-1 Home Figure 2-3-3 Information Figure 2-3-2 Main menu Figure 2-3-4 Work mode www.satlab.com.
Eyr GNSS RTK System User Manual Figure 2-3-5 File manager Figure 2-3-6 Firmware Figure 2-3-7 System Figure 2-3-8 Coordinate System Table 2-3-1 Menu description Main menu Information Work mode Sub-menu Description Device info Device model, version, registration info, etc. Position info Coordinates, satellite tracking, solution state, etc. Sky plot Check the sky plot Satellites list Satellite tracking information Rover Data link and parameter settings of the rover www.satlab.com.
Eyr GNSS RTK System User Manual Base Data link and parameter settings of the base Static Static measurement parameter settings Static data Download, delete and format static data Upgrade Select and upgrade the firmware Restore Restore the system Constellation The satellite tracking switches Radio Radio frequency list Registration Device registration and information Reset Reset the motherboard Others Switch of the static RINEX and volume control, etc File manager Firmware System Projec
Eyr GNSS RTK System User Manual Includes the device’s position, satellites, solution state, latency, PDOP and time, etc. Figure 2-3-10 Position information 3. Sky plot Displays the visual satellites of the device and the switches of each constellation. Figure 2-3-11 Sky plot 4. Satellites list Shows the satellite’s tracked information. www.satlab.com.
Eyr GNSS RTK System User Manual Figure 2-3-12 Satellites list 2.3.3 Work mode 1. Rover Set up the rover’s data link and parameters. The rover station data link includes:Internal UHF, Internal GSM, External Radio. Figure 2-3-13 Rover 2. Base Set up the data link and parameters of the base and get the point coordinates by averaging. The base station data link mode includes:Internal UHF, Internal GSM, External Radio. www.satlab.com.
Eyr GNSS RTK System User Manual Figure 2-3-14 Base 3. Static Set up the file name and parameters of the static collection. Note: After ticking Static Mode, you can only cancel it in the base rover setting interface. Figure 2-3-15 Static 2.3.4 File manager 1. Static data Display the static data files, which supports the Download, Delete and Format options. Note: After checking the "Static Mode", you can only uncheck the "Static Mode" in the base station mode or rover mode. www.satlab.com.
Eyr GNSS RTK System User Manual Figure 2-3-16 Static data 2.3.5 Firmware 1. Upgrade Display specific device version information. Click Select, choose the upgrade package and then click Start. The receiver will automatically detect it and upgrade the firmware. Figure 2-3-17 Upgrade 2. Restore You can restore the system to its state after the last firmware upgrade. www.satlab.com.
Eyr GNSS RTK System User Manual Figure 2-3-18 Restore 2.3.6 System 1. Constellation Switches of the satellite tracking. Figure 2-3-19 Constellation 2. Radio You can select the radio modulation protocol (HI-TARGET19200, HI-TARGET9600, TRIMTALK450S, TRIMTALK III, SATEL-3AS, SOUTH19200, SOUTH9600, CHC19200, CHC9600, TRANSEOT). www.satlab.com.
Eyr GNSS RTK System User Manual Figure 2-3-20 Radio 3. Registration Display the registration information of the receiver. You can select the registration type, and then enter the corresponding code to register online. Figure 2-3-21 Registration 4. Reset Reset the motherboard. www.satlab.com.
Eyr GNSS RTK System User Manual Figure 2-3-22 Reset 5. Others You can set the switches of the Store RINEX Data and Check Base Position, select the RINEX version, and adjust the voice volume of the receiver. Figure 2-3-23 Others 2.3.7 Coordinate System 1. Projection Configure planar projection parameters, such as projection model, central meridian, and scale factor. www.satlab.com.
Eyr GNSS RTK System User Manual Figure 2-3-24 Projection 2. Datum Configure the geodetic coordinate system of the source and target ellipsoids, and optionally the transformation model of both. Figure 2-3-25 Datum 3. DAM File Import and export of coordinate system configuration parameters in dam format that can be linked to the controller Satsurv coordinate system. www.satlab.com.
Eyr GNSS RTK System User Manual Figure 2-3-26 DAM File 2.4 Static survey Static survey is a kind of positioning survey, which is mainly used to establish various control networks. 2.4.1 Static settings There are two ways to set up the device to work in the static mode: 1. Satsurv software – static interface – to set up the static or temporary static mode. 2. Web interface – work mode – to set up the static or temporary static mode.
Eyr GNSS RTK System User Manual 6. Download and post-process the static collection data. 79 mm Figure 2-4-1 Height Notice: Don’t move the tripod or change the collecting set while the receiver is collecting data. 2.4.3 Static Data Download 1. Download by USB cable Connect the receiver to a computer with the Type-C USB cable and copy the static data to the computer. The static data is in the GNSS folder of the static drive. Figure 2-4-2 Static Drive Figure 2-4-3 Static Drive www.satlab.com.
Eyr GNSS RTK System User Manual 2. Download in the web management system The Wi-Fi name of the receiver is its S/N. You can connect it to a controller or phone (the default password is: 12345678) and then input the IP address 192.168.20.1 into the browser to log into the WEB management system. Now, open the file manager interface and select the static file that needs to be exported. Click Download and the file can be downloaded to the controller or phone.
Eyr GNSS RTK System User Manual Figure 2-5-1 Tilt Survey Figure 2-5-2 Shake When the receiver gets the fixed solution, shake the receiver back and forth (once every second) for initialization until Shake is marked with When all of the initialization items are ticked, the receiver prompts “Tilt compensation started” and the tilt survey icon becomes illuminated. This means that the tilt survey initialization is now complete and you can perform the tilt survey on the receiver. 2.
Eyr GNSS RTK System User Manual Notice: Don’t move the tripod or change the collecting set while the receiver is collecting data. 1. Make sure the actual pole height is consistent with the set pole height before the tilt survey. 2. When turning on the Tilt Survey switch, you will need the initialization operation before normal use. 3. To meet most the users’ operational needs, the maximum measurement angle of the tilt survey is 70°. 4.
Eyr GNSS RTK System User Manual 2.7 Image measurement The Eyr receivers have newly added dual cameras, which can support the image measurement function. The SHC55 and the software Satsurv V2.3.0 and later versions are required. The image measurement scene is defined as shooting the unreachable position. After the solution is successfully solved by the control’s software, the points can be marked on the photo and their coordinates can be calculated. 2.7.1 Video Shooting 1.
Eyr GNSS RTK System User Manual 2.7.2 Schematic Diagram Of Video RTK Shooting 1. Error Demonstration Figure 2-7-3 Error Demonstration 2. Correct Demonstration Figure 2-7-4 Correct Demonstration www.satlab.com.
Eyr GNSS RTK System User Manual For detailed setting steps, please refer to ‘Satsurv Software User's Manual’ - Image Measurement. 2.8 AR Stake 2.8.1 AR Stake Instructions The Eyr receivers have newly added dual cameras, which can support the AR stakeout function. The iHand55 control and the software Satsurv V2.3.0 and later versions are required.
Eyr GNSS RTK System User Manual For detailed setting steps, please refer to ‘Satsurv Software User Manual’ - Point Stakeout (AR Stakeout). Chapter 3 Technical Specification This chapter contains: -Technical Specification www.satlab.com.
Eyr GNSS RTK System User Manual 3.1 Technical Parameters Table 3-1-1 Technical Parameters Configuration Channels Detailed Indicators 1408 BDS: B1I,B2I,B3I,B1C,B2a,B2b* GPS: L1C/A,L1C,L2P(Y),L2C,L5 Satellite signals GLONASS: L1, L2 tracked GALILEO: E1,E5a,E5b,E6* simultaneously[1] QZSS: L1,L2,L5,L6* GNSS IRNSS:L5* configuration System configuration SBAS:L1C/A,L5 Output format ASCII: NMEA-0183, Binary data Positioning output 1~20Hz Static data format GNS and RINEX Message type RTCM2.
Eyr GNSS RTK System User Manual Static measurement precision Vertical: ± (5+0.5×10⁻⁶D) mm (D is the distance between measurement points) DGPS position Horizontal: ±0.25m+1ppm precision Vertical: ±0.50m+1ppm SBAS position precision 0.5m Tilt survey less than 8mm+0.7mm/°tilt (2.
Eyr GNSS RTK System User Manual Protocol: HI-TARGET, TRIMTALK450S, TRIMMARK III, TRANSEOT, SATEL, CHC, SOUTH Channels: 116 totally, 16 configurable Sensors User interface Tilt survey applications Power button*1 LED prompt light 3 LED lights, Satellite light, Data light, Power button Intelligent application Remote service Host battery External power supply Physical NFC flash connection, WebUI interaction, U disk firmware upgrade Intelligent voice Message push, online upgrade High-capacity lithium b
Eyr GNSS RTK System User Manual Notice: 1. BDS B2b ,GALILEO E6,QZSS L6, IRNSS L5 are available through firmware upgrade. 2. The measurement accuracy, precision, reliability and initialization time depend on various factors, including tilt angle, number of satellites, geometric distribution, observation time, atmospheric conditions and multi-path validation, etc. The data are derived under normal conditions. 3.
Eyr GNSS RTK System User Manual - Battery & charger 4.1 Data cable Type-C cable: To connect the receiver to the PC for upgrading the firmware and downloading static data. Figure 4-1-1 Type-C cable 4.2 Antenna The UHF radio antenna is used in the Internal UHF mode. Figure 4-2-1 Radio Antenna 4.3 Battery & charger 1. Battery: The receiver has a built-in 6900mAh/7.2V battery. www.satlab.com.
Eyr GNSS RTK System User Manual Notice: If the battery needs to be stored for a long time, it should be charged to about 70% and then placed in a dry, low temperature environment. It is recommended that you charge and discharge the battery every 3 months. If you do not have the conditions that are needed for charging and discharging, take out the battery after 3 months and charge it to about 70% before storing it once more. 2. Charger: To charge the receiver, use the standard charger.
SATSURV User Manual Headquarter: Järnbrotts Prästväg, 2 421 47 Vastra Frolunda Goteborg, Sweden info@satlab.com.se Regional Offices: Warsaw, Poland Jičín, Czech Republic Ankara, Turkey Scottsdale, USA Singapore Hong Kong Dubai, UAE www.satlab.com.se www.satlab.com.