
Installation & Assembly

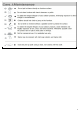

Step 3
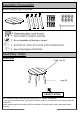
Step 1
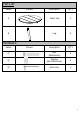
Unpack and place all parts on a clean, non-marring surface.
Step 2
Place the Table Top (A) with its underside facing upwards onto a clean, soft surface to
avoid any scratch or damage to the product.
Loosely affix the Leg(B) into the mounting positions at the corners of the Table Top (A),
using the Bolts(①) with Flat Washers(②) and the Allen Key(③), as shown above.
Repeat the same process with the other Legs (B).
CAUTION: When tightening these Bolts, tighten sequentially.
DO NOT tighten any screw fully and then move towards the next one.
This could cause the frame to warp.
WARNING ! IF THE END TABLE IS NOT STABLE , IT COULD LEAD TO DAMAGE
OF THE PRODUCT.
Turn the Table right side up
Ensure all bolts are fully locked into position.
The Table is ready to be used.
Caution: This Table can only be used on a flat, level surface.
A
4