
Specifications


NUSITE
NUSEIS
Geophysical Technology Inc NuSite Page | 81
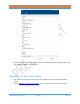
Using Auto Assign Selected
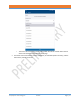
Figure 58
• There are certain requirements that need to be fulfilled before the Auto Assign Selected can be
utilized properly.
o Tick the Auto Assign Selected box on.
o Select the NRU from the list, that is at the station you are approaching on the line.
o NuSite has to have received a current location update from the NuSite device.
o Selected NRU must be deployed and not already assigned in the NuSite database.
o Nearest receiver point is not assigned in the NuSite database.
• In order for the Auto Assign Selected option to work consistently, the accuracy of the NuSite
device GPS has to be taken into account as well as the receiver point spacing.
o Auto Assignment will only happen when the NuSite device is within ½ the distance of
the receiver spacing to the receiver point that the NRU is being Auto Assigned to.
▪ Receiver spacing is 25 meters, the NuSite device position must be within <=12.4
meters of the receiver point.
▪ If a tight receiver spacing of 5 meters is being used and the NuSite device GPS
accuracy is 1-5 meters, then Auto Assign Selected may not operate efficiently.
An accurate external GPS would need to be used in this case or only use manual
assignment.
• There are two options for AutoAssign
o Assign station within first 30 seconds after NRU is deployed
o Assign station to NRU after it has passed self-tests and started recording
• Immediate AutoAssign
1. Use the NuSite Map to navigate to the unassigned receiver station, making sure the external
GPS accuracy is good.
2. Use the MDT to create a hole for the NRU, bump the NRU, and insert into the hole.
3. NuSite should automatically assign the station to the NRU after the green LEDs have flashed
5 times on the NRU.
4. Move to the next station after confirming station assignment is correct.
• Deployed/Recording AutoAssign