NuSite USER August 2020 NuSeis System GEOPHYSICAL TECHNOLOGY INC | WWW.GEOPHYSICALTECHNOLGY.
NUSITE NUSEIS Document Identifier: NuSite This document describes the installation and use of NuSite. This manual is believed to be correct and accurate, however Geophysical Technology Inc reserves the right to make changes to products, software or specifications without notice at any time to improve performance, reliability, and functionality. Information contained in this document may not be modified or altered in any form without the expressed written consent of Geophysical Technology Inc.
NUSITE NUSEIS Contents Chapter 1 Introduction ................................................................................................................................. 4 Overview................................................................................................................................................... 5 Handling ....................................................................................................................................................
NUSITE NUSEIS Chapter 7 User – More Options ................................................................................................................. 53 More Options Overview ......................................................................................................................... 54 Appendix A – Typical Operations............................................................................................................... 55 Deploying a NRU with NuSite ............................
NUSITE NUSEIS Chapter 1 Introduction Geophysical Technology Inc NuSite Page | 4
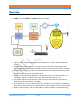
NUSITE NUSEIS Overview • NuSite is part of NuSuite, the NuSeis software package. Figure 1 • • • • • • Figure 1 above shows the NuSite software package as it is used in the overall NuSeis system. NuSite communicates wirelessly over BlueTooth with the NRU recording devices to collect information for charge percentage, voltage, memory, GPS, test results, recording status, error messages, tilt, and more. NuSite transfers this data to NuCentre over WiFi for a comprehensive QC of all deployed NRUs.
NUSITE NUSEIS Handling ❖ While the construction of the NuSeis field equipment is extremely rugged and robust, some of the equipment still contains electronic circuitry that could possibly be damaged by heavy physical shock and abuse. ❖ Handling of all NuSeis equipment should be done in accordance with precautions and instructions described in the NuSeis Manuals. ❖ NRUs should be handled with care. Avoid dropping or throwing the nodes to cause a heavy shock to be translated into the internal electronics.
NUSITE NUSEIS Chapter 2 User – Getting Started Geophysical Technology Inc NuSite Page | 7
NUSITE NUSEIS GPS • • • When using the NuSite devices for navigation and deployment, the inherent inaccuracy of the mobile device GPS must be taken into consideration. Depending on the number of satellites in clear view of the device, and other environmental considerations, the position accuracy of the device can be off 3 to 10 meters. If there is a requirement for higher accuracy from the NuSite device, i.e.
NUSITE NUSEIS o o • The first is to grant NuSite access to photos, media, and files on the device. Answer Yes. The 2nd is to grant NuSite access to the device’s location (GPS). If location access is not allowed, NuSite will not operate. Answer Yes. o The 3rd alert is to Ignore the battery optimizations. This will let NuSite stay connected when in the background. Must answer Yes.
NUSITE NUSEIS Figure 2 Figure 3 o Tapping in the IP Address field will open a NuWeb IP Address pop up window. Type in the IP address of the NuScribe computer. Then tap OK.
NUSITE NUSEIS o The display will change back to the IP Address window with the new address that was entered, followed by /NuWeb which is automatically added by the NuSite software. Click on the OK bar. Figure 5 o This will open the Synchronizing User Profiles display. A rolling orange progress circle and a percentage of complete will be displayed. Once 100% has been reached, click on the OK bar. Figure 6 • • Now the Username and Password can be entered.
NUSITE NUSEIS Figure 7 ➢ Note: Important information about the NuSite installation and the device in use, can be found by tapping ABOUT in the upper right hand of the top toolbar in the Login screen as seen in Figure 9 below. ➢ Important operational considerations for the use of NuSite. o When Bluetooth is turned on, the NuSite device will pick up scans of ALL NRUs, those deployed on line, in low power mode in pickups, and in low power mode or testing in camp.
NUSITE NUSEIS Figure 8 Figure 9 Geophysical Technology Inc NuSite Page | 13
NUSITE • NUSEIS The banner bar at the top of NuSite has status indicators and tools.
NUSITE NUSEIS Chapter 3 User – Map Geophysical Technology Inc NuSite Page | 15
NUSITE NUSEIS Map Screen Overview • Tapping on the Map Icon on the Home screen will open the Map display screen. Figure 10 • • • Tapping on the back arrow in the left of the top tool bar will return NuSite to the home page. The map display can zoom out by using the normal touch screen method of pinching in with 2 fingers. Zoom in by un-pinching 2 fingers. The bar at the bottom of the screen shows the zoom level in meters as defined by the length of the bar.
NUSITE NUSEIS o o • Red is defined as receiver points that currently do not have a NRU node designated deployed at the point within the database of the device. Blue is defined as receiver points that have had an NRU node designated as deployed at the point within the database of the device. The screen can be automatically zoomed using the 2 zoom tools.
NUSITE NUSEIS Figure 13 • Tapping on the menu callup icon will bring up the Map Options window. The options that are chosen in the Options may depend on the size of screen of the device in use. Figure 14 o Ticking and unticking the Show Legend box will toggle the legend box in the Map screen on and off.
NUSITE NUSEIS o o Ticking and unticking the Show Labels box will toggle the receiver point labels on and off on the Map screen. Below the Show Labels tick box are 4 choices for changing the position of the receiver point labels. Left, Top, Right, or Bottom. Tapping on the choice will shift a box over it, indicating which position choice is currently active. Figure 15 o The Receiver Flag Size can be picked by tapping on the S, M or L choices. A box will shift over the choice that is currently active.
NUSITE NUSEIS ▪ There will be an arrow drawn from the current position of the NuSite device, to the first receiver included in the Work Order. Figure 18 ▪ Tapping on the right arrow will advance the navigation to the next incremental receiver point in the work order.
NUSITE NUSEIS Figure 19 ▪ o Tapping on the left arrow will cause the navigation to shift to the next lower receiver point from the currently chosen point. For instance, in the above screenshot in Figure 19 navigation is pointing to receiver point 1002. Tapping on the left arrow will cause the navigation to shift to receiver point 1001. Note, the arrows are deactivated when using a manual waypoint via long tap.
NUSITE NUSEIS Map Screen Use • Current position of the device is displayed as a blue dot surrounded by white. • To navigate to a receiver point and corresponding NRU node: o Select a map zoom level that displays both the receiver point to navigate to, and the current position dot. o Make sure the centering bullseye icon is lit green. o Move towards the targeted receiver point, adjusting zoom appropriately, until the NRU node icon appears on the screen at the targeted receiver point.
NUSITE NUSEIS Chapter 4 User – NRU Units Geophysical Technology Inc NuSite Page | 23
NUSITE NUSEIS NRU Units List Page • Clicking on the NRU Units icon in the home page will open the NRU Units List Page. Figure 20 NRU Units List Page Overview • The grey bar below the top tool bar shows the number of broadcasting NRUs that NuSite is currently receiving broadcasts from. In brackets is the number of NRU that NuSite has received broadcasts from that are deployed, followed by the number broadcasting errors.
NUSITE NUSEIS NRU Serial Number Deployment Status Time of Last Scan BLE Signal Strength NRU Status Battery Percentage Figure 22 NRU Units List Page Display Settings • In the top tool bar there are 3 different menu drop down selections that control how the list page is displayed. Depending on the Android device in use, and the available screen space, these will be arranged left to right, or top to bottom. The selection on the left / top is for the Refresh Rate of the list.
NUSITE NUSEIS Figure 24 o o o o o • Hold - will cause the list display to stop refreshing after the time of the last selection has expired, i.e. if 5 seconds was the last selection, after 5 seconds the list will stop refreshing and hold the current listing. 2 Seconds – will cause the page to refresh the listing at that rate. (Recommended) 5 Seconds – will cause the page to refresh the listing at that rate. 10 Seconds – will cause the page to refresh the listing at that rate.
NUSITE NUSEIS Figure 26 o o o o o All – will display all NRU broadcast scans that were received within the last 30 minutes. Broadcasting – will display all NRUs that are currently broadcasting within range of the NuSite device. Deployed – will display all broadcasting NRUs that have a deployed status. Un-Deployed – will display all broadcasting NRUs that have an un-deployed status.
NUSITE NUSEIS NRU Unit Details Page • Tapping on any NRU in the List Page will change to the NRU Unit Details page of that NRU. Figure 28 NRU Unit Details Page Overview • • In the top tool bar, the NRU serial number will be shown as well as the Deployment status as of the last scan of status, including assigned line and station number. In the example above in figure 28, NRU #210007084 was deployed at line 2 station 2002.
NUSITE NUSEIS o Assign Deployment/Edit Deployment – if the NRU is in a deployed state and is currently within BLE range of the NuSite device this button will be visible. ▪ If the NRU is undeployed, the Assign/Edit Deployment button will not be visible. ▪ If the NRU is deployed but has not yet received a GPS position, the Assign/Edit Deployment button will be greyed out. ▪ The button will read Assign Deployment if the NuSite database does not have a valid station assignment for the NRU.
NUSITE NUSEIS Figure 30 o Overview – This section is automatically open when the Details page is first opened. ▪ Unit Status – displays current status of the NRU. It is very important to pay attention to this field to understand NRU status and state. • CPU status o When bumping an NRU that is set to Auto-Deploy, a bump cannot be done until CPU status is Inactive. When the CPU is Active a bump will not take effect.
NUSITE NUSEIS Figure 31 ▪ ▪ ▪ ▪ ▪ ▪ o Last Scan Time – time of last scan in the NuSite database. Attention should be paid to this field to see if the unit status is updating. If the Last Scan Time is not updating, then no new scans are being received by the NuSite device. Unit Type – type of NRU recording unit RSSI – signal level of BLE if the NRU is broadcasting and in range of the NuSite device. Job Identifier – job number and CRC of internal settings.
NUSITE NUSEIS Figure 32 ▪ ▪ ▪ ▪ ▪ ▪ ▪ ▪ Unit Location – shows the last GPS position of the NRU that was received by the NuSite device if it is in range of the NRU, or the last position of the NRU that is present in the NuSite database Deploy ID – an identifier key that is used to differentiate deployments of the NRU after the NuSite database has been synchronized into the NuSuite database.
NUSITE NUSEIS ▪ ▪ ▪ ▪ o not have a system time lock. The NRU must have System Time Lock to start recording. GPS Locked – will show True or False. If the NRU is currently in BLE range of the NuSite device this will show the current state of the GPS that the NRU is broadcasting. If the NRU is no longer in range of the NuSite device this will show the last status of the GPS that is present in the NuSite database. True indicates a GPS lock, false indicates the NRU does not have GPS lock.
NUSITE NUSEIS Figure 33 ▪ ▪ ▪ ▪ Self-Testing Errors – if any errors are detected during the NRU power-on testing, they will be listed here. If no errors are detected the field will show (none). If errors are detected the error will be listed and the field will turn red. The Test Results bar will turn red and indicate the number of errors present in the Test Results field.
NUSITE NUSEIS o Tapping on the Environment Bar will drop down the Environment field details. These fields will only be populated if the NRU is in a deployed state. Only Battery Voltage will be populated if the NRU is in an Un-deployed state. Figure 34 ▪ ▪ ▪ ▪ Spread Noise – the amount of average noise detected on the geophone element/string during geophone tests.
NUSITE NUSEIS NRU Management Page • In the NRU Details Page, if the NRU is in BLE range of the NuSite device, tapping on Connect will open the NRU Management page. In this page, Deployment or Un-deployment can be done. Or the unit can be put into Shutdown mode. ➢ Please note that in the current NuSite software, as reflected in the manual screenshots, Shutdown is referred to as “Shelf”. This will be changed to “Shutdown” within NuSite in future releases.
NUSITE NUSEIS Figure 36 • • Below the connection status will be either Deploy or Un-deploy depending on the current state of the connected NRU, and Shutdown NRU or Cannot Shutdown, depending on the current state of the connected NRU. Below Deploy and Shutdown is Assign Deployment or Edit Deployment depending on whether or not the NRU has an assigned deployment within the NuSite database.
NUSITE NUSEIS o General – this is the same as the Overview field in the NRU Details page. o Battery and Charger – this is an extended version of the Environment field from the NRU Details page. This page is for engineering information and will be phased out in future releases. Figure 38 ▪ ▪ ▪ ▪ ▪ ▪ ▪ ▪ ▪ ▪ ▪ Engineering -Only Field: Raw Data (20 Bytes) – currently present to be used for Engineering purposes, not useful to the user.
NUSITE NUSEIS Deploy/Un-deploy • If the NRU that is connected to the NuSite device is in an Un-Deployed state, the Deploy button will be show in the grey bar. Figure 39 o o o Tapping on Deploy will send a Deploy command to the NRU, which will flash green if successful or red if there is an issue and the NRU did not deploy properly. After tapping on Deploy, the screen will shift back to the NRU Details page and the BLE connection to the NRU will be dropped.
NUSITE NUSEIS o o If the NuSite device has been synched to the NuScribe database, and receiver information is present in the NuSite database, the Line and Station fields will automatically populate with the nearest receiver point. If there are no nearby receiver points or the wrong numbers have populated the fields, the Line and Station can be manually typed in by tapping on the Line and entering the desired number, then tapping on Station and entering the desired number.
NUSITE NUSEIS o Tapping on Un-Deploy will cause the NRU to switch to an un-deployed state. Shutdown/Cannot Shutdown • If the NRU that is connected to the NuSite device is in an Un-Deployed state, Shutdown Unit will be show in the grey bar. Figure 43 o • Tapping on Shutdown NRU will cause the NRU to shut down completely, power off. ▪ The NRU LEDs will turn on solid orange. First all 4, then 2. Once all LEDs are off the NRU is shut down.
NUSITE NUSEIS Chapter 5 User – Manage Data Geophysical Technology Inc NuSite Page | 42
NUSITE NUSEIS Manage Data Overview • Tapping on the Manage Data icon in the Home page will open the Manage Data page. Figure 44 • The Manage Data page is broken into 2 sections, Data Synchronization and Import/Export.
NUSITE NUSEIS Data Synchronization • • • Make sure that the NuSite device has its Wi-Fi turned on and is connected to the same Wi-Fi network as the NuScribe computer. To test the connection, in a web browser on the NuSite device, in the address bar, type in the IP address of the NuScribe computer followed by /NuWeb. For example, 10.0.1.4/NuWeb. A NuWeb web page should display in the browser indicating a good connection. Close the browser.
NUSITE NUSEIS o • The number of total unit logs that are present in the database and how many are not synchronized with the NuScribe database. o Number of work orders. o Number of user profiles from the last user synchronization of the device. Synchronize All will show the date and time of the last synchronization with the NuScribe database. Tapping on Synchronize All will initiate a complete synchronization.
NUSITE NUSEIS Figure 47 o Once all 4 categories show a good synchronization, tap on OK to return to the NuWeb Data Transfer page. Figure 48 • • Tapping on Advanced Settings will tick the Advanced Settings box. o This opens a open to Set Sync From Date o Tapping on that box opens a calendar view ▪ Navigate to the required data, tap on the date so it is highlighted, then tap on Ok. ▪ This will cause the database to synchronize only from that picked date up to the present.
NUSITE NUSEIS o Export Database – saves a backup copy of the NuSite database. The file is saved to the Device Storage/Thales directory. Only 1 copy of the database will be stored, subsequent export will overwrite the file. ▪ The database file can be copied off of the NuSite device.
NUSITE NUSEIS Chapter 6 User – Work Orders Geophysical Technology Inc NuSite Page | 48
NUSITE NUSEIS Summary • • • • • Work Orders are created on NuScribe in the Work Orders view. See the NuScribe manual Appendix A for instructions for setting up Work Orders. Work Orders are synchronized to the NuSite devices via NuWeb. See the Data Synchronization section for more information on synchronization. It is not necessary to have a Work Order to carry out NuSite operations, but if the navigation feature of NuSite is required, then the Work Order feature needs to be used.
NUSITE NUSEIS Figure 50 • • • • • • In the example screenshot in Figure 51 above, there are 2 Work Orders listed that were synchronized to the device. In the grey bar at the top of the work orders, is listed the total number of Work Orders, and in brackets the total number for the NuSite user. In this case the user logged in as user1. Each Work Order is highlighted with a different color to differentiate them.
NUSITE NUSEIS Work Order Control Figure 51 • Start Work – tapping on the Start Work button will start the Work Order and the Started At date and time will change from to a date and time.
NUSITE • • NUSEIS Complete Work – tapping on Complete Work will cause the Work Order to stop and a date and time will be recorded in the Completed At field. This will also stop the navigation feature in the Map screen. Edit Comments – used to add user comments to the Work Order, which will be uploaded to NuScribe the next time the NuSite device is synchronized. Figure 53 • • Tapping on the left arrow in the blue menu bar will take the user back to the Work Order list.
NUSITE NUSEIS Chapter 7 User – More Options Geophysical Technology Inc NuSite Page | 53
NUSITE NUSEIS More Options Overview • In the top banner bar of all the NuSite application screens, on the right side is an icon of 3 vertical dots. This is the More Options menu call up icon. Tapping on the icon will bring up a list of menu selections. More Options Figure 54 Figure 55 • Some of the options in the More Options menu will change depending on which NuSite screen the user is in when tapping in the More Options icon.
NUSITE NUSEIS Appendix A – Typical Operations Geophysical Technology Inc NuSite Page | 55
NUSITE NUSEIS Deploying a NRU with NuSite 1. The NuSite device database should have been synchronized with the NuScribe database prior to starting operations in the morning. See the section on Data Synchronization. 2. Log into NuSite using the proper username and password that were assigned to the user at the beginning of the project. 3. If Work Orders are in use, open the Work Order page and tap on the Work Order for that day’s work. 4.
NUSITE NUSEIS 15. At the end of day if Work Orders are in use, and a Work Order was started for the day, go to the Work Orders page, tap on the work order being used and then tap on Stop. 16. At the end of the workday, the NuSite device database must be synchronized to the NuScribe database. 17.
NUSITE NUSEIS Appendix B – External GPS Startup Guide Geophysical Technology Inc NuSite Page | 58
NUSITE NUSEIS Juniper Geode Downloading Geode App For NuSite to function properly with external Geode GPS on an Android device you will first need to download the Geode Connect App from Google Play Store. This will allow you to initially set up your connection to the Geode device. Click the install button to start the procedure.
NUSITE NUSEIS Setting up Mock Location After installing the Geode Connect app, open the Android Settings and scroll to the bottom of the setting menu. • • • • If the Developers options is not visible, it will need to be enabled. Tap on About tablet. In the right hand window the Build Number should be visible. Tap on the Build Number 7 times. During tapping, you should see a message giving a tap countdown to enabling Developer options.
NUSITE NUSEIS First Time Connection to the Geode • • • • • • Turn on the Geode by pressing the power button. Open the Android Settings Connection Bluetooth window. The Geode will show up in the available devices list as GEODE xxxxx (xxxxx = Geode Serial Number) Tap on that device and the Android device will pair to the Geode. The Geode should now be listed in the list of Paired Devices. If not paired, Geode Connect will give an error when trying to connect to the Geode.
NUSITE • NUSEIS In this case the device, 189898, would be the first choice in the menu. Select this button and the app should begin connecting to your geode.
NUSITE NUSEIS • After connecting to your device, you will need to press the three bars in the upper left corner of the screen, or the 3 dots in the upper right, depending on the version of Geode Connect or Android. • This will bring up a drop-down menu where you can access device preferences and setting. On this screen you will need to select preferences. • This will take you to the screen where you can select Enable Mock Location Provider.
NUSITE • NUSEIS If the Geode Connect program has been installed for the first time, the Enable Mock Location Provider may show as ticked for enabled but is not actually enabled yet. o Changing the Position Format setting from it’s current setting to either of the other settings will not affect the coordinates passed through to NuSite, but will activate the Save icon. These formats only affect the position as displayed on the Geode Connect application.
NUSITE NUSEIS preferences, this forces the Enable Mock Location provider to actually set as enabled.
NUSITE Geophysical Technology Inc NUSEIS NuSite Page | 66
NUSITE NUSEIS Operation – At Each Line / Station When starting normal operations with the NuSite tablet, follow these steps. 1. Power on the tablet, if any apps were left open when it was powered off, close all the apps especially the GPS app and NuSite. 2. Power on the GPS and let it acquire satellites, as indicated by the LED. 3.
NUSITE NUSEIS Figure 56 Example of Capturing External Bluetooth GPS Location If no mock location is available, then no capture is performed when line and station are entered into NuSite. See Figure 2.
NUSITE NUSEIS Figure 57 Example of not Capturing External Bluetooth GPS Location Troubleshooting If you have followed all the steps accurately and are still having trouble with NuSite finding the mock location return to Settings/Developer Options/Mock Location app.
NUSITE NUSEIS apps. Go back to the same settings and select Geode Connect again you should see a pop-up that indicates “Location Services Enabled”. Sometimes the android system becomes stale and needs this manual refresh. If you were using the 3rd party app “Bluetooth GPS”, this will now be obsolete for use with NuSite and a Geode GPS. You can uninstall this app under settings/apps. If you have other GPS apps on your device, going through this process will disable those apps.
NUSITE NUSEIS Trimble PG200 Downloading Trimble App For NuSite to function properly with external Trimble GPS on an android device you will first need to download the Trimble GNSS Status App from Google Play Store. This will allow you to initially set up your connection to the Trimble device. Click the install button to start the procedure.
NUSITE NUSEIS On the back of your Trimble there will be a serial number. The last 5 digits are used when identifying the device within the GNSS Status software. In this case 50403. Setting Mock Location Provider After installing the GNSS Status app, open the Android Settings and scroll to the bottom of the setting menu. • • • • If Developers options is not visible, it will need to be enabled. Tap on About tablet. In the right hand window the Build Number should be visible.
NUSITE NUSEIS As seen here no Mock Location app has been set. You will need to set this to GNSS Status. Click on Mock Location App and tap on the GNSS Status choice, this will allow you to use the Mock Location function, and you will see an improvement in GPS performance though NuSite. First Time Connection to the Trimble The Bluetooth pairing needs to be made to the Trimble with the Android NuSite device. Prior to starting the GNSS Status app.
NUSITE • NUSEIS Tap on the yellow bar and it will open the Source page. Alternatively tap on the menu icon in the upper left corner of the home page, then tap on Source. o In the Source Page will be a Position Source drop down box. Tap on that box and a dropdown selection will show. o o Tap on the Bluetooth selection. The Available Devices selection bo0x will open. Tap on the GNSS:xxxxx device. So that it is highlighted, then tap on the blue Select bar at the bottom of the page.
NUSITE NUSEIS o • The screen will return to the Home page and the name of the Trimble device should show in the Yellow bar at the bottom of the page The Home screen will show the number of satellites, an estimated position accuracy, and the status of the position correction.
NUSITE • NUSEIS In order to turn on SBAS corrections, tap on the Menu icon in the upper left hand corner of the Home screen. In the menu tap on Corrections o Tap on the Primary dropdown menu and tap on SBAS o Return to the Home menu and wait for SBAS to show below the estimated accuracy. This many take a few seconds or longer when the Trimble has just been powered on.
NUSITE • NUSEIS Next tap on the Menu icon and in the menu tap on the NMEA selection o By default when the Trimble device has first been paired with the NuSite device, all of the NMEA outputs will be off. o In the NMEA page all of the NMEA words will be listed on the left in the Available list. o Move them over to the right, into the Selected list by tapping on each word required.
NUSITE • NUSEIS The app can now be minimized. The app should be left operating in the back ground while using the Trimble with NuSite for external GPS. Operation – At Each Line / Station • • This procedure is the same no matter what external GPS has been connected to the NuSite device. See the Operation – At Each Line / Station section in the previous chapter for instructions.
NUSITE NUSEIS Troubleshooting • • • • If there are problems with the external GPS positions showing in NuSite, power off both the Trimble and the NuSite device. Power the devices back up and reconnect as described previously. Check that the external positions are showing in NuSite and not turning off and on. Make sure no other GPS apps are turned on, if necessary, do a Force Stop of the non-GNSS Status app in Settings or uninstall the app.
NUSITE NUSEIS Appendix C – Auto Assign Geophysical Technology Inc NuSite Page | 80
NUSITE NUSEIS Using Auto Assign Selected Figure 58 • • • • • There are certain requirements that need to be fulfilled before the Auto Assign Selected can be utilized properly. o Tick the Auto Assign Selected box on. o Select the NRU from the list, that is at the station you are approaching on the line. o NuSite has to have received a current location update from the NuSite device. o Selected NRU must be deployed and not already assigned in the NuSite database.
NUSITE NUSEIS 1. Use the NuSite Map page to navigate to the first unassigned receiver point. The NRU that is to be assigned to that receiver point should be visible on the Map screen. 2. Tap on that NRU. 3. The screen will switch to the NRU Details page. 4. If the NuSite device GPS is less than ½ the receiver spacing from the unassigned receiver point, you will see the Deploy button change to Edit Deployment and display the assigned line and station number. 5.
NUSITE NUSEIS Customer Support: Email – customersupport@geophysicaltechnology.