
Users Manual


FIELD EQUIPMENT
NUSEIS
Geophysical Technology Inc Field Equipment Page | 37
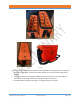
• The ports should be checked for a buildup of dirt and debris in the bottom of the cups. Too
much dirt or debris may keep the NRU from turning on or communicating properly due to the
debris obstructing proper seating.
o Remove power from the panel
o Use a vacuum, or compressed air, preferably with a line dryer, to blow out the cups.
o A dry soft brush can be used to loosen debris in the cup prior to blowing it out with
compressed air.
o No CRC or other aerosol cleaning sprays should be used to clean the cups.
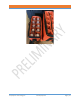
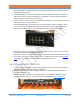
• The NRUs can be inserted individually. The nodes do not need to oriented as the connections
are 360°.
• Insert the NRUs as straight as possible. A straight up and down insertion of the NRUs will avoid
damage to the connector cups.
Figure 25
• When initiating an upload or commissioning sequence, if an NRU fails the Connect step with a
“Failed to receive NRU status” error, the NRU may not be contacting the springs of the cup.
o When Charge On is applied to a cup, it will act as a charge panel cup. The NRU will blink
a white LED at first, then start blinking a yellow LED indicating charging.
o The NRU must detect a charge voltage during uploading or commissioning.
o Moving the NRU slightly may help the NRU contact the springs.
• If the NRU is detected and a serial number is displayed, but keeps failing during further
sequence steps intermittently, there may be an issue with TransferJet alignment.
o Slightly rotate the NRU either clockwise or counterclockwise, then restart the sequence.
o Repeat if necessary.
• If an NRU shows a continuous flashing purple LED when in the cup connector, it has lost
TransferJet communications during a sequence step.
o Rotate the NRU slightly in the cup connector and restart the sequence.
o If you are never able to reestablish communications with the NRU after rotating several
times and it has never stopped blinking purple, then -
▪ Execute a Charge Off command on that cup connector in the Rack view by right
clicking on the NRU and clicking on Charge Off in the popup menu.
▪ Execute a Data Off command on that cup connector in the Rack view by right
clicking on the NRU and clicking on Data Off in the popup menu.
▪ Remove the NRU from the cup connector.
▪ Using a NuSite device, connect to the NRU and Shutdown the NRU.
▪ Reinsert the NRU in the cup connector and start the sequence over.
• Once upload or commissioning has finished, the NRUs can be removed from the panel.