
User's Manual
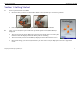
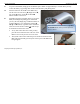
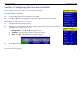

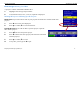
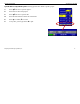
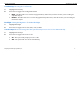
Table Of Contents
- Limited Warranty, Limitations Of Liability And Restrictions
- System Menu Option
- Date/Time: Configuring Date and Time
- Configuration: Configuring Orientation, Language, Units, Laser, and Sound
- Calibration: Auto Calibrations for Surface and Brightness
- Clear Storage: Deleting Saved Data
- Deleting All Projects or Deleting Specific Projects
- Scan Density: Selecting the Scan Density
- Backlight: Setting the Brightness of the Mini Backlight
- Save Prompt: Whenever Saving, Have the System Prompt You to Save or Save Automatically
- Collect Menu Option
- Project: Saving Files to a Specific Project
- Depth: Selecting the Depth Where You are Scanning
- Dielectric: Selecting the Approximate Dielectric of the Area You are Scanning
- Autotarget: Allowing the Mini to Automatically Pick Your Targets
- Display: While Collecting Data, Display Data Only or Data + O-Scope
- Color: Choosing the Colors You Want Displayed During Data Collection
- Collecting Data and Marking Your Targets
- Playback Menu Option
- Project: Selecting a Specific Project to Select a Specific File to Playback
- AutoDepth: Automatically Adjusting Depth Scale
- Autotarget: Allowing the Mini to Automatically Pick Your Targets
- Display: While Viewing Data, Display Data Only or Data + O-Scope
- Color: Choosing the Colors to Display During Data Collection
- Playing Back the Selected File

Quick Start Guide StructureScan Mini
Geophysical Survey Systems, Inc.
2
3 To power off the Mini, simply press and hold the power button for approximately 2 seconds. Then you may
remove the battery by pressing down on the tab of the battery and pulling down.
4 Note the buttons on the handle of the Mini. They
will be referred as Left Arrow Í, Right Arrow Î,
Up Arrow Ï, Down Arrow Ð, and Enter
buttons relative to the screen.
Unless otherwise noted, this button, regardless
of orientation, will return you to the previous
screen or menu.
5 Depending upon the orientation of the screen on the
Mini (Left or Right depending upon which hand
you use), the Left, Right, Up, and Down buttons are
switched. However, you will still be pressing Í,
Î, Ï, and Ð buttons, regardless of the orientation
of the screen. The “Enter” button (
) will always
be the button located in the center.
• At any time unless otherwise noted, you may
press the Arrow button closest to the rear of the
Mini to return to the previous screen or menu.
• The system comes with a GSSI strap to be attached to the back of the
Mini. This strap should go around your wrist to prevent the Mini from
being dropped.