
User's Manual
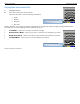
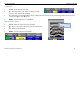
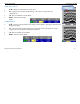
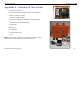
Table Of Contents
- Limited Warranty, Limitations Of Liability And Restrictions
- System Menu Option
- Date/Time: Configuring Date and Time
- Configuration: Configuring Orientation, Language, Units, Laser, and Sound
- Calibration: Auto Calibrations for Surface and Brightness
- Clear Storage: Deleting Saved Data
- Deleting All Projects or Deleting Specific Projects
- Scan Density: Selecting the Scan Density
- Backlight: Setting the Brightness of the Mini Backlight
- Save Prompt: Whenever Saving, Have the System Prompt You to Save or Save Automatically
- Collect Menu Option
- Project: Saving Files to a Specific Project
- Depth: Selecting the Depth Where You are Scanning
- Dielectric: Selecting the Approximate Dielectric of the Area You are Scanning
- Autotarget: Allowing the Mini to Automatically Pick Your Targets
- Display: While Collecting Data, Display Data Only or Data + O-Scope
- Color: Choosing the Colors You Want Displayed During Data Collection
- Collecting Data and Marking Your Targets
- Playback Menu Option
- Project: Selecting a Specific Project to Select a Specific File to Playback
- AutoDepth: Automatically Adjusting Depth Scale
- Autotarget: Allowing the Mini to Automatically Pick Your Targets
- Display: While Viewing Data, Display Data Only or Data + O-Scope
- Color: Choosing the Colors to Display During Data Collection
- Playing Back the Selected File

Quick Start Guide StructureScan Mini
Geophysical Survey Systems, Inc.
22
Appendix B – Battery/Charger Information
Your system comes with a two-slotted battery charger and adapter. It also comes with three international interchangeable
plugs.
• To charge your batteries, simply attach the adapter to the charger and plug in the
adapter. Insert one or both batteries. The batteries will charge one at a time. The bars
located at the top of the batteries will indicate how much charge is left in the battery.
• At times, you may wish to re-calibrate a battery. Simply insert a battery into the slot
on the left and press the RECAL button
•
LED Lights
– As the batteries are charging, the LED lights for each slot will do
different things.
• No Lights – No Batteries
• Green Flash – Fast Charging
• Green Solid – Fully Charged
• Yellow Flash – Recalibrating
• Yellow/Green – Recalibrated
• Yellow Solid – Standby
• Red Flash – Error
• If the charger remains plugged in and there are NO batteries in the charger, the charger will eventually begin to
“beep.” Since this can be annoying, it is recommend that you unplug the charger when not in use.