
User's Manual

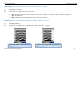
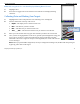
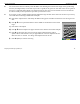


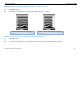
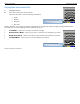
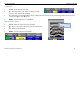
Table Of Contents
- Limited Warranty, Limitations Of Liability And Restrictions
- System Menu Option
- Date/Time: Configuring Date and Time
- Configuration: Configuring Orientation, Language, Units, Laser, and Sound
- Calibration: Auto Calibrations for Surface and Brightness
- Clear Storage: Deleting Saved Data
- Deleting All Projects or Deleting Specific Projects
- Scan Density: Selecting the Scan Density
- Backlight: Setting the Brightness of the Mini Backlight
- Save Prompt: Whenever Saving, Have the System Prompt You to Save or Save Automatically
- Collect Menu Option
- Project: Saving Files to a Specific Project
- Depth: Selecting the Depth Where You are Scanning
- Dielectric: Selecting the Approximate Dielectric of the Area You are Scanning
- Autotarget: Allowing the Mini to Automatically Pick Your Targets
- Display: While Collecting Data, Display Data Only or Data + O-Scope
- Color: Choosing the Colors You Want Displayed During Data Collection
- Collecting Data and Marking Your Targets
- Playback Menu Option
- Project: Selecting a Specific Project to Select a Specific File to Playback
- AutoDepth: Automatically Adjusting Depth Scale
- Autotarget: Allowing the Mini to Automatically Pick Your Targets
- Display: While Viewing Data, Display Data Only or Data + O-Scope
- Color: Choosing the Colors to Display During Data Collection
- Playing Back the Selected File

Quick Start Guide StructureScan Mini
Geophysical Survey Systems, Inc.
13
7 Other Options
• Press and HOLD Ï (New File) to save your current scan. If you have configured Save Prompt On, you will
be prompted to confirm the save. Press Ï to Save, Ð to not save the data. If you have configured Save
Prompt Off, it will save automatically.
• Press Í to place a user mark in your data.
• Press Î to exit. If you have configured Save Prompt On, you will be prompted to confirm the save. Press Ï
to save, Ð to not save the data. If you have configured Save Prompt Off, it will save automatically.
Helpful Hint: Make a sketch map of your survey area with immovable objects as reference points. Sketch in your survey
files, note the start and stop points, direction of travel, and file name on the map. This will make it much easier to relocate
your targets after the survey.
Helpful Hint: The top of a target is generally the middle of the first positive peak for metal targets (rebar, tensioned
cable, wires in PVC, conduit). If you are working in a grayscale color table, the positives are white. If the utility is air or
gas filled (empty PVC, voids) the top of the target is the middle of the first negative peak (black).
Please refer to Appendix C for examples of the different types of data.