
User's Manual

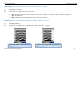
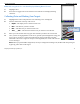
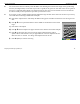


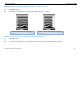
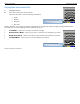
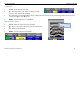
Table Of Contents
- Limited Warranty, Limitations Of Liability And Restrictions
- System Menu Option
- Date/Time: Configuring Date and Time
- Configuration: Configuring Orientation, Language, Units, Laser, and Sound
- Calibration: Auto Calibrations for Surface and Brightness
- Clear Storage: Deleting Saved Data
- Deleting All Projects or Deleting Specific Projects
- Scan Density: Selecting the Scan Density
- Backlight: Setting the Brightness of the Mini Backlight
- Save Prompt: Whenever Saving, Have the System Prompt You to Save or Save Automatically
- Collect Menu Option
- Project: Saving Files to a Specific Project
- Depth: Selecting the Depth Where You are Scanning
- Dielectric: Selecting the Approximate Dielectric of the Area You are Scanning
- Autotarget: Allowing the Mini to Automatically Pick Your Targets
- Display: While Collecting Data, Display Data Only or Data + O-Scope
- Color: Choosing the Colors You Want Displayed During Data Collection
- Collecting Data and Marking Your Targets
- Playback Menu Option
- Project: Selecting a Specific Project to Select a Specific File to Playback
- AutoDepth: Automatically Adjusting Depth Scale
- Autotarget: Allowing the Mini to Automatically Pick Your Targets
- Display: While Viewing Data, Display Data Only or Data + O-Scope
- Color: Choosing the Colors to Display During Data Collection
- Playing Back the Selected File

Quick Start Guide StructureScan Mini
Geophysical Survey Systems, Inc.
12
epth.
to Set Depth. The vertical scale will adjust and the dielectric will be
se the
5
The center of the antenna is directly under the Mini. After marking the location of the target on the ground using
the laser (if configured On) at each side of your cart as a guide (or the groove on each side of the cart as a guide if
the laser is configured Off). Push the cart straight forward or move the cart to do another line scan. No data will
be collected until you have passed the spot where you started to reverse.
6
If you wish, you may calibrate depth (optional). Match the target location in the data to its location in your survey
area. Drill down to that target and measure the depth.
a)
Press Enter “Depth Cursor” and backup the Mini to bring up the crosshairs and set them over the target in the
data.
b)
Press Ï Ð to line up the horizontal line in the middle of first dominant color of that
target.
c)
Press Enter to Set Depth.
d)
Press Ï Ð until the Depth in the upper left hand corner matches the measured d
e)
Press Í
updated. Please note that this is only an approximation of the true depth becau
dielectric value or constant can change with depth and across the site.
f)
Press Î (Back) to continue scanning.