
User's Manual
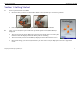
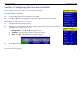

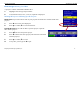
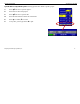
Table Of Contents
- Limited Warranty, Limitations Of Liability And Restrictions
- System Menu Option
- Date/Time: Configuring Date and Time
- Configuration: Configuring Orientation, Language, Units, Laser, and Sound
- Calibration: Auto Calibrations for Surface and Brightness
- Clear Storage: Deleting Saved Data
- Deleting All Projects or Deleting Specific Projects
- Scan Density: Selecting the Scan Density
- Backlight: Setting the Brightness of the Mini Backlight
- Save Prompt: Whenever Saving, Have the System Prompt You to Save or Save Automatically
- Collect Menu Option
- Project: Saving Files to a Specific Project
- Depth: Selecting the Depth Where You are Scanning
- Dielectric: Selecting the Approximate Dielectric of the Area You are Scanning
- Autotarget: Allowing the Mini to Automatically Pick Your Targets
- Display: While Collecting Data, Display Data Only or Data + O-Scope
- Color: Choosing the Colors You Want Displayed During Data Collection
- Collecting Data and Marking Your Targets
- Playback Menu Option
- Project: Selecting a Specific Project to Select a Specific File to Playback
- AutoDepth: Automatically Adjusting Depth Scale
- Autotarget: Allowing the Mini to Automatically Pick Your Targets
- Display: While Viewing Data, Display Data Only or Data + O-Scope
- Color: Choosing the Colors to Display During Data Collection
- Playing Back the Selected File

Quick Start Guide StructureScan Mini
Geophysical Survey Systems, Inc.
8
Section 3: Collecting Data
After your configuration is complete, you are now ready to collect data.
Collect Menu Option
1
From the Main Menu, select Collect by pressing Í.
2
Use Ï Ð buttons to highlight the appropriate options under the Collect Menu.
Before you begin to collect data (Start Collect), you may want to configure the Mini for a
particular scan/project.
Project: Saving Files to a Specific Project
1
Highlight Project and press Enter.
2
Highlight a Project number and press Enter. All files that you save during collection will be saved under this
project. (Note: you may want to take field notes to document what files went under which project).
Depth: Selecting the Depth Where You are Scanning
1
Highlight Depth.
2
Press Enter to toggle between 8, 12, and 16 inches (20, 30, and 40 cm).