
Installation Guide

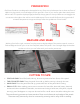


For exterior projects, start with an “S” pattern of construction adhesive on the back of each Product.
Adhesive is not recommended for interior projects with a drywall substrate. Ensure the Product
is level before fastening the Products with screws along the positive shiplap edge as outlined by
Product below. Next, feel throughout the face of the panel for any ex, if you notice any ex between
the panel and the substrate, eliminate the ex with a screw in the face of the Product. This fastener
can be hidden under a stone and concealed later with color match caulking and paint. The last step
before repeating the process with the next Product is to run a bead of Big Stretch caulk along the
positive shiplap edge. The caulking creates a water tight connection and helps prevent movement.
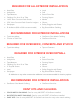
ATTACHING PANELS, CORNERS AND FINISHED EDGES
• PANEL: Every 8 inches along the top positive shiplap and 3 fasteners evenly spaced along the
right positive shiplap. Face screws are recommended, especially if any ex is detected.
• CORNERS: 2 evenly spaced fasteners in the top horizontal 12 inch positive shiplap and 3 evenly
spaced fasteners in the two vertical 12 inch positive shiplap edges. 2 evenly spaced fasteners in
both horizontal 6 inch positive shiplap edges. Face screws are recommended.
• FINISHED EDGES: 3 evenly spaced fasteners along the positive shiplap edges. Face screws are
required in the face of the Product as well as one fastener in the nished edge.
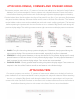
For exterior projects, start with an “S” pattern of construction adhesive on the back of each trim
piece. Adhesive is not recommended for interior projects with a drywall substrate. Before attaching
the trim, run a bead of Big Stretch caulk along the side of the trim piece where it will come into
contact with other GenStone Products or obtrusions such as electrical boxes. Ensure the Product is
level before fastening the trim with screws in the face of the trim as outlined below.
ATTACHING TRIM