
- GENICOM LLC User Guide printer LN45, mL450
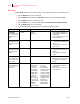
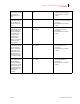
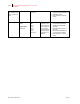
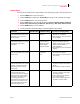
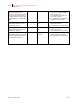
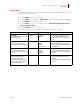
Table Of Contents
- How This Manual is Organized
- Preface
- Unpacking and Installing Your Printer
- About this Chapter
- Installation Precautions
- Unpacking the Printer
- Installing the EP Cartridge
- Adding paper to the 500-sheet universal paper cassette
- Connecting the Parallel Cable
- Connecting the Ethernet Cable
- Connecting the Power Cord
- Turning the Printer On
- Selecting a Display Language
- Installing Printer Drivers
- Printing a Configuration Summary
- Printing a Test Page
- Printing PCL and PostScript Font Lists
- Turning the Printer Off
- Printer and Options Parts and Functions
- Understanding Paper, Paper Paths, Paper Delivery and Paper Loading
- About this Chapter
- Paper
- Paper Size Requirements
- Media Sizes Supported
- Media Types supported
- Paper Orientation
- Long and Short Edge Duplex Binding in Portrait and Landscape Orientations
- Paper Paths
- Paper Delivery
- Adding paper to the 500-sheet paper cassette, Tray 1 or Tray 2
- Adding paper to the multi bypass feeder
- Adding paper to the HCF unit (2500-sheet)
- Loading envelopes into the envelope feeder
- Understanding and Navigating the Control Panel Menus
- Printer Consumables, Cleaning and Maintenance
- Troubleshooting
- About this Chapter
- Solving Printer Power-on Problems
- Solving Print Quality Problems
- Clearing Paper Jams
- Clearing Paper Jams from Area A
- Clearing Paper Jams from Area B
- Clearing Paper Jams from Area C
- Clearing Paper Jams from Area E
- Clearing Paper Jams from Area F
- Clearing Paper Jams from Area H
- Clearing Paper Jams from Tray 1
- Clearing Paper Jams from Tray 2
- Clearing Paper Jams from Trays 3, 4 and 5 in the HCF unit
- Clearing Paper Jams from the Multi-Bypass Feeder (MBF)
- Clearing Paper Jams from the Envelope Feeder
- Control Panel LCD Messages
- Ethernet Network Interface Troubleshooting
- Using DRAM DIMMs, FLASH DIMMs and Power-on Files
- General Information
- Safety Notes and Regulatory Compliances
- Printing Font Summaries
- Frequently Used Ethernet Commands
- GENICOM Customer Support and Part Numbers

Aug 01 Publication No. GEG-99126
GENICOM LN45 and Intelliprint mL450 User Guide 4-19
Pushbuttons
Quality Menu
The Quality Menu provides access to the printer settings that are related to print quality. Use the follow ing
procedure to enter the Quality Menu
1. r ess the MENU ut ton on the control panel.
2. r ess the NEXT ut ton until the tet Quality Menu is sho w n on the second line of the disp lay.
3. r ess the SELECT ut ton to enter the syste enu.
4. r ess the NEXT ut ton to ove through the su en us Resolution, Enhancement, Toner
Saver, and Print Density.
5. r ess the SELECT ut ton to enter a su en u .
6. Use the procedures in the follow ing tal e to access and change the syste settings
Submenus Default Setting Available Settings Procedure for Changing Setting
Resolution
This submenu allows you to set
the resolution (dpi).
600 dpi 300 dpi
600 dpi
1. Press NEXT or PREVIOUS to scroll
through the available resolutions.
2. Press SELECT to choose and set the
dpi.
Enhancement
This submenu allows you to
choose an enhancement method.
None None
Edge
Photo
Edge & Photo
1. Press NEXT or PREVIOUS to scroll
through the available enhancements.
2. Press SELECT to choose and set the
enhancement.
Toner Saver
This submenu allows you to
choose from several toner-saving
settings.
Off Off
Light
Lighter
Lightest
1. Press NEXT or PREVIOUS to scroll
through the available toner settings.
2. Press SELECT to choose and save this
setting.
Print Density
This submenu allows you to
specify the print density.
1 represents the lightest print
density, while 7 represents the
darkest print density.
5 Numbers 1-7 1. Press NEXT or PREVIOUS to scroll
through the available print density
settings.
2. Press SELECT to choose and save this
setting.