
- GENICOM LLC User Guide printer LN45, mL450
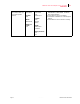
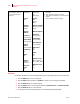
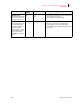
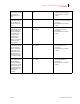
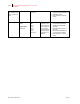
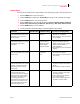
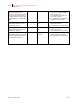
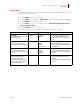
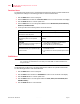
Table Of Contents
- How This Manual is Organized
- Preface
- Unpacking and Installing Your Printer
- About this Chapter
- Installation Precautions
- Unpacking the Printer
- Installing the EP Cartridge
- Adding paper to the 500-sheet universal paper cassette
- Connecting the Parallel Cable
- Connecting the Ethernet Cable
- Connecting the Power Cord
- Turning the Printer On
- Selecting a Display Language
- Installing Printer Drivers
- Printing a Configuration Summary
- Printing a Test Page
- Printing PCL and PostScript Font Lists
- Turning the Printer Off
- Printer and Options Parts and Functions
- Understanding Paper, Paper Paths, Paper Delivery and Paper Loading
- About this Chapter
- Paper
- Paper Size Requirements
- Media Sizes Supported
- Media Types supported
- Paper Orientation
- Long and Short Edge Duplex Binding in Portrait and Landscape Orientations
- Paper Paths
- Paper Delivery
- Adding paper to the 500-sheet paper cassette, Tray 1 or Tray 2
- Adding paper to the multi bypass feeder
- Adding paper to the HCF unit (2500-sheet)
- Loading envelopes into the envelope feeder
- Understanding and Navigating the Control Panel Menus
- Printer Consumables, Cleaning and Maintenance
- Troubleshooting
- About this Chapter
- Solving Printer Power-on Problems
- Solving Print Quality Problems
- Clearing Paper Jams
- Clearing Paper Jams from Area A
- Clearing Paper Jams from Area B
- Clearing Paper Jams from Area C
- Clearing Paper Jams from Area E
- Clearing Paper Jams from Area F
- Clearing Paper Jams from Area H
- Clearing Paper Jams from Tray 1
- Clearing Paper Jams from Tray 2
- Clearing Paper Jams from Trays 3, 4 and 5 in the HCF unit
- Clearing Paper Jams from the Multi-Bypass Feeder (MBF)
- Clearing Paper Jams from the Envelope Feeder
- Control Panel LCD Messages
- Ethernet Network Interface Troubleshooting
- Using DRAM DIMMs, FLASH DIMMs and Power-on Files
- General Information
- Safety Notes and Regulatory Compliances
- Printing Font Summaries
- Frequently Used Ethernet Commands
- GENICOM Customer Support and Part Numbers

Publication No. GEG-99126 Genicom Aug 01
4-14 GENICOM LN45 and Intelliprint mL450 User Guide
PCL Menu
PCL Menu
The PCL Menu provides access to the PCL settings. Use the following procedure to enter the PCL menu:
1. Press the MENU button on the control panel.
2. Press the NEXT button until the text “PCL Menu” is shown on the second line of the display.
3. Press the SELECT button to enter the PCL menu.
4. Press the NEXT button to move through the submenus: Print PS Errors, Manual Feed TO.
5.
Press the SELECT button to enter a submenu.
6. Use the procedures in the following table to access and change the PCL settings:
Submenus Default Setting Available Settings Procedure for Changing Setting
Orientation
This submenu allows
you to choose the
orientation of the
page.
Portrait Portrait
Landscape
1. Press NEXT or PREVIOUS to
toggle between PORTRAIT and
LANDSCAPE.
2. Press SELECT to choose and
save an orientation.
Font Source
This submenu allows
you to choose a font
source.
Internal Internal 1. Press NEXT or PREVIOUS to
scroll through the available font
sources.
2. Press SELECT to choose and
set a source.
Font Number
This submenu allows
you to set the font
number.
0 Numbers 0-? 1. Press NEXT or PREVIOUS to
increase or decrease the font
number.
2. Press SELECT to save this
setting.
Pitch
This submenu allows
you to change the
pitch of text.
10.00 0.08 - 100.00 1. Press NEXT or PREVIOUS to
increase or decrease the pitch.
2. Press SELECT to save this
setting.
Symbol Set
This submenu allows
you to choose a
symbol set.
10U:PC-8 CP437 10U:PC-8 CP437
11U:PC-8 D/N
12U:PC-850
17U:PC-852
9T:PC-Turkish
19U:WIN Latin1
9E:WIN Latin2
5T:WIN Latin5
7J:Desk Top
10J:PS Text
13J:Ventura Intl
14J:Ventura US
6J:Microsoft Pub
8M:Math-8
PS:Math
6M:Ventura Math
15U:Pi Font
1U: Legal
1E: ISO4 UK
0U:ISO6 ASCII
0S:ISO11 Swedish
0I:ISO15 Italian
2S:ISO17 Spanish
1G:ISO21 German
0D:ISO60 Norweg.
1F:ISO69 French
9U:WIN3.0 Latin1
8U:Roman 8
0N:ISO 8859-1
2N:ISO 8859-2
5N:ISO 8859-5
1. Press NEXT or PREVIOUS to
scroll through the available
symbol sets.
2. Press SELECT to choose and
set a symbol set.