
- GENICOM LLC User Guide printer LN45, mL450

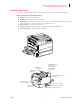
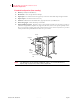

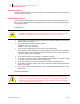
Table Of Contents
- How This Manual is Organized
- Preface
- Unpacking and Installing Your Printer
- About this Chapter
- Installation Precautions
- Unpacking the Printer
- Installing the EP Cartridge
- Adding paper to the 500-sheet universal paper cassette
- Connecting the Parallel Cable
- Connecting the Ethernet Cable
- Connecting the Power Cord
- Turning the Printer On
- Selecting a Display Language
- Installing Printer Drivers
- Printing a Configuration Summary
- Printing a Test Page
- Printing PCL and PostScript Font Lists
- Turning the Printer Off
- Printer and Options Parts and Functions
- Understanding Paper, Paper Paths, Paper Delivery and Paper Loading
- About this Chapter
- Paper
- Paper Size Requirements
- Media Sizes Supported
- Media Types supported
- Paper Orientation
- Long and Short Edge Duplex Binding in Portrait and Landscape Orientations
- Paper Paths
- Paper Delivery
- Adding paper to the 500-sheet paper cassette, Tray 1 or Tray 2
- Adding paper to the multi bypass feeder
- Adding paper to the HCF unit (2500-sheet)
- Loading envelopes into the envelope feeder
- Understanding and Navigating the Control Panel Menus
- Printer Consumables, Cleaning and Maintenance
- Troubleshooting
- About this Chapter
- Solving Printer Power-on Problems
- Solving Print Quality Problems
- Clearing Paper Jams
- Clearing Paper Jams from Area A
- Clearing Paper Jams from Area B
- Clearing Paper Jams from Area C
- Clearing Paper Jams from Area E
- Clearing Paper Jams from Area F
- Clearing Paper Jams from Area H
- Clearing Paper Jams from Tray 1
- Clearing Paper Jams from Tray 2
- Clearing Paper Jams from Trays 3, 4 and 5 in the HCF unit
- Clearing Paper Jams from the Multi-Bypass Feeder (MBF)
- Clearing Paper Jams from the Envelope Feeder
- Control Panel LCD Messages
- Ethernet Network Interface Troubleshooting
- Using DRAM DIMMs, FLASH DIMMs and Power-on Files
- General Information
- Safety Notes and Regulatory Compliances
- Printing Font Summaries
- Frequently Used Ethernet Commands
- GENICOM Customer Support and Part Numbers
Publication No. GEG-99126 Genicom Aug 01
1-2 GENICOM LN45 and Intelliprint mL450 User Guide
Installation Precautions
About this Chapter
Describes a suitable location for your laser printer and how to unpack and install it. Be sure to read this chap-
ter before setting up the printer.
Installation Precautions
Before unpacking your laser printer, it is recommended that you read the following to assist locating a suit-
able spot for your new laser printer. To make optimum use of the printer, observe the following precautions
when locating the printer.
Environment
" Place the printer on a horizontal, sturdy and stable surface. The printer weighs about 106 lbs. (48 kg)
and may cause injury if it falls over.
" Always place the printer under the following conditions:
Temperature: 50º to 95º F (10 to 35º C)
Humidity: 15 to 85% (non-condensation)
" Be sure to keep the temperature to below 82º F (28º C) if the humidity is 85%
If the temperature changes drastically from a cold environment to a warm environment, condensation
may develop inside the printer and cause print problems. Therefore, be sure to let the printer rest for
some time to adjust to the new temperature.
" Do not subject the printer to direct sunlight or a malfunction may result.
" Do not place the printer in a location with high temperature and humidity, poor ventilation, or high
level of dust, otherwise a fire hazard or electric shock may result.
" Do not place the printer near heaters or similar objects, otherwise a fire hazard may result.
" Never block the ventilation openings of the printer, otherwise the internal temperature will build up
and cause a fire hazard.
" Do not place the printer near alcohol, benzine, or other volatile and flammable materials, or a fire haz-
ard may result.
Space requirements
WARNING: The installation surface must be stable and very sturdy to support the consider-
able weight of the printer. If the printer falls over, there is a severe risk of injuries.
CAUTION: Be sure to leave ample space between the ventilation openings on the printer
and the nearest wall or other surface, otherwise overheating may occur leading to a fire
hazard. For easy operation, maintenance and replacing of consumables, you should also
leave the clearances shown below around the printer. Installation of the printer should be
carried out by qualified service personnel.