User's Manual EasyCoder® 3400e Bar Code Label Printer
Intermec Technologies Corporation Corporate Headquarters 6001 36th Avenue West Everett, WA 98203 U.S.A. www.intermec.com The information contained herein is proprietary and is provided solely for the purpose of allowing customers to operate and service Intermec-manufactured equipment and is not to be released, reproduced, or used for any other purpose without written permission of Intermec.
Document Change Record This page records changes to this document. The document was originally released as version 001. Version Date Description of Change 002 07/2003 Updated the user’s manual to include the EasyLAN 10i2 adapter accessory and the EasyLAN Wireless option.
iv EasyCoder 3400e Bar Code Label Printer User’s Manual
1233*Helv Condensed Contents Contents Before You Begin...............................................................................................................ix Safety Summary....................................................................................................ix Safety Icons ..........................................................................................................ix Global Services and Support ...........................................................................
Contents *1233* Setting the Media Sensitivity Number ..............................................................................24 Setting the MSN for Intermec Media and Ribbon...............................................26 Setting the MSN for Other Media and Ribbon ...................................................26 Communicating With the Printer.....................................................................................28 Using the PrintSet Software........................................
1233*Helv Condensed Contents How the Image Bands Command Works ............................................................53 Optimizing Print Speed and Image Band Setting.................................................54 6 Using Test and Service Mode ............................................................................................. 55 Using Test and Service Mode Procedures .........................................................................56 Printing Test Labels.......................
Contents *1233* 2D Stacked Symbologies ........................................................................74 2D Matrix Symbologies..........................................................................75 B Character Sets ............................................................................................................................. 77 International Character Sets..............................................................................................78 Advanced Character Table..
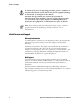
C d 39 Helvetica CondensedHelvetica Before You Begin Before You Begin This section provides you with safety information, technical support information, and sources for additional product information. Safety Summary Your safety is extremely important. Read and follow all warnings and cautions in this document before handling and operating Intermec equipment. You can be seriously injured, and equipment and data can be damaged if you do not follow the safety warnings and cautions.
Before You Begin *1233* A caution alerts you to an operating procedure, practice, condition, or statement that must be strictly observed to prevent equipment damage or destruction, or corruption or loss of data. Attention: Une précaution vous avertit d’une procédure de fonctionnement, d’une méthode, d’un état ou d’un rapport qui doit être strictement respecté pour empêcher l’endommagement ou la destruction de l’équipement, ou l’altération ou la perte de données.
C d 39 Helvetica CondensedHelvetica Before You Begin Telephone Support These services are available from Intermec Technologies Corporation. Call 1-800-755-5505 and choose this option Service Description Factory Repair and On-site Repair Request a return authorization number for authorized service center repair, or request an on-site repair technician. 1 Technical Support Get technical support on your Intermec product.
Before You Begin xii *1233* EasyCoder 3400e Bar Code Label Printer User’s Manual
1 Getting Started This chapter describes the EasyCoder® 3400e printer and explains how to get your new printer running for the first time.
Chapter 1— Getting Started C d 39 Helvetica CondensedHelvetica Getting to Know Your Printer Features of your printer include: • support for direct thermal and thermal transfer printing applications. Chapters 1 and 2 explain how to load both types of media. • an internal optional self-strip with integral liner takeup. See Chapter 2, “Operating the Printer,” for more information. • an easy-to-use software application called PrintSet.
C d 39 Helvetica CondensedHelvetica Chapter 1— Getting Started Darkness adjust control DIP switches 1 2 3 4 5 6 7 8 Optional I/O board port 1 2 3 4 5 6 7 8 Serial communications port On/Off switch AC power cord receptacle Parallel port I O Media window Media cover 3XXXU.003 Fanfold media access slot 3400e back view: This illustration shows the features on the back of the 3400e. Several options are available for use with your printer.
Chapter 1— Getting Started C d 39 Helvetica CondensedHelvetica 1 1 2 2 3 I 4 I O 5 O 6 7 8 1 2 3 4 5 I O 6 3 7 8 I 1 2 3 4 5 6 7 8 O 1 2 3 4 5 6 7 8 I O 3XXXU.004 3 Plug the AC power cord into the receptacle at the rear of the printer. Plug the other end of the power cord into a grounded wall outlet or surge protector. 4 Turn the On/Off switch to the on position. When you power on the printer, the Power On LED lights, the Empty/Pause LED flashes, and the platen roller advances.
C d 39 Helvetica CondensedHelvetica Chapter 1— Getting Started 3 2 Pow er /D Ale Em ata rt pty /P au se Fe ed /P au Inte se rme c 34 00 1 3XXXU.005 2 Grasp the front of the media cover with your left hand and lift the front of the media cover upward to release it from the printer frame. 3 Lift the media cover away from the top of the printer. Loading Media for Fanfold Printing Use the sample of fanfold media provided in the Media Envelope to complete the following procedures.
Chapter 1— Getting Started C d 39 Helvetica CondensedHelvetica ➤ ➤ ➤ Media access slot I O Lower media guide Edge guide 1 2 3 4 5 6 7 8 ➤ Head lift lever 1 2 3 4 5 6 7 8 ➤ Supply roll post Fanfold media Supply roll retainer 3XXXU.006 5 To allow easy access to the media path, pull down on the lower media guide. Make sure that the edge guide is slid all the way to the outer edge of the edge guide plate. 6 Insert the fanfold media through the printer mechanism as shown in the next illustration.
C d 39 Helvetica CondensedHelvetica Chapter 1— Getting Started Note: For your convenience, refer to the label with directions for loading media. This label is located on the inside of the media cover. Printing the Hardware Configuration Test Label You can print the hardware configuration test label to test the printer and make sure it is operating correctly. The hardware configuration test label lists the printer’s configuration.
Chapter 1— Getting Started C d 39 Helvetica CondensedHelvetica What the Hardware Configuration Test Label Tells You The hardware test label provides these statistics: • Amount of installed memory • Amount of media printed • Printhead configuration • Firmware information • Printhead alignment (the vertical lines) If a Hardware Configuration Test Label Does Not Print If you are unable to print a hardware configuration test label, see “Printer Operation Problems” on page 42.
C d 39 Helvetica CondensedHelvetica Chapter 1— Getting Started Connecting Your Printer to a PC You can connect your printer to either a serial port or parallel port on your PC. You must provide the correct cables for connecting the printer. See the following sections for cable information. Contact your Intermec representative for ordering assistance if you do not have the appropriate cables.
Chapter 1— Getting Started C d 39 Helvetica CondensedHelvetica To connect your printer to a PC parallel port 1 Turn the On/Off switch to the off position. 2 Plug the parallel interface connector into the parallel communications port on the rear of the printer. 3 Plug the other end of the cable into a parallel port on the PC. Connecting Your Printer to a Network You can connect the printer to Novell NetWare networks, Token Ring networks, or other TCP/IP networks.
C d 39 Helvetica CondensedHelvetica Chapter 1— Getting Started Connecting the Printer to a Mainframe To connect the printer directly to an IBM mainframe, you need: • a coax adapter card. • a coaxial cable equivalent to IBM part number 2577672 or 1833108. The maximum cable length allowed is 1,500 meters (4,920 feet). See the IBM specification Installation and Assembly of Coaxial Cable and Accessories, part number GA27-2805-4, for further information.
Chapter 1— Getting Started C d 39 Helvetica CondensedHelvetica Configuring the Serial Port for Communications You need to configure the serial port of the printer to match the configuration of your PC or network controlling device. If the printer’s default settings do not match, use the DIP switch settings table to configure the serial port.
C d 39 Helvetica CondensedHelvetica Chapter 1— Getting Started Bottom Bank Switch Number Top Bank Switch Number OFF Serial I/F O = OFF 1 = ON ON Baud Rate Selection 115200 57600 38400 19200 9600 4800 2400 1200 Parity Selection Even* Odd None OFF 1 2 3 4 5 6 7 8 1 1 1 O 1 1 1 O 1 O O O 1 O O O 1 O 1 1 O O O 1 O O 1 Number of Data Bits 7 Bit* 8 Bit Reserved O 1 OO Default settings are noted with an* O = OFF 1 = ON ON Multi-Drop Address Selection *A B C D E F G H I J K L M N O P Q R S T
Chapter 1— Getting Started C d 39 Helvetica CondensedHelvetica 5 Transmit at least four characters from your system. At this point, the printer does not attempt to interpret any printer commands, but simply prints each character with its hexadecimal equivalent underneath. Note: An example of using DOS to verify printer communications follows this procedure. 6 To enter normal Print mode, turn the printer power off and then on again.
2 Operating the Printer This chapter describes how to use the printer.
Chapter 2— Operating the Printer C d 39 Helvetica CondensedHelvetica Learning How to Operate the Printer To operate the printer, you need to understand: • how light emitting diodes (LEDs) help you monitor the status of the printer and the various tasks the Feed/Pause button performs. • how to load roll media, thermal transfer ribbon, and the procedure for using the self-strip option. • how to optimize print quality and print speed.
C d 39 Helvetica CondensedHelvetica Chapter 2— Operating the Printer LED Power/Data Power/Data Green LED Orange LED State Off On Flashing Indication Power off Power on Receiving data Alert Off Flashing On Printing or idle Over-temperature System fault Empty/Pause Off Flashing On Printing or idle Paused Media fault Alert Yellow LED Empty/Pause Feed/Pause 3440U.012 LED states: This illustration shows what each LED state indicates.
Chapter 2— Operating the Printer C d 39 Helvetica CondensedHelvetica Feed/Pause Button Functions (continued) Printer Mode Turned on for the first time You Want To Print the hardware configuration label. What to Do Press and hold the Feed/Pause button. See “Printing the Hardware Configuration Test Label” on page 7 for more information.
C d 39 Helvetica CondensedHelvetica Chapter 2— Operating the Printer If you are replacing the empty media roll with a new roll of the same width, you do not need to adjust the edge guide or the supply roll retainer. 3 Place the media roll on the supply roll post and position it firmly against the printer. If you are using a narrow roll of media, less than 7.62 centimeters (3 inches), insert the media support between the roll of media and the supply roll retainer before securing it.
Chapter 2— Operating the Printer C d 39 Helvetica CondensedHelvetica 9 Use PrintSet, your third-party software, or the IPL command set to configure the printer for the kind of media you are using (continuous or mark label). Refer to the PrintSet online help, your third-party documentation, or the IPL Programming Reference Manual for help. 10 Press Feed/Pause to advance several inches of media through the printer and out the label opening in the front cover. Your printer is now ready to print labels.
C d 39 Helvetica CondensedHelvetica Chapter 2— Operating the Printer Media roll Supply roll retainer Supply roll post Po we r/D ata Ale ➤ rt Em pty /P au se Fe ed /P au se Inte Media support rm 34 ec 40 ➤ ➤ Media liner ➤ ➤ ➤ Lower media guide Upper media guide Edge guide Media access door Self-strip assist roller Rewinder hub Rewinder clasp Head lift lever 3XXXU.027 5 Unscrew the edge guide and slide it to the outer edge of the lower media guide. Screw it in place.
Chapter 2— Operating the Printer C d 39 Helvetica CondensedHelvetica 15 Use PrintSet, your third-party software, or the IPL command set to enable self-strip and the label taken sensor. Refer to the PrintSet online help, your third-party documentation, or the IPL Programming Reference Manual for help. 16 Press the Feed/Pause button to advance a label through the printer. Grasp the leading edge of the label where it has separated from the backing and pull it away from the printer.
C d 39 Helvetica CondensedHelvetica Chapter 2— Operating the Printer 2 Remove the other end of the bracket from the ribbon hub. 3 Slide one end of the plastic core-locking bracket (P/N 066792) into a bracket slot on the ribbon hub. 4 Lift up on the middle of the bracket and use your index finger to slide the other end of the bracket into the remaining bracket slot on the ribbon hub.
Chapter 2— Operating the Printer C d 39 Helvetica CondensedHelvetica 5 Route the ribbon leader through the printer mechanism as shown in the previous illustration. Note: Make sure the ribbon runs above the upper media guide. The shiny side of the ribbon must come in contact with the printhead. 6 Attach the leader from the new thermal transfer ribbon roll to the empty ribbon core using the adhesive strip on the leader edge.
C d 39 Helvetica CondensedHelvetica Chapter 2— Operating the Printer 120066102605140 SENSITIVITY NUMBER 120066102605140 5✩7 3XXXU.029 Media sensitivity number: This illustration shows you where to find the media sensitivity number. Note that some ribbon rolls have the media sensitivity number printed inside of the core. Use this three-digit number to optimize print quality and print speed on your printer.
Chapter 2— Operating the Printer C d 39 Helvetica CondensedHelvetica Setting the MSN for Intermec Media and Ribbon For direct thermal media, use the three-digit sensitivity number located on the roll of media to set the sensitivity number. You can also use the values from the tables in the next section. For thermal transfer media, you need to look in two places to determine the sensitivity number.
C d 39 Helvetica CondensedHelvetica Chapter 2— Operating the Printer Direct Thermal Media Sensitivity Settings Approximate Sensitivity Numbers 700 Series High Sensitivity 400 Series Medium Sensitivity 100 Series Low Sensitivity 800 Series High Sensitivity (Paper) 600 Series Medium Sensitivity (Paper) Sensitivity Setting 720 Direct Thermal Media Duratherm Lightning Plus - 2 Maximum Recommended Print Speed 8 480 Duratherm Lightning IR Tag 5 470 Duratherm Lightning - 1 5 460 European IR 5 450
Chapter 2— Operating the Printer C d 39 Helvetica CondensedHelvetica Thermal Transfer Media and Ribbon Sensitivity Settings Approximate Sensitivity Numbers 500 Series Medium Sensitivity (Paper) 300 Series Low Sensitivity (Plastic) 200 Series Low Sensitivity (Kapton) Sensitivity Setting 567 Direct Thermal Media Duratran II-1/Premium - 7 Maximum Recommended Print Speed 8 565 European Premium Paper/Premium 4 563 Duratran II-1/Premium 7 533 European Tag/Premium 6 527 Duratran II Tag - 7 mil/P
C d 39 Helvetica CondensedHelvetica Chapter 2— Operating the Printer Using the PrintSet Software Use the PrintSet application software to easily configure your printer from your PC. You can upload the current configuration settings, modify them, and then download them to your printer. PrintSet also lets you: • download graphics and fonts. • print test labels using resident fonts, user-defined bitmap graphics, or resident bar code symbologies. • allocate printer memory.
Chapter 2— Operating the Printer C d 39 Helvetica CondensedHelvetica To print the test label 1 Start PrintSet on your PC. 2 From the Options menu, choose Test Print. 3 Select the Test Label option button. 4 Select either the Text or the Bar Code option button. If you select to print text, you can choose any font in the Select Printer Font list box. If you select to print a bar code, you can choose any symbology in the Select Symbology list box. 5 Choose Print. Your attached printer prints a test label.
3 Maintaining the Printer This chapter explains how to clean and maintain the printer. Even though the printer can withstand harsh environments, you must clean it on a regular basis to maximize performance. It is very important to perform the maintenance procedures if you expose the printer to dirt or debris.
Chapter 3— Maintaining the Printer C d 39 Helvetica CondensedHelvetica Inspecting the Printer Inspect the printer and the rest of your data collection system equipment on a regular basis. Your inspection should include the following: • Make sure you have properly grounded the printer. • Inspect the work environment. Large electric motors, welders, and switching equipment can affect printer performance. • Keep the printer away from liquids.
C d 39 Helvetica CondensedHelvetica Chapter 3— Maintaining the Printer Printer Maintenance Schedule (continued) Printer Component Drive roller and tear bar Maintenance Period Clean after every five rolls of media. If you are using hi-tack adhesive, you must clean after every roll of media. If you are using tag stock or continuous media, you may want to clean after every five rolls of media or as necessary. Clean more often in environments that are harsh or dusty.
Chapter 3— Maintaining the Printer C d 39 Helvetica CondensedHelvetica Cleaning the Printhead In order for the printhead to provide good print quality, it must maintain close contact with the media. Therefore, cleaning media debris from the printhead is very important. Clean after every roll, or 15,240 centimeters (6,000 inches), of media or when necessary. There are two ways to clean the printhead: • Use the cleaning card. • Use a cotton swab and isopropyl alcohol.
C d 39 Helvetica CondensedHelvetica Chapter 3— Maintaining the Printer 7 Engage the printhead by rotating the head lift lever counterclockwise until it locks in place. 8 Use one hand to hold the printer and use the other hand to pull the cleaning card forward until you have pulled the entire card through the media path. 9 Repeat Steps 6 through 8. 10 Dispose of the cleaning card properly. 11 If you are finished cleaning, replace the media cover.
C d Chapter 3— Maintaining the Printer 39 Helvetica CondensedHelvetica Cleaning the Printer Covers Use a general purpose cleaner (soapy water/mild detergent) to clean the printer covers. Do not use abrasive cleansers or solvents. Be sure to clean the transparent panel on the media cover so that the media supply inside the printer is visible when you close the cover.
C d 39 Helvetica CondensedHelvetica Chapter 3— Maintaining the Printer 8 Engage the printhead by turning the head lift lever counterclockwise until the printhead locks. 9 If you are finished cleaning, replace the media cover. Cleaning the Media Guides and Media Path You should clean the media guides and media path regularly to keep debris off the media surface and printhead where irregularities can spoil print quality or damage the printhead.
Chapter 3— Maintaining the Printer C d 39 Helvetica CondensedHelvetica Cleaning the Label Sensors Three label sensors on the printer require regular cleaning: • Label taken sensor • Label mark sensor • Label gap sensor To clean the label sensors 1 Turn the On/Off switch to the off position and remove the power cord. 2 Remove the media cover. 3 Rotate the head lift lever clockwise to release the printhead. Rotating the head lift lever raises the printhead to allow access to the label mark sensor.
C d 39 Helvetica CondensedHelvetica Chapter 3— Maintaining the Printer 6 Pull down on the lower media guide to expose the label gap sensor. Using a cleaning brush or vacuum, remove all debris and dust from the label gap sensor. 7 Clean the label gap sensor with a cotton swab and alcohol. 8 Replace the media and ribbon. 9 Engage the printhead by rotating the head lift lever counterclockwise until it locks in place. 10 Replace the media cover.
Chapter 3— Maintaining the Printer 40 C d 39 Helvetica CondensedHelvetica EasyCoder 3400e Bar Code Label Printer User’s Manual
4 Troubleshooting This chapter provides some hints for troubleshooting error messages that the printer sends to the host and problems you may experience with the printer.
Chapter 4— Troubleshooting C d 39 Helvetica CondensedHelvetica Troubleshooting Checklist Even though Intermec designed your printer to operate under harsh conditions, you may still encounter a printer operation, print quality, or communication problem at some time. You can easily fix most of the errors you encounter and consequently not delay operation of the printer for very long. To troubleshoot your printer 1 First try cleaning the printer components and checking all of the connections.
C d 39 Helvetica CondensedHelvetica Chapter 4— Troubleshooting Printer Operation Problems (continued) Symptom Printer slows down. Possible Causes The image bands or print speed is incorrectly set. Solution Use PrintSet to change the image bands or print speed settings. The printer has aborted and reset the print speed and image bands. Use PrintSet to change the image bands or print speed settings. Labels stick to door or fail to strip. The self-strip roller is dirty. Clean the self-strip roller.
Chapter 4— Troubleshooting C d 39 Helvetica CondensedHelvetica Print Quality Problems If your labels are not printing properly, check the following table to locate the symptom and correct the problem. Print Quality Problems Symptom Blotches printing on labels. Possible Causes Dirty printhead. Solution Clean the printhead. For help, see “Cleaning the Printhead” on page 34. Dirty media path or rollers. Clean the media path. For help, see “Cleaning the Media Guides and Media Path” on page 37.
C d 39 Helvetica CondensedHelvetica Chapter 4— Troubleshooting Print Quality Problems (continued) Symptom Print quality is poor. (continued) Possible Causes Printhead, platen roller, or label path are dirty. Solution Clean printhead, platen roller, and label path as described in Chapter 3, “Maintaining the Printer.” Uneven print contrast (density). Adjust the bias adjust screw. See “Correcting Uneven Print Quality” on page . Poor quality label or ribbon stock.
Chapter 4— Troubleshooting C d 39 Helvetica CondensedHelvetica Preventing Data Loss Several problems can cause data loss or communication problems on the printer. Data loss can result in printing errors or missing field data. Your printer is a serial ASCII device. It communicates with the host through an ASCII serial communication I/O port. Hardware handshaking involves the use of a hardware wire. Software handshaking involves a twoway datalink between the devices.
5 Optimizing Printer Performance This chapter explains how to optimize and maintain print quality, use the printer memory more efficiently, and maximize throughput.
Chapter 5— Optimizing Printer Performance C d 39 Helvetica CondensedHelvetica Optimizing and Maintaining Print Quality Intermec designed and configured your printer to provide the best possible print quality for both direct thermal and thermal transfer media. However, there are many factors that you need to take into account before you can achieve maximum print quality.
C d 39 Helvetica CondensedHelvetica Chapter 5— Optimizing Printer Performance If printing is light on the left side of label, turn the bias adjust screw clockwise. A R E A R E If printing is light on the right side of label, turn the bias adjust screw counterclockwise. 3XXXU.039 3 Replace the media cover. Adjusting the Print Darkness Use the darkness adjust control in combination with the PrintSet software configuration tool to fine-tune the darkness of print on your labels.
Chapter 5— Optimizing Printer Performance C d 39 Helvetica CondensedHelvetica 1 2 3 4 5 6 7 8 Turn the darkness Darkness adjust control clockwise adjust control for darker density 1 2 3 4 5 6 7 8 Turn the darkness adjust control counterclockwise for lighter density I 1 2 3 4 5 6 7 8 O 1 2 3 4 5 6 7 8 Screwdriver 3XXXU.037 Adjusting the Label Mark Sensor The label mark sensor detects the mark on the back of continuous media stock. The printer uses the output to determine the start of print.
C d 39 Helvetica CondensedHelvetica Chapter 5— Optimizing Printer Performance Platen roller Locate the label mark sensor behind the platen roller near the inboard edge of the printer. Use your index finger to adjust the label mark sensor. Inboard edge of printer. The platen roller is not shown for clarity only. Label mark sensor (The label mark sensor can be positioned no more than 1" from the inboard edge.) 3XXXU.040 3 Enable mark printing with PrintSet, your third-party software, or IPL commands.
Chapter 5— Optimizing Printer Performance C d 39 Helvetica CondensedHelvetica Using the Printer Memory Efficiently To receive the best performance from your printer, you must understand how to use the printer memory. The following sections can help you determine the most efficient way to use your printer memory.
C d 39 Helvetica CondensedHelvetica Chapter 5— Optimizing Printer Performance • Delete any unneeded user-defined fonts, graphics, pages, or formats. For help, see the PrintSet software or the IPL Programming Reference Manual. • Purchase additional memory. Please contact your Intermec representative for information on purchasing additional memory for the printer.
Chapter 5— Optimizing Printer Performance C d 39 Helvetica CondensedHelvetica The minimum number of required image bands is dependent upon the print speed and the complexity of the label. Labels that contain numerous fields with different rotations, graphics, or combinations of these formatting options may require a higher number of image bands. To set the number of image bands, use PrintSet or the IPL command. For help, see the PrintSet online help or the IPL Programming Reference Manual.
6 Using Test and Service Mode This chapter explains the different procedures you can perform while the printer is in Test and Service mode. Use Test and Service mode on the printer to print test labels, perform special procedures, and change select configuration commands.
Chapter 6— Using Test and Service Mode C d 39 Helvetica CondensedHelvetica Using Test and Service Mode Procedures For all Test and Service mode tests, pressing the Feed/Pause button pauses the current test. Holding the Feed/Pause button aborts the current test and starts a new test. To enter Test and Service mode 1 Record your current DIP switch settings for later reference. 2 Set all of the DIP switches to the off position.
C d 39 Helvetica CondensedHelvetica Chapter 6— Using Test and Service Mode Default settings are noted with an * O = OFF 1 = ON OFF TESTS ON Top Bank 1 2 3 4 5 6 Bottom Bank 7 8 Test Prints Configurations Hardware* Software Test Labels Print Quality Pitch Page Single Page All Pages Format Single Format All Formats UDC Single UDC All UDCs Font Single Font All Fonts O O O Data Line Print *1 O O O O O O O Selective Transfer Receiver Send Pages Single Page All Pages Send Format Single Forma
Chapter 6— Using Test and Service Mode C d 39 Helvetica CondensedHelvetica Printing Test Labels The printer can print a variety of test print labels that provide you with information about the printer configuration and the quality of the printing. To print a test label 1 Turn the On/Off switch to the off position. 2 Press and hold the Feed/Pause button while turning on the printer. The printer prints a hardware configuration label and then enters Data Line Print mode.
C d 39 Helvetica CondensedHelvetica Chapter 6— Using Test and Service Mode To use memory reset 1 Turn the printer off. 2 Press and hold the Feed/Pause button while turning on the printer. The printer prints a hardware configuration test label. 3 Set the DIP switches to reset a portion or all of the memory by using the Test and Service Mode DIP Switch Settings illustration on page 57. 4 Hold the Feed/Pause button down for 1 second. The printer resets a portion or all of its memory.
Chapter 6— Using Test and Service Mode C d 39 Helvetica CondensedHelvetica Setting the Number of Dot Increments You can move the label rest point and X forms adjust configuration commands forward or backward by setting the printer DIP switches. Use the top bank of DIP switches to determine whether the movement is forward or backward. Use the bottom bank of DIP switches to set the number of dot increments for label rest point, X forms adjust, and Y forms adjust. The printer moves in 5 mil increments or 0.
C d 39 Helvetica CondensedHelvetica Chapter 6— Using Test and Service Mode 3 In the bottom bank turn on the switches that have a 1 in their column. Turn off all other switches. 4 Press the Feed/Pause button and the printer prints the software configuration label and stops at the new location. For example, you print a label and discover that it does not extend far enough from the tear bar. You need to move the label rest point forward 10 dot increments (0.
Chapter 6— Using Test and Service Mode C d 39 Helvetica CondensedHelvetica Top Bank Top Bank OFF OFF ON ON 1 2 3 4 Switch settings for feeding label forward 1 2 3 4 Switch settings for retracting label 3XXXU.048 4 In the bottom bank of the Test and Service DIP switches, turn on or off the appropriate DIP switches. See the Dot Increments DIP Switch Settings illustration on page 60. 5 Press the Feed/Pause button.
C d 39 Helvetica CondensedHelvetica Chapter 6— Using Test and Service Mode 4 Press and hold the Feed/Pause button while turning on the printer. The printer prints the hardware configuration label. 5 In the top bank of the Test and Service DIP switches, turn on switches 1 and 3 and turn off switch 2. 6 Use the table below to help you choose the appropriate DIP switch settings: Setting Emulation 10 mil Description The printer emulates an 8636 or 8646 printer printing multiples of 10 mil (0.
Chapter 6— Using Test and Service Mode C d 39 Helvetica CondensedHelvetica Origin (Ø,Ø) -X➤ ➤ +X Y *FORMAT* *FORMAT* ➤ +Y Leading Edge 3XXXU.049 ➤ Direction of media from printer Default X and Y origins: This illustration shows the default X and Y origins. You can control the default X origin (top of form) with PrintSet or with the Test and Service DIP switches. You can control the default Y origin with the DIP switches only. The default X origin is .25 centimeters (0.
C d 39 Helvetica CondensedHelvetica Chapter 6— Using Test and Service Mode Top Bank Top Bank OFF OFF ON ON 1 2 3 4 Switch settings for moving the X origin forward 5 1 3XXXU.050 2 3 4 5 Switch settings for moving the X origin backward 4 In the bottom bank of the Test and Service DIP switches, turn on or off the appropriate DIP switches. See the Dot Increments DIP Switch Settings illustration on page 60 to see how to set the X forms adjust forward or backward a given number of increments.
Chapter 6— Using Test and Service Mode 66 C d 39 Helvetica CondensedHelvetica EasyCoder 3400e Bar Code Label Printer User’s Manual
A Specifications This chapter contains the following reference information: • Specifications • Printer options • Bar code symbologies supported EasyCoder 3400e Bar Code Label Printer User’s Manual 67
Appendix A— Specifications C d 39 Helvetica CondensedHelvetica Printer Specifications This section describes the specifications of the 3400e printer. Dimensions (no options installed) Height 27.9 cm (11 in) Width 26.7 cm (10.5 in) Length 43.2 cm (17 in) Weight 15.
C d 39 Helvetica CondensedHelvetica Appendix A— Specifications Fonts and Graphics There are 21 resident bitmap fonts (including OCR A and B) and three outline fonts available on the e series printers. You can use font ID 3 through 6 and 8 through 19 to download user-defined fonts. Maximum UDF 102 mm square (4 in square) Maximum UDC 102 mm square (4 in square) Media C D F E G H A B 3XXXU055.eps Media dimensions: This illustration shows how to measure the media dimensions.
Appendix A— Specifications C d 39 Helvetica CondensedHelvetica Printhead 200 dpi Printed dot size 0.127 mm (0.00492 inch square) Width 104 mm (4.1 inches square) Resolution 8 dots per mm (203 dots per inch) Number of elements 832 per printhead “X” dimensions 10 mil to 50 mil (0.25 mm to 1.27 mm); 5 mil (0.13 mm) in drag mode only (specified media only) 400 dpi Printed dot size 0.065 mm (0.0025 in square) Width 112 mm maximum (4.
C d 39 Helvetica CondensedHelvetica Appendix A— Specifications Printer Options This section contains a list of the options you can use with the printer along with a brief description. Consult your Intermec representative to order any option. Communication Interface EasyLAN 10i Interface This option lets you connect your printer to a 10BaseT Ethernet network. Various network printing protocols are available. For more information, see your EasyLAN 10i documentation.
Appendix A— Specifications C d 39 Helvetica CondensedHelvetica Finishers Cutter Use the cutter option to cut continuous media into individual labels ready for use. This 3400 option works best for individual random lengths or short batches of different label lengths. Batch Takeup This device automatically spools labels as they are printed. This attachment is limited to small batches with maximum outer diameter (OD) of 12.7 centimeters (5 inches).
C d 39 Helvetica CondensedHelvetica Appendix A— Specifications Parallel Interface Pin Descriptions (continued) Signal DB4 Pin 6 Return 24 Direction IN Description DB5 7 25 IN DB6 8 26 IN DB7 9 27 IN ACK 10 28 OUT Negative pulse. Data has been received. BUSY 11 29 OUT If HIGH, printer cannot receive data. PE 12 30 OUT If HIGH, out of ribbon or media. SELECT 13 - OUT Pulled to +5V. Printer is on. CHASSIS GND 17 - - Printer’s chassis gnd isolated from logic gnd.
Appendix A— Specifications C d 39 Helvetica CondensedHelvetica Supported Bar Code Symbologies (continued) Symbology EAN Description The European Article Numbering system (abbreviated as EAN) is a numeric superset of UPC. EAN has both a version that uses 8 digits and a version that uses 13 digits. The version with 13 digits encodes the same number of bars as 12 digit UPC Version A, but the 13th digit is encoded into a parity pattern at the left of the center guard bar.
C d 39 Helvetica CondensedHelvetica Appendix A— Specifications Supported 2D Stacked Symbologies (continued) Symbology Code 49 Description Code 49 is an alphanumeric symbology developed in 1987 as a means of labeling very small objects. A Code 49 bar code contains from two to eight adjacent rows, each separated by a one-module separator bar. PDF417 PDF417 is a stacked 2D symbology that provides the ability to scan across rows of code.
Appendix A— Specifications C d 39 Helvetica CondensedHelvetica Supported 2D Matrix Symbologies (continued) Symbology QR Code 76 Description QR (Quick Response) Code is a matrix 2D symbology that encodes data into patterns consisting of black and white dots or modules. A three-position detection pattern enables omni-directional reading and ultra high-speed reading. QR Code can handle a wide range of data, including numerical, alphabetical, Kanji, Hiragana, Katakana, graphics, and control codes.
B Character Sets This chapter contains tables for the character sets that the 3400e printer supports. To select a character set, use PrintSet, your third-party software application, or the IPL command set.
Appendix B— Character Sets C d 39 Helvetica CondensedHelvetica International Character Sets The following tables show which hex codes to download for international characters not available in the U.S. character set. To use the tables, find the hex code for the U.S. character that corresponds with the character in your language.
C d 39 Helvetica CondensedHelvetica Appendix B— Character Sets IBM Translation Character Table If you are running your printer with IBM Translation enabled, use this table to find the right hex codes for the international character sets. IBM Translation Hex Codes 21 23 24 40 5B 5C 5D 5E 60 7B 7C 7D 7E U.S. ASCII ¦ # $ @ ¢ \ ! ¬ ` { ¦ } ~ U.K.
C d Appendix B— Character Sets 39 Helvetica CondensedHelvetica ! " 22 14 15 # $ % & ' ( ) ∗ + , - .
C d 39 Helvetica CondensedHelvetica Appendix B— Character Sets Extended Character Sets Each internal font in the printer has a different character set associated with it as shown in the following tables. The hex codes accompany each character.
C d Appendix B— Character Sets 39 Helvetica CondensedHelvetica Characters in Fonts c20 8 point c21 12 point c22 20 point c25, c26, c28 outline fonts c30-c41 monospace fonts (6 point to 36 point) ØØ 1Ø Ø2 Ø3 Ø4 Ø5 Ø6 Ø7 11 12 13 14 15 16 17 ! " # $ % & ’ Ø1 Ø8 Ø9 18 19 ( ) ØA 1A * ØB 1B + ØC ØD ØE ØE 1C 1D 1E 1F , - .
C d 39 Helvetica CondensedHelvetica Appendix B— Character Sets Characters in Font c23 OCR A ØØ Ø1 Ø2 Ø3 Ø4 Ø5 Ø6 Ø7 Ø8 Ø9 ØA ØB ØC ØD ØE ØE 1Ø 11 12 13 14 15 16 17 18 19 1A 1B 1C 1D 1E 1F 2Ø 21 22 23 24 25 26 27 28 29 2A 2B 2C 2D 2E 2F 3Ø 31 32 33 34 35 36 37 38 39 3A 3B 3C 3D 3E 3F 4Ø 41 42 43 44 45 46 47 48 49 4A 4B 4C 4D 4E 4F 5Ø 51 52 53 54 55 56 57 58 59 5A 5B 5C 5D 5E 5F 6Ø 61 62 63 64 65 66 67
C d Appendix B— Character Sets 39 Helvetica CondensedHelvetica Characters in Font c24 OCR B Size 2 ØØ Ø1 Ø2 Ø3 Ø4 Ø5 Ø6 Ø7 Ø8 Ø9 ØA ØB ØC ØD ØE ØE 1Ø 11 12 13 14 15 16 17 18 19 1A 1B 1C 1D 1E 1F 2Ø 21 22 23 24 25 26 27 28 29 2A 2B 2C 2D 2E 2F 3Ø 31 32 33 34 35 36 37 38 39 3A 3B 3C 3D 3E 3F 4Ø 41 42 43 44 45 46 47 48 49 4A 4B 4C 4D 4E 4F 5Ø 51 52 53 54 55 56 57 58 59 5A 5B 5C 5D 5E 5F 6Ø 61 62 63 64 65
C Communications Reference This chapter provides communications reference information.
Appendix C— Communications Reference C d 39 Helvetica CondensedHelvetica Communications Protocols Communications protocols are important because they determine the transmission standards for communication between the printer and the host. The printer and the host must use the same protocol and parameters to communicate properly. The printer supports the flow control and block transfer protocols described in the next sections. All of these protocols are point-to-point except Multi-Drop.
C d 39 Helvetica CondensedHelvetica Appendix C— Communications Reference Intermec Standard Protocol Printer Status Conditions (continued) Printer Status Printing Character DC1 Pin 11/20 Ready Ready/Online DC1 Ready Note: Do not confuse the Buffer now full status with the XON/XOFF characters and . When the printer returns Buffer Now Full () status, it accepts the currently received message block.
Appendix C— Communications Reference C d 39 Helvetica CondensedHelvetica When you switch the printer online (and the input buffer is empty), pin 11/20 becomes “Ready” and it transmits a DC1.
C d 39 Helvetica CondensedHelvetica Appendix C— Communications Reference characters exists. You may redefine these characters to create a table that all of the protocols can use. One possibility for the user to redefine protocol characters might be the replacement of control characters with printable characters. Note: Please use caution when replacing control characters with printable characters. You cannot replace one control character with more than one printable character.
Appendix C— Communications Reference C d 39 Helvetica CondensedHelvetica Host Requirements Your printer has the following hardware and software requirements: • The host computer must use the American Standard Code for Information Exchange (ASCII) for data communications. • A serial port must be available on the host if you are connecting directly to the printer. • The host must support at least one of the following data communications interfaces: RS-232, RS-422, or RS-485.
C d 39 Helvetica CondensedHelvetica Appendix C— Communications Reference RS-422 Serial Interface Use the RS-422 interface in long line point-to-point direct connect installations. The printer cable must have the pin assignments for an RS-422 serial interface shown in the next table. RS-485 Serial Interface Use the RS-485 serial interface for Multi-Drop installations only. The printer cable must have the pin assignments for an RS-485 serial interface shown in the next table.
Appendix C— Communications Reference C d 39 Helvetica CondensedHelvetica Printer Serial Port The rear panel of the printer contains the serial port connector. It is a 25-pin D-style subminiature receptacle. The port is wired as a data terminal equipment (DTE) device. DTR 25 13 24 12 23 11 22 10 21 9 20 8 19 7 18 6 17 5 RTS 16 4 RD 15 3 14 2 PS SG CTS TD 1 GND 3XXXU.063 Serial port pin assignments: This illustration shows the serial port pin assignments.
C d 39 Helvetica CondensedHelvetica Appendix C— Communications Reference Shield 9-Pin (Socket) D-Sub Metal Backshell 25-Pin (Plug) D-Sub Metal Backshell 1 Chassis Ground Received Data 2 2 Transmitted Data Transmitted Data 3 3 Received Data Clear to Send 8 8 Carrier Detect Data Set Ready Request to Send 7 Data Terminal Ready 4 6 Data Set Ready 6 20 Data Terminal Ready Carrier Detect 1 5 Clear to Send 4 Request to Send 7 Ground Ground 5 PC 3XXXU011.
C d Appendix C— Communications Reference 39 Helvetica CondensedHelvetica Shield 1 + - Input RxDA 16 - Output TxDA 14 Output TxDB 19 + Printer ➤ ➤ Input RxDB 13 1 ➤ ➤ 3XXXU013.eps 19 14 16 13 Host RS-422 serial interface: This illustration shows the pin assignments for the RS-422 serial interface. The host in this case includes Intermec products that support RS-422. Non-Intermec controllers may have different pin assignments. Note: Connect pin 1 to shield at one end only.
D Full ASCII Table This chapter contains these tables: • Full ASCII table • Full ASCII control characters table EasyCoder 3400e Bar Code Label Printer User’s Manual 95
C d Appendix D— Full ASCII Table 39 Helvetica CondensedHelvetica Full ASCII Table This table lists the ASCII characters and their binary, hexadecimal, decimal, and Code 39 equivalents.
C d 39 Helvetica CondensedHelvetica Appendix D— Full ASCII Table Full ASCII Table (continued) Binary0 01000100 Hex1 44 Dec2 68 C393 D Char4 D Binary0 01100011 Hex1 63 Dec2 99 C393 +C Char4 c 01000101 45 69 E E 01100100 64 100 +D d 01000110 46 70 F F 01100101 65 101 +E e 01000111 47 71 G G 01100110 66 102 +F f 01001000 48 72 H H 01100111 67 103 +G g 01001001 49 73 I I 01101000 68 104 +H h 01001010 4A 74 J J 01101001 69 105 +I i 01001011
Appendix D— Full ASCII Table C d 39 Helvetica CondensedHelvetica Full ASCII Control Characters Table This table lists the ASCII control characters and their definitions.
G Glossary EasyCoder 3400e Bar Code Label Printer User’s Manual 99
Glossary C d 39 Helvetica CondensedHelvetica ASCII American Standard Code for Information Interchange. A standard sevenbit code almost always transmitted with a parity bit for a total of eight bits per character. ASCII was established by the American National Standards Institute to achieve compatibility between various types of data communication equipment. Equivalent to the International ISO 7-bit code. backing Silicon release liner on media to which labels are attached until ready for use.
C d 39 Helvetica CondensedHelvetica Glossary density Number of data characters that can be represented in a linear unit of measure. Often expressed in characters per inch. direct thermal A method of thermal printing in which images are printed when heat from the thermal printhead produces a black mark on the media. EAN European Article Numbering; now also called IAN (International Article Numbering).
Glossary C d 39 Helvetica CondensedHelvetica graphic A bitmap picture downloaded to the printer by the host before printing. HIBC Health Industry Bar Code standard. A modified version of Code 39 that has 43 characters, utilizes the Modulus 43 check character, and reserves some character combinations for special usage. human-readable A character, number, or symbol printed in a font that can be read by a human; as opposed to bar code symbology, which can only be read by a machine. See text.
C d 39 Helvetica CondensedHelvetica Glossary margin The distance between the edge of a label and where the printing starts on that label. See also top of form. media The label stock on which the printer prints labels. Media can be made of plain paper, polyester, thermally reactive paper, or other materials with adhesive backing and ribbon. mnemonic code An acronym or abbreviation for a computer instruction, routine, or format. For example, represents the start of text.
Glossary C d 39 Helvetica CondensedHelvetica point size A unit of measure for font height; 72 points equals 1 inch as measured from slightly above the top of the uppercase letters to slightly below the bottom of the lowercase descenders. Polling Mode D protocol Polling Mode D is a protocol that allows devices and controllers to exchange data in an “ask and receive” format. Use Polling Mode D to connect multiple devices to a single multiport controller.
C d 39 Helvetica CondensedHelvetica Glossary scan To read a bar code with a device known as a scanner that converts optical information into electrical signals. selective transfer A procedure that copies selected formats, fonts, graphics, or pages stored in the memory of one printer to the memory of another. self-strip An internal device for the printer that presents each label after it is printed, with the backing removed so it may be applied immediately.
Glossary C d 39 Helvetica CondensedHelvetica UPC Universal Product Code. A numeric, 12-digit bar code symbology used extensively in retail, particularly the grocery industry. User-Defined Characters (UDC) See graphic. User-Defined Fonts (UDF) See soft font. variable data field Bar code and text fields that change from one label to the next. XON/XOFF protocol A protocol that stops the host from sending data when the printer buffer fills up and starts it again when the buffer empties.
I Index EasyCoder 3400e Bar Code Label Printer User’s Manual 107
Index Numbers 2D symbologies Code 16K, 74 Code 49, 75 Data Matrix, 75 described, 74 Maxicode, 75 PDF417, 75 QR Code, 76 86XX Emulation mode, 62 A AC power receptacle, 3 adjustments bias adjust screw, 48 darkness adjust control, 49 label mark sensor, 50 X forms adjust, 64 Y forms adjust, 65 Advanced mode, international character sets, 78 Alert LED, troubleshooting, 43 AS400, connecting to the 3400, 10 ASCII definition, 100 table, 96, 97 B backing, definition, 100 bands, image, 53 bar code definition, 100 sy
Index configuration definition, 100 printing test label, 29, 58 test label hardware, 7 software, 25 troubleshooting, 43 configuration commands changing from Test and Service mode, 59 Emulation mode, 62 X forms adjust, 64 Y forms adjust, 65 DIP switch settings, 59 connecting printer to a mainframe, 11 printer to a network, 10 printer to a PC using the parallel port, 9 using the serial port, 9 printer to an AS400, 10 printer to power source, 3 printer to system using the parallel port, 8 using the serial por
Index image bands definition, 102 description, 53 function, 54 optimizing with print speed, 54 imaging, definition, 102 increasing printer throughput, 53 inspecting the printer, 32 installing, printer, 3 interfaces communications, 90 EasyLAN 10i, 71 EasyLAN 10i2 adapter accessory, 71 EasyLAN Wireless, 71 RS-232, 90 RS-422, 91 RS-485, 91 Interleaved 2 of 5, 74 Intermec Standard protocol, described, 86 international character sets, 78 IPL commands, using to communicate, 29 ips, definition, 102 ISO, definitio
Index point size, definition, 104 Polling Mode D protocol definition, 104 described, 88 POSTNET, 74 power loss, troubleshooting, 42 preparing the printer for installation, 3 preventing data loss, 46 print quality correcting, 48 darkness adjust control, adjusting with, 49 maintaining, 48 optimizing, 48 printing test label, 58 troubleshooting, 44 understanding, 48 print speed adjusting for use with image bands, 54 definition, 104 printer communication problems, 45 communications, 28, 68 components back view,
Index serial port cables, 9 definition, 105 description, 92 pin assignments, illustrated, 92 using to connect a PC to the 3400, 9 setting dot increments, number of, 60 media sensitivity number, 24, 26 soft font, definition, 105 software configuration label, printing, 25 speed, printing, 70 stacked symbologies, See 2D symbologies Standard protocol definition, 105 described, 86 straight-through printing, 18 symbologies 2D, described 74 Codabar, 73 Code 11, 73 Code 128, 73 Code 16K, 74 Code 2 of 5, 73 Code 39
blank page
Corporate Headquarters 6001 36th Avenue West Everett, Washington 98203 U.S.A. tel 425.348.2600 fax 425.355.9551 www.intermec.