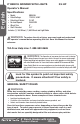
8" Bench Grinder with Lights Meuleuse d'établi de 8 po, avec éclairages Esmeriladora de banco de 8”, con luces Operator's Manual Manuel d’utilisation Manual del Operario GBG800L
English 8" BENCH GRINDER WITH LIGHTS 3/4 HP Operator’s Manual Specifications: • • • • • • Model: Rated Voltage: Rated Input Power: No Load Speed: Wheel Size: Shaft Diameter: GBG800L 120V AC, 60HZ 3/4 HP 3550 RPM 8” 3/4” Includes: (1) 36G Wheel, (1) 60G Wheel and Light Bulbs WARNING: To reduce the risk of injury, user must read and understand this operator’s manual before operating this tool. Save this Manual for future reference.
SAVE THESE INSTRUCTIONS WORK AREA SAFETY • Keep your work area clean and well lit. Cluttered benches and dark areas invite accidents. • Do not operate power tools in explosive atmospheres, such as in the presence of flammable liquids, gases, or dust. Power tools create sparks which may ignite the dust or fumes. English WARNING: READ AND UNDERSTAND ALL WARNINGS, CAUTIONS AND OPERATING INSTRUCTIONS BEFORE USING THIS EQUIPMENT.
English • Avoid accidental starting. Ensure the switch is in the off position before plugging in. Carrying power tools with your finger on the switch or plugging in power tools that have the switch on invites accidents. • Remove any adjusting keys or wrenches before turning the power tool on. A wrench or key that is left attached to a rotating part of the tool may result in personal injury. • Do not overreach. Maintain proper footing and balance at all times.
• Feed the work piece in the correct direction and speed. Feed the work • Never leave the tool running unattended, turn the power off. Do not leave the tool until it comes to a complete stop. • Never start the power tool when any rotating component is in contact with the work piece. SERVICE • Have Your Power Tool Serviced by a qualified repair person using only identical replacement parts. This will ensure that the safety of the power tool is maintained.
English SPECIFIC SAFETY RULES FOR BENCH GRINDERS WARNING: DO NOT LET COMFORT OR FAMILIARITY WITH PRODUCT (GAINED FROM REPEATED USE) REPLACE STRICT ADHERENCE TO PRODUCT SAFETY RULES. If you use this tool unsafely or incorrectly, you can suffer serious personal injury! • Make sure the bench grinder is on a firm, level surface and properly secured to avoid injury from unexpected movement. Firmly clamp or bolt the bench grinder to a support surface to prevent slipping or sliding during the operation.
• Do not stand directly in front of the machine when turning it "ON". • Never grind on a cold wheel. The grinder should always be started and allowed to run at idle speed for on full minute before applying work to the grinding wheel. • Never grind on the side of the wheel. Always grind on the face of the wheel only. • Never apply coolant directly to the grinding wheel. Coolant may weaken the bonding strength of the wheel causing it to fail. Dip the hot work piece into water to cool it.
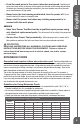
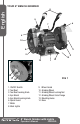
YOUR 8" BENCH GRINDER English 8 5 6 7 4 10 9 2 2 13 13 12 11 1 14 FIG 1 10 1. ON/OFF Switch 2. Tool Rest 3. Tool Rest Locking Knob 4. Eye Shield 5. Eye Shield Locking knob 6. Spark Guard 7. Motor 8. Work Lights 9. Wheel Guard 10. Grinding Wheel 11. Grinding Wheel Locking Nut 12. Grinding Wheel Outer Flange 13. Mounting Holes 14.
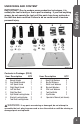
UNPACKING AND CONTENT unlikely the tool is faulty or that a part is missing. If you find anything wrong, do not operate the tool until the parts have been replaced or the fault has been rectified. Failure to do so could result in serious personal injury.
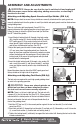
English ASSEMBLY AND ADJUSTMENTS WARNING: Always be sure that the tool is switched off and unplugged from the power source before adjusting, adding accessories, or checking a function on the tool. Attaching and Adjusting Spark Guards and Eye Shields (FIG 3,4) NOTE: Always check to ensure the eye shields are correctly attached and the spark guards are correctly adjusted each time the grinder is used. Eye shields and spark guards must be attached over each grinding wheel.
Mounting Bench Grinder If during operation of the bench grinder there is any tendency for the grinder to slide or "walk" or to tip over, then the grinder must be secured to a work bench or other supporting surface using fasteners (not supplied) through the two holes in the grinder base. Before mounting the grinder to a work bench or similar surface, determine the ideal mounting position by performing a series of non-powered tests with items that will typically be used on the grinder (e.g.
English OPERATION IMPORTANT: Before each use of the bench grinder, inspect its general condition. Check for loose screws, damaged electrical wiring, cracked, chipped, or damaged wheels and misalignment or binding of the moving parts. If bench or pedestal mounted, check that all fasteners are in place and tight. CAUTION: Keep your bench grinder clean by removing dust from working parts, the lower portion of the wheel guard assembly, and the work area surrounding the grinder.
Because grinders can remove material rapidly, a freshly dressed wheel and the amount of work piece pressure applied to the wheel are keys to efficient grinding. Use the following basic guidelines to aid in working metals and avoid overheating: • Never force the work piece against the grinding wheel. • Always keep the work piece constantly moving against the grinding wheel with light pressure and even motion. • Keep the work piece cool by maintaining a container of water nearby for dipping the work piece.
English Sharpening Wood Chisels & Plane Irons: As in all freehand sharpening operations, practicing the technique and actual sharpening experience are the best teachers. Sharpening chisels and irons on the bench grinder will produce razor sharp hollow ground bevels which must be followed by honing on a whetstone. Use the following tips to help develop your sharpening skill and success. 1. The chisel cutting edge must be free of nicks and be 90° to the chisel edge.
This product is warranted free from defects in material and workmanship for 2 years after date of purchase. This limited warranty does not cover normal wear and tear or damage from neglect or accident. The original purchaser is covered by this warranty and it is not transferable. Prior to returning your tool to store location of purchase, please call our Toll-Free Help Line for possible solutions. THIS PRODUCT IS NOT WARRANTED IF USED FOR INDUSTRIAL OR COMMERCIAL PURPOSES.
Richpower Industries, Inc. 736 Hampton Road Williamston, SC USA www.richpowerinc.