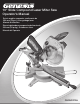
0" Slide Compound Laser Miter Saw Operator’s Manual Scie à onglets composés coulissante de 254 mm (10 po.), Avec guidage laser Manuel d’utilisation Sierra ingleteadora compuesta deslizante de 254 mm (10 pulg.
English 10" Slide Compound Laser Miter Saw, 15 AMP Operator’s Manual Specifications: • Model: GMSUDR15L • Rated Input: 120V~AC, 60HZ, 15A • No Load Speed: 5,000 rpm • Blade Size: 10” (254mm) • Arbor Size: 5/8” (16mm) • Blade Bevel: 0-45° • Blade Miter: 0-45° Left, 0-45° Right • Cutting Capacity @ 90° 3” H x 12-1/5” W • Cutting Capacity @ 45° 3” H x 8-1/4” W • Cutting Capacity @ 0° Miter & 45° Bevel: 1-5/8” H x 12-1/5” W • Cutting Capacity @ 45° Miter & 45° Bevel: 1-5/8” H x 8-1/4” W
English Warning: READ AND UNDERSTAND ALL WARNINGS, CAUTIONS AND OPERATING INSTRUCTIONS BEFORE USING THIS EQUIPMENT. Failure to follow all instructions listed below may result in electric shock, fire and/or serious personal injury. SAVE THESE INSTRUCTIONS WORK AREA SAFETY: • Keep your work area clean and well lit. Cluttered benches and dark areas invite accidents. • Do not operate power tools in explosive atmospheres, such as in the presence of flammable liquids, gases, or dust.
English • Do not force the power tool. The tool will perform the job better and safer at the feed rate for which it is designed. Forcing the tool could possible damage the tool and may result in personal injury. • Use the correct power tool for the job. Don’t force the tool or attachment to do a job for which it is not designed. • Do not use tool if switch does not turn it on or off.
English EXTENSION CORDS Grounded tools require a three wire extension cord. Double insulated tools can use either a two or three wire extension cord. As the distance from the power supply outlet increases, you must use a heavier gauge extension cord. Using extension cords with inadequately sized wire causes a serious drop in voltage, resulting in loss of power and possible tool damage. Refer to the table shown below to determine the required minimum wire size.
English • Make sure all the saw’s adjustment handles are tight before cutting, even if the table is positioned in one of positive stops. Do not forget to tighten the rear mounted bevel adjustment handle. • Never apply lubricants to the blade when it is running. • Never use saw blades rated for operation at less than 5,000 rpm. • Never start the tool with the work piece against the blade. • Allow the motor to attain full speed prior to starting the cut.
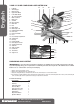
English YOUR 10" SLIDE COMPOUND LASER MITER SAW 1. 2. 3. 4. 5. 6. 7. 8. 9. 10. 11. 12. 13. 14. 15. 16. 17. 18. 19. 20. 21. 22. 23. 24. 25. 26. 27. 28. 29.
English ASSEMBLY AND ADJUSTMENTS Warning: DO NOT connect your compound miter saw to the power source until the machine is completely assembled, all necessary adjustments made, and you have read and understand the entire operator’s manual. Your saw comes from the factory fully adjusted and requires only minor assembly to prepare the miter saw for operation.
English ADJUSTING SUPPORT FOOT FIG 5 When making sliding cuts, turn the support foot (a) clockwise or counterclockwise depending on the amount of support needed. (FIG 5) a DEPTH OF CUT ADJUSTMENT Warning: Be sure the machine is unplugged from the power source. Accidental saw start-up could result in serious personal injury. NOTE: Your Miter Saw should come adjusted properly for depth of cut while using the Factory-installed blade for normal operation.
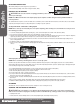
English 3. 4. 5. 6. Loosen the miter lock knob (7). Rotate the miter table and move pointer to the 0° position. (FIG 9) Tighten the miter lock knob securely. Pull the saw head down completely and move the arm release knob (24) into the transport position, locking the blade and arm in the down position. Lay a small framing square or tri-square on the miter table. Place one leg of the square against the fence and slide the other leg of the square against a flat part of the saw blade.
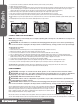
English changes in the laser’s path. With patience and practice you’ll be able to place the laser line in the ideal position for your style of blade to cut line alignment. (FIG 12) OPERATION Warning: Always be sure the miter saw is disconnected from the power source before making any adjustments or setting up prior to cutting. Failure to disconnect or unplug the machine may cause accidental starting, resulting in serious personal injury. TRANSPORTING THE SAW 1.
English ROTATING THE MITER TABLE This miter saw will accurately cut any angle from the straight 90° cut to 45° left and 45° right. To rotate the miter table, loosen the Miter Lock Knob (7) one or two turns counterclockwise and then rotate the miter table to the desired angle using the miter handle (13). When the desired angle is reached, turn the miter lock knob (7) clockwise to lock the miter table in place.
English APPLICATION TYPICAL COMPOUND MITER SAW OPERATIONS Warning: Always be sure the miter saw is disconnected from the power source before making any adjustments or during set-up prior to cutting. Failure to disconnect or unplug the machine may cause accidental starting, resulting in serious personal injury. Warning: Be sure the miter saw is securely bolted down or clamped to a workbench or appropriate work surface before performing any cutting operations.
English CUTTING BASE MOLDING Base molding can be cut using two methods: standing vertically against the fence or horizontally, laying flat on the miter table. Using the vertical method is limited by the height capacities of your compound miter saw. Vertical Cutting: 1. Stand the base molding upwards with the molding back against the fence and molding bottom sitting on the miter table. 2. Set the bevel angle to 0°. 3.
English MAINTENANCE SAW BLADE INSTALLATION OR REMOVAL Warning: Be sure that the tool is switched off and unplugged from the power source before performing any work on the tool. Warning: Use only 10” diameter saw blades that have 5/8” diameter arbor holes and are rated for speeds equal to or greater then the nameplate rated RPM of this miter saw. Warning: Use only blades designed for cross-cutting operations.
English LUBRICATION This table saw are permanently lubricated at the factory and require no additional lubrication. TWO-YEAR WARRANTY This product is warranted free from defects in material and workmanship for 2 years after date of purchase. This limited warranty does not cover normal wear and tear or damage from neglect or accident. The original purchaser is covered by this warranty and it is not transferable.
Richpower Industries, Inc. 736 Hampton Road Williamston, SC USA www.richpowerinc.