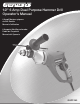
⁄2" 6 Amp Dual Purpose Hammer Drill Operator’s Manual 6 Ampli Marteau-piqueur de But Double Manuel d’utilisation 6 Amperio Martillo perforador Doble de Propósito Manual del Operario GHD1260
English 1⁄2" 6 Amp Dual Purpose Hammer Drill Operator’s Manual Specifications: • • • • • • • • • • Model # GHD1260 Input: 120V AC, 60Hz, 6.0 Amp Chuck Capacity: 1⁄2” No-Load Speed: 0-3,500 RPM and Reversible. Hammer Action:44,500 BPM. Auxiliary Handle: 360 degree with depth rod. Drilling Capacities: • Steel: 1⁄2” • Masonry: 5/8” • Wood: 1 1/4” Net weight: 4.12 lbs Includes: Hammer Drill, Auxiliary Handle, Depth Rod and Chuck Key Two-Year warranty.
English Warning: READ AND UNDERSTAND ALL WARNINGS, CAUTIONS AND OPERATING INSTRUCTIONS BEFORE USING THIS EQUIPMENT. Failure to follow all instructions listed below may result in electric shock, fire and/or serious personal injury. SAVE THESE INSTRUCTIONS 1. READ THE OPERATOR’S MANUAL BEFORE OPERATING THE MACHINE. To minimize the possible occurrence of accidents and personal injury, learn the tool’s application, limitations, and specific potential hazards peculiar to this tool. 2.
English 19. DON’T OVERREACH. Maintain proper footing and balance at all times; loss of balance can cause you to fall into the working machine, possibly causing an injury. 20. NEVER STAND ON THE TOOL. An injury may occur if the machine is tipped or if you should unintentionally contact the cutting tool. 21. DO NOT FORCE THE TOOL. The tool will perform the job better and safer at the feed rate for which it was designed. Forcing the tool could possibly damage the machine and may result in personal injury.
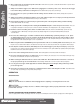
English EXTENSION CORDS Grounded tools require a three wire extension cord. Double insulated tools can use either a two or three wire extension cord. As the distance from the power supply outlet increases, you must use a heavier gauge extension cord. Using extension cords with inadequately sized wire causes a serious drop in voltage, resulting in loss of power and possible tool damage. Refer to the table shown below to determine the required minimum wire size.
English 6. Wear cushioned gloves and take frequent rest breaks. Hammer drills can generate considerable vibration when in operation which may be harmful to your hands and arms. 7. Always check that the trigger lock is “OFF” before plugging the tool into the power source. Never leave the trigger locked in the “ON” position when not using the tool. Accidental start-ups may cause personal injury. 8. Do not hold the tool or place your hands near the rotating chuck or drill bit.
English slowly increasing the pressure on the switch trigger, tool speed will gradually increase until reaching maximum rated RPM. To start the tool, simply pull the switch trigger. Increase tool speed by applying more pressure on the switch trigger. To stop the tool, release the switch trigger. “LOCK-ON” BUTTON The “Lock-On” button is located in the handle of your tool, beside the switch trigger and allows you to continuously operate the drill at a preset RPM without holding down the switch trigger.
English (NOTE: To engage the hammering mechanism, apply and maintain pressure on the bit. When pressure on the bit is released, the hammering action will stop and the rotation will continue until the tool is switched off.) When using the hammer drill mode for drilling into hard material like concrete, we recommend that you use carbide-tipped percussion drill bits. caution: Always be sure that the tool is switched off and unplugged before adjusting or checking function on the tool.
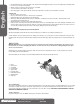
English To set the depth gauge: • Unplug the hammer drill. • Loosen the auxiliary handle and depth gauge by turning the wing nut located beside the depth gauge rod. • Measure backwards from the tip of drill bit the desired depth of holes, and then move the depth gauge so the tip of the gauge is aligned with the desired drilling depth. • Tighten the auxiliary handle and depth gauge by turning the wing nut clockwise.
English • • • • • If not drilling through holes, set the depth gauge to the desired hole depth and tighten the wing nut to secure the depth gauge and auxiliary handle. Be sure the “lock-on” button is disengaged. Mark the location(s) on work piece where the holes are to be drilled. Secure the work piece with clamps or other means. Wear safety goggles or safety glasses with side shields. Wear a dust mask or respirator to prevent inhalation of wood dust.
Richpower Industries, Inc. 736 Hampton Road Williamston, SC USA www.richpowerinc.