
Operating Guide


PRODUCT OVERVIEW
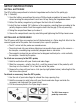
Fig. 1 shows the labels and positions of the VIC’s display, controls and physical structures.
Familiarize yourself with their functions before moving on to the setup and operating
instructions.
4
1. Press to generate a local WiFi network
2. Press to increase/decrease camera
lighting
3. Press to start/stop recording of video clip
(enabled only when linked to ToolSmart
™
app)
4. Press to take a still photo of the displayed
image (enabled only when linked to
ToolSmart
™
app)
5. Press to power the VIC on and off
6. Battery compartment
7. 1m long, 8mm diameter probe
8. Camera head
9. LCD
10. RESET button (on back); see page 7
11. Triangular hanger hook (behind monitor)
INCLUDED ACCESSORIES
12. 45° mirror
13. Pickup hook
14. Magnetic pickup
Fig. 1. The VIC’s controls,
physical structures
and accessories
1
0
9
11
12 3
6
7
8
4
5
FACEPLATE
12
1
3
14