
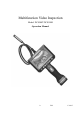
User's Manual


8 V0.2 131015
to take a picture; when Auto Capture is ON, unit will detect image changes and pictures will
be taken and saved automatically if any changes detected)
d. Press to record video clips (press the shoot key can do the same function), a red indicator will
be displayed on screen, and clips will be saved in internal memory or SD card.
e. Press key to show switch function. Every press, the screen will switch between 4:3 and 16:9
f. Press to zoom in from x1 to x4.0. The magnification increase by 0.5 and will be displayed on
screen.
g. Press to zoom out, the corresponding magnification will be displayed on screen; no
magnification will be displayed when the magnification is x1.
h. Press MENU to configure menu options
i. Press to enter playback mode(message will show up if no files found)
j. Press and hold for 3 seconds to turn off.
Tips: A folder named “YCKC” will be created in the internal memory or TF card in which the product
will create a sub-folder named as the current date. Videos and photos captured for the day
will be saved in this folder.
Warning: DO NOT remove the SD card while system is working (especially while recording and
transferring files with computers), doing so may result in damage to stored files and SD card.
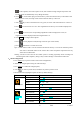
3、Menu Configuration
a. Press MENU key in preview mode to enter menu configurations;
b. Select to be changed options using the 4 direction keys;
c. Press MENU to confirm the changed option;
d. Press to return to parent menu, and all the way back to preview mode.
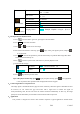
e. Menu Instructions (highlighted options are factory default settings)
Menu Submenu Options
Auto Capture
Auto Capture ON;OFF
Master Ch. Photo 1;Photo 3;Movie 5s;Movie 10s
Range 1/1;1/4;1/16
Timeslot 1s;3s;5s
Sensitivity Low;Middle;High
Advanced
Setting
Movie Size QVGA;D1
File OverWrite ON;OFF
TV Output NTSC;PAL
LCD Bright LOW;NOR-;NOR;NOR+;HIGH
Format Yes; No
Set to Default Yes; No