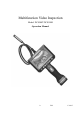
Multifunction Video Inspection Model: DCS500T/DCS500R Operation Manual 0 V0.
Multifunction Video Inspection Model:DCS500T/DCS500R Overview DCS500T/DCS500R Multifunction video inspection has been designed as a user friendly and economical way of solving hidden problems and increasing productivity. (eg. Inspect vent pipe and system of air conditioner, machine equipment, engine and so on). The product has a high clarity color LCD of 5 ’’ size.
electrical shock and damage to the product. ●Do not use this device for personal or medical use. ●The unit is not shock-resistant. Do not use it as a hammer or drop it. Battery precautions ● Please use the standard factory power adapter, otherwise will destroy the inside battery. ● Please completely exhaust the power for the first time. And we recommend full charging and full discharging for the first three times. And the charging time should not less than 5 hours.
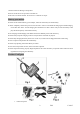
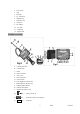
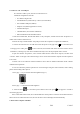
2.LCD screen 3.Grip 4.Hook tip 5.45°Mirror tip 6.Magnetic tip 7.Protection cap 8、CD Driver 9、DC adapter 10、TV cable 11、USB cable 12、Signal cable Product overview A.Camera protection B.Camera head C.Probe D.Probe connector E.TFT screen F.Power indication G.Power button H.LED brightness increase key I.LED brightness decrease key J.Charging light indicator K.build-in microphone L.Plughole protection cover M. key——left key/zoom out N. key——upward key/video recording key O.MENU key——menu key 3 V0.
P. key——downward key/camera key Q. key——right key/zoom in R. key——screen display switch/ return key S.Tripod nut T.build-in microphone U.Charging interface V.signal interface W.TV output socket X.USB socket Y.Micro SD socket Z.reset pin hole Screen Keys Instructions Key Preview Mode Playback Mode switch to playback mode; press and hold switch to playback mode, press and hold for 3 seconds to power for 3 seconds to power off the unit off the unit the screen display browse files in grid view, press
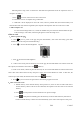
●Connect the grip unit to camera probe The inspecting grip must be connected to the camera probe. To connect the probe, make sure the keyed ends are properly aligned. (Fig7). Once they are aligned, finger tighten the nut. Note: The probe can’t be connected after the unit is on. Before connecting the probe, be sure the unit is off, in case of the current harms the unit. ●Accessories installation The unit uses accessories for 9mm probe shown in Fig.2.
● Connect to a PC via USB port KC-250 has a USB 2.0 port, and can be connected to a PC. Minimum configuration of the PC: • P4 1.4GHz or higher CPU • 256 MB RAM of system memory or above (recommended) • One available USB port (USB2.0) • Graphics Card (Must support Direct X 9.0c) • 1GB Free HD Space • CD-ROM Drive (For software installation) • Microsoft Windows XP/Vista/Win7/Win8 1.
Following below steps, users are allowed to download and upload files from the inspection unit to a computer via USB 2.0: 1. Press on screen on the screen to turn on the screen. 2. Connect the screen to a computer using a USB cable. 3. “USB Disk” will be displayed on the LCD screen, and two portable disk (the internal memory and external Micro SD card) will be recognized by the computer. The inspection unit now works as an U-disk.
to take a picture; when Auto Capture is ON, unit will detect image changes and pictures will be taken and saved automatically if any changes detected) d. Press to record video clips (press the shoot key can do the same function), a red indicator will be displayed on screen, and clips will be saved in internal memory or SD card. e. Press key to show switch function. Every press, the screen will switch between 4:3 and 16:9 f. Press to zoom in from x1 to x4.0. The magnification increase by 0.
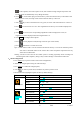
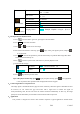
Disk Information Set Time/Date Free ****MB Total ****MB FW Version Ver *.** UI *.** Set Time/Date YY/MM/DD Photo TimeStamp On;Off Moive TimeStamp On;Off Off Delay Never;5min;15min;30min Language Select English;Français;Español;Português;简体中文 Language Select 4、File Operations in Playback Mode a. Press to browse files in grid view, press again to browse folders. b. Press MENU to view files or folders. c. Press or to view last or next image. d.
inspection, automobile inspection, circuitry, vessel and aircraft inspection. While in operation, the product is easy to extend ahead. If there is a distance limitation, the accessories could be applied to pick up rings or screws on the floor. ● Operation Precautions: a. Please read the safety instructions carefully, choose desirable work area for fear causing danger. b. The probe is flexible to help you operate in hard-to–reach areas. Please don’t insert or bend by force..
●If the tool couldn’t work well after turning it on. Please stop use and have the unit checked by a qualified technician. ●Store idle product out of reach of children and other untrained persons. The tool is dangerous in the hands of untrained users. ●Maintain the inspection tool with care. If the tool is dropped, check for the breakage ,which may affect the tool’s operation. If it is damaged, have the tools serviced before using. Many accidents are caused by poorly maintained products.
Trouble Shootings Problems Causes Solutions Adapter didn’t connect well Please check and try again. with the product. The connect or or cable is broken. Replace and try again. Can’t charge. The working temperature of Charge after the temperature is down. battery is so high (indication is when plug in the adapter, the red and green LED on at the same time) . The screen is on but without image or shows “No Signal” 1、the grip power is off Check and open the grip power 2、The probe is loosed.
Support camera head assembly specifications (not included) Probe accessories KC12AV4 KC05AV3 KC23AV KC12AV5 The probe connection head for choice (not included) Probe and camera head protection Light source Image display Image resolution LCD Resolution Image zooming TV output format magnet, hook, mirror and screw thread protector The assembly of Φ12mm camera head The assembly of Φ 5.
● We are not responsible for any damage resulting from abrasion, water, dropping or disassembling Tips:Most parts of the product could be recycled, please refer to your local regulations for disposing of them instead of throwing into the dustbin. 14 V0.