WK2017SD USER’S MANUAL pH, ORP, CONDUCTIVITY, TDS, SALT AND DO METER WITH DATALOGGING SD CARD Please read this manual carefully and thoroughly before using this product.
TABLE OF CONTENTS Introduction . . . . . . . . . . . . . . . . . . . . . . . . . . . . . . . . . 3 Key Features . . . . . . . . . . . . . . . . . . . . . . . . . . . . . . . . 4 Operating Instructions . . . . . . . . . . . . . . . . . . . . . 4 – 16 What’s in the case . . . . . . . . . . . . . . . . . . . . 4 – 5 Setup . . . . . . . . . . . . . . . . . . . . . . . . . . . . . . . 6 – 8 Calibrating a pH Electrode . . . . . . . . . . . . . . 8 – 9 Calibrating the Conductivity/ TDS/Salt Probe. . . . . . . . .
INTRODUCTION Thank you for purchasing General Tools & Instruments’ WK2017SD pH, ORP, Conductivity, TDS, Salt and DO Meter with Datalogging SD Card. Please read this user’s manual carefully and thoroughly before using the instrument. The WK2017SD is a general purpose handheld instrument capable of measuring the pH, oxidation-reduction potential (ORP) or conductivity of a solution, as well as its TDS (total dissolved solids), DO (dissolved oxygen) or salt content.
KEY FEATURES • Measures pH, ORP and conductivity, and TDS, salt and DO content using included and optional electrodes and probes • Measured parameter can be changed by pressing front-panel buttons • DO measurements can be compensated for salt, altitude and temperature • Also measures oxygen content of a volume of air • Optional ATC probe automatically temperature-compensates pH electrode • Displays maximum and minimum readings • Performs real-time automatic datalogging at sampling time settable from 1 secon
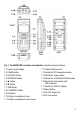
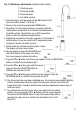
TOP FRONT BOTTOM RIGHT SIDE BACK Fig. 1.
SETUP 1. Choose the power source. Before using the WK2017SD, be sure it is powered by fresh batteries or an optional 9VDC AC adapter plugged into the bottom jack on its right side (callout 1-15). To remove the battery compartment cover, remove the two screws holding it in place (callout 1-11). Then install six “AA” batteries in the correct orientation, using the polarity marks on the inside of the compartment as a guide. Replace the cover by replacing the two screws. 2. Install an SD card.
above “mm” flashing. Use the ▼ or ▲ button to navigate to the current month and press the REC/ENTER button to store the setting. When the next screen flashes the value above “dd”, again use the ▼ or ▲ button to navigate to the current day and press the REC/ENTER button to store the setting. Once you have set the date, the display will prompt you to set the hour, minute and second of the current time.
11. Compensate for altitude in metric units when operating in DO measurement mode. The default value is 0 meters (sea level). The level is adjustable from 0 to 8,900 meters. Once the salt compensation level has been set and stored, the lower portion of the display will show the term “High-”. Press the ▼ or ▲ button repeatedly until the value above “High-” reflects your altitude in meters. Press the REC/ENTER button to store the setting. 12.
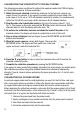
Fig. 2. Calibrating a pH electrode using the buffer solution 2-1 Electrode plug 2-2 Electrode handle 2-3 Electrode head 2-4 pH buffer solution 1. Insert the plug of a pH electrode into the BNC socket at the top of the meter (callout 1-16 of Fig. 1). 2. Power on the meter by pressing the POWER button. 3. Using Step 15 of the setup procedure, manually adjust the compensation temperature so it matches the temperature of the buffer solution.
CALIBRATING THE CONDUCTIVITY/TDS/SALT PROBE The following procedure is sufficient to calibrate the supplied conductivity/TDS/salt probe so it accurately measures all three parameters. 1. Obtain the correct standard conductivity solution(s) for the full-scale range(s) you expect to use. For example, if you expect to measure conductivity values using a fullscale range of 2 mS, use a 1.413 mS standard conductivity solution.
Fig. 3. How to fill an oxygen probe’s head with electrolyte PROBE PLUG Fig. 3 PROBE HANDLE Fig. 4 PROBE-FILLING ELECTROLYTE To calibrate an oxygen probe, use the following procedure while referring to Figures 1 and 4. Fig. 4. An oxygen probe’s main components 4-1 — Probe plug 4-2 — Probe handle 4-3 — Temperature-sensing metal 4-4 — Probe cap 4-5 — Probe head protective cover 1. Plug the probe plug into the DO probe socket (callout 1-14 of Fig. 1) on the top of the meter. 2.
NORMAL OPERATION The WK2017SD can operate in any of four measurement modes, selectable by pressing the ▼ button (which has the word “Function” stenciled above it). Pressing the button repeatedly cycles through the modes and produces the following on-screen text: • PH (for measuring the pH or ORP of a solution) • Cd (for conductivity and TDS measurements) • SALt (for measuring the salt content of a solution by weight) • do (for dissolved oxygen measurements) 1.
4. To measure the conductivity of a solution, power on the meter and press the ▼ button until the display shows the term “Cd”. Plug the conductivity/TDS/salt probe into its dedicated socket (callout 1-15 of Fig. 1) on the top of the meter.
7. To measure the DO content of a liquid, power on the meter and press the ▼ button until the display shows the term “do”, indicating operation in DO measurement mode. Then—after making sure that the optional oxygen probe you have obtained is full of fresh electrolyte and has been recently calibrated—remove the protective cover from the probe head and plug the probe into its dedicated socket on the top of the meter (callout 1-14 of Fig. 1). To make the DO content measurement, do the following: 1.
HOLDING AND STORING MEASUREMENTS 1. To hold a measured value of any parameter, press the HOLD/ESC button during the measurement. Doing so will cause the word “HOLD” to appear at the top of the display. Pressing the HOLD/ESC button again releases the hold. 2. To record and recall readings, press the REC/ENTER button while making measurements. This will make the term “REC” appear at the top of the display.
5. To change the storage location of manually logged data, press the ▼ button once; this causes the “P” to disappear from the left side of the display and the value on its line to begin flashing. Once the flashing begins, you can use the ▼ and ▲ buttons to change the flashing value to any number between 1 and 99. Once you have chosen the storage location, press the REC/ENTER button to save the setting. This causes the value to stop flashing and the “P” to return. Fig. 5. Typical Excel data-only screen 6.
SPECIFICATIONS Embedded microcontroller Display type Display size Parameters measured Measurement range Measurement accuracy Measurement resolution Temperature compensation Storable/recallable readings Datalogging sampling time SD card capacity Settable parameters Operating temperature Operating relative humidity Power source Power consumption Dimensions of meter Weight of meter Custom one-chip LSI device Liquid-crystal with green backlight 2.05 x 1.5 in.
MAINTENANCE & TROUBLESHOOTING TIPS Keep all probes and electrodes clean and protected from the elements when not in use. When a pH electrode is not being used, General recommends keeping its head inserted in the bottle of pH buffer solution. When the icon appears in the left corner of the display, it’s time to replace the six “AA” batteries that power the instrument (although measurements will remain valid for several hours after the low-battery indicator first appears).
WARRANTY INFORMATION General Tools & Instruments’ (General’s) WK2017SD pH, ORP, Conductivity, TDS, Salt and DO Meter with Datalogging SD Card is warranted to the original purchaser to be free from defects in material and workmanship. Subject to certain restrictions, General will repair or replace this instrument if, after examination, the company determines it to be defective in material or workmanship for a period of one year.
GENERAL TOOLS & INSTRUMENTS 80 White Street New York, NY 10013-3567 PHONE (212) 431-6100 FAX (212) 431-6499 TOLL FREE (800) 697-8665 e-mail: sales@generaltools.com www.generaltools.com WK2017SD User’s Manual Specifications subject to change without notice ©2010 GENERAL TOOLS & INSTRUMENTS NOTICE - WE ARE NOT RESPONSIBLE FOR TYPOGRAPHICAL ERRORS.