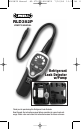
RLD382P Manual -6P-071008:RLD382P 7/10/08 11:32 AM RLD382P USER’S MANUAL Refrigerant Leak Detector w/Pump Thank you for purchasing this Refrigerant Leak Detector. Read through the instruction manual before operation for correct and safe usage. Please store and retain this instruction manual for future reference.
RLD382P Manual -6P-071008:RLD382P 7/10/08 FEATURES: This Refrigerant Leak Detector is the perfect tool for maintaining airconditioning, or cooling systems with a compressor and refrigerant. This unit uses a newly developed semi-conductor sensor, which is extremely sensitive to a wide variety of general refrigerants.
RLD382P Manual -6P-071008:RLD382P 7/10/08 11:32 AM DISABLE AUTO POWER OFF: Press and Hold “Hi” button then power on the meter. Warm-Up TIME: Approximately 45 seconds Operating Temperature & Humidity: 32° to 104°F (0° to 40°C), < 80% RH STORAGE TEMPERATURE & HUMIDITY: 14° to 140°F (-10° to 60°C), < 70% RH ALTITUDE: < 6500' (2000m) OPERATING GUIDE: 1. The refrigerant leak detector unit is not equipped with anti-explosive designs and measures.
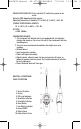
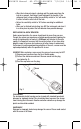
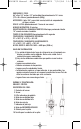
RLD382P Manual -6P-071008:RLD382P 7/10/08 LED LEAK INDICATOR DEFINITION: Base Concentration Indication More Highest Concentration Indication GETTING STARTED: INSTALLING BATTERIES • Loosen the screw and remove the battery compartment door located on the bottom of the instrument as shown below (Fig.1). • Install 4 “AA” batteries. • Reinstall the battery cover by aligning it with the handle. When the batteries are nearing the end of their useful life, the Red LED Low Battery indicator will illuminate.
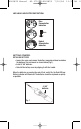
RLD382P Manual -6P-071008:RLD382P 7/10/08 11:32 AM AUTOMATIC AMBIENT RESET FEATURE: The Refrigerant leak detector features an Automatic Ambient Reset function that sets the unit to ignore ambient concentrations of refrigerant. • Automatic Ambient Setup - Upon initial power on, the unit automatically sets itself to ignore the level of refrigerant present at the tip. Only a level, or concentration greater than this will cause an alarm.
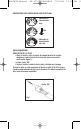
RLD382P Manual -6P-071008:RLD382P 7/10/08 OPERATING PROCEDURE: WARNING! Do not operate this instrument in the presence of gasoline, natural gas, propane, or in other combustible atmospheres. • HOW TO FIND LEAKS NOTE: A sudden whipping of the leak detector probe or “blowing” into the sensor tip will affect the air flow over the sensor and cause the instrument to alarm. (1) POWER-UP KEY: The “ON/OFF” key turns the Refrigerant Leak Detector instrument ON or OFF and is also the reset function.
RLD382P Manual -6P-071008:RLD382P 7/10/08 • When the instrument signals a leakage, pull the probe away from the leak for a moment, then bring it back to pinpoint the location. If the refrigerant leak is large, setting the sensitivity switch to “Lo” will make it easier to find the exact site of the leak. • Return the sensitivity switch to “Hi” before searching for additional leaks.
RLD382P Manual -6P-071008:RLD382P 7/10/08 11:32 AM RLD382P MANUAL DEL PROPIETARIO DETECTOR DE PÉRDIDAS DE REFRIGERANTE CON BOMBA INFORMACIÓN GENERAL Gracias por comprar este detector de fugas de refrigerante. Lea cuidadosamente el manual de instrucciones antes de la operación para lograr un uso seguro y correcto. Guarde y conserve este manual de instrucciones para consultarlo en el futuro.
RLD382P Manual -6P-071008:RLD382P 7/10/08 11:32 AM DIMENSIONES / PESO: 6.8" alto x 2.6" ancho x 2.2" profundidad. Aproximadamente 14.1 onzas (173 x 66 x 56 mm) aproximadamente (400 g) ACCESORIOS: 4 pilas “AA”, manual del usuario, botella de comprobación de fugas, estuche VIDA DE LA PILA: Aproximadamente 7 horas de uso normal APAGADO AUTOMÁTICO: 10 minutos DESACTIVACIÓN DEL APAGADO AUTOMÁTICO: Mantenga presionado el botón “Hi” cuando enciende el medidor.
RLD382P Manual -6P-071008:RLD382P 7/10/08 DEFINICIÓN DEL INDICADOR LED DE FUGA: Indicación de concentración base Más Indicación de concentración más alta PARA EMPEZAR: CÓMO INSTALAR LAS PILAS • Afloje el tornillo y retire la puerta del compartimiento de las pilas ubicado en la parte inferior del instrumento como se muestra a continuación (figura 1). • Instale 4 pilas “AA”. • Vuelva a instalar la cubierta de las pilas y alinéela con el mango.
RLD382P Manual -6P-071008:RLD382P 7/10/08 11:32 AM FUNCIÓN DE RESTABLECIMIENTO AMBIENTAL AUTOMÁTICO: El detector de fugas de refrigerante presenta una función de restablecimiento ambiental automático que ajusta la unidad para que ignore las concentraciones ambientales de refrigerante. • Ajuste ambiental automático - Al encender el detector, la unidad se ajusta automáticamente para ignorar el nivel de refrigerante presente en la punta. Sólo un nivel o concentración mayor desencadenarán una alarma.
RLD382P Manual -6P-071008:RLD382P 7/10/08 11:32 AM Nivel de sensibilidad bajo (LED verde) Nivel de sensibilidad medio (LED naranja) Nivel de sensibilidad alto (LED rojo) PROCEDIMIENTO DE OPERACIÓN: ¡ADVERTENCIA! No opere este instrumento en presencia de gasolina, gas natural, propano, u otras atmósferas combustibles.
RLD382P Manual -6P-071008:RLD382P 7/10/08 11:32 AM 3) VERIFIQUE EL ESTADO DE LA UNIDAD Y DEL SENSOR: • Ajuste el nivel de sensibilidad a “Hi” (Alto). • Destape la botella de comprobación de fugas y acérquela lentamente a la boquilla de la sonda de acero inoxidable. • La indicación deberá subir de bajo a alto. Luego aleje la botella de comprobación y el LED deberá volver a apagarse. Esto demuestra que la unidad está funcionando.
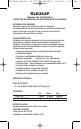
RLD382P Manual -6P-071008:RLD382P 7/10/08 Protector del sensor Sensor Fig. 2 LIMPIEZA: La caja de plástico del instrumento se puede limpiar con detergente doméstico estándar o con alcohol isopropílico. Se deberá tener cuidado para evitar que el limpiador entre al instrumento. La gasolina y otros disolventes pueden dañar el plástico, por lo tanto se deberán evitar. ¡ADVERTENCIA! El detergente o el alcohol isopropílico pueden dañar el sensor. Evite en todo momento el contacto con el sensor.
RLD382P Manual -6P-071008:RLD382P 7/10/08 RLD380L MODE D’EMPLOI DÉTECTEUR DE FUITE DE FLUIDE FRIGORIGÈNE AVEC POMPE GÉNÉRALITÉS Merci d’avoir acheté ce détecteur de fuite de réfrigérant. Pour assurer un usage correct et sans danger, lire tout le mode d’emploi avant utilisation. Veiller à conserver ce manuel pour toute consultation ultérieure.
RLD382P Manual -6P-071008:RLD382P 7/10/08 11:32 AM ACCESSOIRES : 4 piles AA, Mode d’emploi, flacon de contrôle de fuite, étui de transport AUTONOMIE DES PILES : 7 heures d’utilisation normale environ ARRÊT AUTO : 10 minutes DÉSACTIVER LA FERMETURE AUTOMATIQUE Appuyez et tenez enfoncé le bouton d'alimentation « Hi » sur l’instrument de mesure.
RLD382P Manual -6P-071008:RLD382P 7/10/08 INDICATIONS DES VOYANTS DE FUITE : Indication de la concentration de base Plus Indication de la concentration la plus élevée POUR DÉMARRER : MISE EN PLACE DES PILES • Desserrer la vis et enlever le couvercle du compartiment des piles situé au bas de l'appareil, comme représenté ci-dessous (Fig.1). • Placer 4 piles AA. • Remettre le couvercle des piles en place en l’alignant avec la poignée.
RLD382P Manual -6P-071008:RLD382P 7/10/08 11:32 AM FONCTION DE RÉINITIALISATION AMBIANTE AUTOMATIQUE : Le détecteur de fuite de réfrigérant comporte une fonction de réinitialisation ambiante automatique, qui règle l’appareil de manière à ignorer les concentrations ambiantes de réfrigérant. • Configuration de la fonction ambiante automatique – Lors de la mise sous tension, l’appareil se règle automatiquement pour ignorer la concentration en réfrigérant au niveau de l’embout.
RLD382P Manual -6P-071008:RLD382P 7/10/08 Niveau de sensibilité faible (DEL verte) Niveau de sensibilité moyen (DEL orange) Niveau de sensibilité élevé (DEL rouge) PROCÉDURE D’UTILISATION : AVERTISSEMENT ! Ne pas utiliser cet appareil en présence d’essence, de gaz naturel, de propane ou autre atmosphère combustible.
RLD382P Manual -6P-071008:RLD382P 7/10/08 11:32 AM (3) VÉRIFIER L’ÉTAT DE L’APPAREIL ET DU CAPTEUR : • Régler le niveau de sensibilité sur « Hi ». • Ouvrir le capuchon du flacon de contrôle de fuite et le rapprocher lentement de l’embout de la sonde flexible. • L’affichage doit passer du niveau faible au niveau élevé. Éloigner ensuite le flacon de contrôle et l’affichage doit revenir à zéro. Ceci montre que l’appareil est en bon état de marche.
RLD382P Manual -6P-071008:RLD382P 7/10/08 AVERTISSEMENT ! Lors du remplacement du capteur neuf, le capteur usagé peut être CHAUD !! (1) Déposer le capuchon conique de l’embout de la sonde flexible. (2) Extraire le capteur usagé et introduire le capteur neuf dans la fiche (voir Fig. 2 ci-dessous). (3) Remettre le capuchon sur l’embout. Protège-capteur Capteur Fig. 2 NETTOYAGE : Le boîtier en plastique de cet appareil se nettoie avec un détergent ménager courant ou avec de l’alcool isopropylique.
RLD382P Manual -6P-071008:RLD382P 7/10/08 11:32 AM NOTES __________________________________________________________ __________________________________________________________ __________________________________________________________ __________________________________________________________ __________________________________________________________ __________________________________________________________ __________________________________________________________ _______________________________________
RLD382P Manual -6P-071008:RLD382P 7/10/08 11:32 AM __________________________________________________________ __________________________________________________________ __________________________________________________________ __________________________________________________________ __________________________________________________________ __________________________________________________________ __________________________________________________________ _____________________________________________
RLD382P Manual -6P-071008:RLD382P 7/10/08 GENERAL TOOLS & INSTRUMENTS™ 80 White Street, New York, NY 10013-3567 PHONE (212) 431-6100 FAX (212) 431-6499 TOLL FREE (800) 697-8665 e-mail: sales@generaltools.com www.generaltools.com RLD382P User’s Manual Specifications subject to change without notice ©2008 GENERAL TOOLS & INSTRUMENTS™ NOTICE - WE ARE NOT RESPONSIBLE FOR TYPOGRAPHICAL ERRORS.