RGR150 manual-FINAL-091908:Layout 1 9/19/08 8:59 AM RGR150 USER’S MANUAL Wireless Rain Gauge with Thermometer and Clock INTRODUCTION Thank you for selecting this Wireless Rain Gauge. This device monitors and displays rainfall data along with the indoor/outdoor temperature from up to three remote locations. Please read and follow the manual carefully.
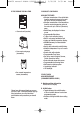
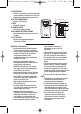
RGR150 manual-FINAL-091908:Layout 1 IN THIS PACKAGE YOU WILL FIND: CH PM • One main unit (receiver) • One remote rain gauge (transmitter) 4 3 3 M H z W I R E L E S S 3 THERMO – SENSOR • One remote temperature sensor (transmitter) 9/19/08 8:59 AM PRODUCT OVERVIEW MAIN UNIT FEATURES • Wireless transmission of the rainfall data from the remote rain gauge to the main unit up to 100 feet (30 meters) away • Wireless transmission of the temperature from the remote temperature sensor to the main unit
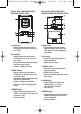
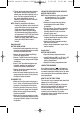
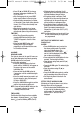
RGR150 manual-FINAL-091908:Layout 1 9/19/08 8:59 AM Page 3 FRONT VIEW (MAIN RECEIVER UNIT) (RAIN MODE CONTROL PANEL) REAR VIEW (MAIN RECEIVER UNIT) (TIME AND TEMPERATURE CONTROLS PANEL) C. MODE button • Toggles between the rainfall modes – for the past hour, 24 hours, and for the past 7 days H. MODE button • Toggles between four clock modes – time with seconds, time with the day of the week, Time Zone programming and calendar D.
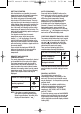
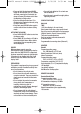
RGR150 manual-FINAL-091908:Layout 1 M. CHANNEL button • Recalls a different channel of the remote temperature • Enables remote temperature channels auto scanning feature N. SNOOZE/LIGHT button • Enables backlight for 5 seconds • Stops any alarm temporarily 9/19/08 8:59 AM A. Rain gauge bucket Holds all rain gauge components B. Knob Secures the top on the rain gauge bucket C. Rain gauge bucket feet Allow securing the rain gauge on its place REMOTE RAIN GAUGE O.
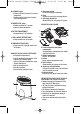
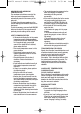
RGR150 manual-FINAL-091908:Layout 1 9/19/08 8:59 AM Page 5 A. LED INDICATOR • Flashes once when the remote temperature sensor transmits a reading to the main unit. • Flashes twice when battery power is low. B. BATTERY COMPARTMENT • Holds 2 “AA” batteries C. RESET • Resets all readings D. CHANNEL SWITCH • Selects the desired channel E. WALL-MOUNT RECESSED OPENING • Keeps the remote temperature sensor on the wall F.
RGR150 manual-FINAL-091908:Layout 1 4. Though the remote temperature sensors are weather-resistant, they should be placed away from direct sunlight, rain or snow. The best suggested location for the remote temperature sensor for outdoors is under the eave on the north side of the building. NOTE: When the temperature falls below freezing, the batteries in the remote rain gauge and outdoor remote temperature sensor may have reduced voltage supply and a shorter effective range.
RGR150 manual-FINAL-091908:Layout 1 GETTING STARTED After the batteries are installed; the remote temperature sensor will transmit temperature readings at about 45 second intervals. The remote rain gauge will transmit rainfall data at about 183 second intervals. The main unit may take up to two minutes to receive the initial readings. Upon successful reception, the rainfall reading (0.00) will appear on the top line of the main unit’s display and the remote temperature will appear on the line below.
RGR150 manual-FINAL-091908:Layout 1 MAXIMUM AND MINIMUM TEMPERATURE The maximum and minimum record of the indoor and remote temperatures will be automatically stored in the memory of the main unit. To display the minimum, maximum or the current reading press MEMORY button on the back panel. To clear the memory, press and hold MEMORY button on the back for two seconds and all previously stored readings will be erased.
RGR150 manual-FINAL-091908:Layout 1 • Press UP (▲) or DOWN (▼) to change language. Languages available are DE, FR, IT, SP & EN. • After the language is set, press MODE button again to move to the next value • Continue setting temperature (in Celsius or Fahrenheit,) year, month, date, calendar format, (12 or 24 hour time format) hour and minutes. • After the last parameter is set, press MODE for the last time to return to the default mode (time of day with seconds).
RGR150 manual-FINAL-091908:Layout 1 • Press and hold the back panel ALARM button for two seconds. The “30” number will flash, meaning that if selected, the alarm will sound 30 minutes earlier than the Weekday or Single alarm. • Enter the desired minutes from 15 to 90 minutes in 15 minutes intervals, using UP (▲) or DOWN (▼). • Press back panel ALARM button again to confirm and exit from the alarm setting mode. ACTIVATING THE ALARM • Press ALARM ON/OFF button to enter into the alarms mode.
RGR150 manual-FINAL-091908:Layout 1 REMOTE TEMPERATURE SENSOR Remote Temperature Proposed operating range with alkaline batteries: -4.0º to 158ºF (-20.0º to 70.0ºC) Proposed operating range with lithium batteries: -38.0º to 158ºF (-38.8º to 70.0ºC) Temperature resolution: 0.2ºF (0.
RGR150 manual-FINAL-091908:Layout 1 9/19/08 GENERAL TOOLS & INSTRUMENTS™ 80 White Street, New York, NY 10013-3567 PHONE (212) 431-6100 FAX (212) 431-6499 TOLL FREE (800) 697-8665 e-mail: sales@generaltools.com www.generaltools.com RGR150 User’s Manual Specifications subject to change without notice ©2008 GENERAL TOOLS & INSTRUMENTS™ NOTICE - WE ARE NOT RESPONSIBLE FOR TYPOGRAPHICAL ERRORS.