4-IN-1 PIN/PAD RH MOISTURE METER USER’S MANUAL MMH800 Please read this manual carefully and thoroughly before using this product.
TABLE OF CONTENTS Introduction . . . . . . . . . . . . . . . . . . . . . . . . . . . . . . . . 3 – 4 Key Features . . . . . . . . . . . . . . . . . . . . . . . . . . . . . . . . . . 5 What’s in the Case . . . . . . . . . . . . . . . . . . . . . . . . . . . . . 5 Product Overview . . . . . . . . . . . . . . . . . . . . . . . . . . . 6 – 7 Setup Instructions . . . . . . . . . . . . . . . . . . . . . . . . . . . . . 7 Install Battery . . . . . . . . . . . . . . . . . . . . . . . . . . . . . . . .
INTRODUCTION Thank you for purchasing General Tools & Instruments’ MMH800 4-in-1 Pin/Pad RH Moisture Meter. Please read this user’s manual carefully and thoroughly before using the meter. The MMH800 is designed for use in woodworking, water damage restoration, building construction and home renovation.
However, for hard materials like wood or concrete, the meter’s readings mostly represent surface moisture content because: 1) Moisture close to the surface has a greater effect on a reading than moisture deep below it; and 2) The factory-installed pins of the MMH800 are only 0.2 in. (5mm) long and cannot be driven deep into a hard material.
KEY FEATURES • Pin (intrusive measurement of moisture content) and pad (non-intrusive measurement of surface moisture) sensors • Separate 3-digit displays of moisture level and temperature + humidity • Selectable wood or building materials measurement mode • °F/°C unit selection • Wide measurement range and high accuracy • Audible and visual indications of high, medium and low moisture levels • Holds moisture level readings for convenient viewing later • Pin cover doubles as calibration checker • Auto power
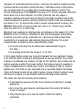
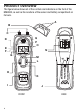
PRODUCT OVERVIEW The figure below shows all of the controls and indicators on the front of the MMH800, as well as the locations of the sensor and battery compartment on its back.
A. Calibration holes B. Protective cover C. Replaceable test pins D. low/medium/highmoisture level icon (high moisture shown) E. Wood icon F. Building materials icon G. Beeper enabled icon H. Dual function button: Power on/off (press and hold for >3 seconds); Backlight on/off (press briefly) I. Temperature and humidity split-screen display J. Battery compartment cover K. Dual function button: Beeper on/off (press and hold for >3 seconds); Moisture reading hold/release (press briefly) L.
OPERATING INSTRUCTIONS To power on the meter, press the button and hold it for at least three seconds. (To power off the meter, follow the same instruction.) MEASURING MOISTURE LEVEL To measure the moisture level of wood or a building material, first make sure that its icon appears on the left side of the display. If it does not, press the button briefly to toggle between wood and building materials.
Some measurement tips: 1. To locate the source of a leak behind wood, plaster, drywall or a ceiling, make measurements at different locations. The leak is where the meter displays the highest reading. 2. Never use force to drive the test pins into a hard surface. 3. When measuring the moisture level of soil, surface readings will be lower than readings with the test pins deep in the soil.
CHECKING CALIBRATION As mentioned earlier, the meter is factory-calibrated for measuring the moisture level of wood and building materials on different scales. To check the calibrations, remove the protective cap from the top of the meter, taking care not to stab yourself with the two sharp pins beneath it. Then flip the cap over and place the two holes in its top over the meter’s two test pins. The upper display should read 17.5% ±3% with the meter in wood measurement mode and 16.
MAINTENANCE TIPS The battery charge icon at the upper right of the display shows two bars when the voltage of the installed battery is between 7.25 and 9V. When the charge drops to between 6.3 and 7.25V, the icon will show only one bar on the right, like this: When the battery charge drops below 6.3V: 1) the last bar of the icon will begin flashing, 2) the beeper will sound repeatedly, and 3) the unit will automatically power itself off in 15 seconds.
RETURN FOR REPAIR POLICY Every effort has been made to provide you with a reliable product of superior quality.