PIN-TYPE LED BAR GRAPH MOISTURE METER USER’S MANUAL MM1E Please read this manual carefully and thoroughly before using this product.
TABLE OF CONTENTS Introduction . . . . . . . . . . . . . . . . . . . . . . . . . . 3 – 4 Key Features . . . . . . . . . . . . . . . . . . . . . . . . . . . . . 4 What’s in the Blister Pack . . . . . . . . . . . . . . . . . . 4 Product Overview . . . . . . . . . . . . . . . . . . . . . . . . . 5 Setup Instructions . . . . . . . . . . . . . . . . . . . . . . . . 6 Install Battery . . . . . . . . . . . . . . . . . . . . . . . . . 6 Operating Instructions . . . . . . . . . . . . . . . . . .
INTRODUCTION Thank you for purchasing General Tools & Instruments’ MM1E Pin-Type LED Bar Graph Moisture Meter. Please read this user’s manual carefully and thoroughly before using the meter. The MM1E is designed for applications in woodworking, building construction and home inspection.
The MMD5NP’s front-panel bar graph of 10 LEDs measures %WME (Wood Moisture Equivalent) over two different ranges: 7 to 15%, and 16 to 35%. A slide switch on the back of the meter requires the user to choose the right range for the material under test. The same switch functions as the power switch. Whenever the meter is powered on, the bar graph momentarily indicates remaining battery life.
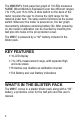
PRODUCT OVERVIEW The figure below shows all of the controls and indicators on the front and the back of the MM1E, as well as the location of the battery compartment on the back.
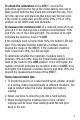
SETUP INSTRUCTIONS INSTALL BATTERY To open the battery compartment, turn the meter over and push the flange on the bottom of the battery compartment cover up with your thumb. Lift and remove the cover and set it aside. Plug the included “9V” battery into the wired socket inside the compartment. The terminals of the battery and the socket mate in only one way, with the smaller male terminal plugging into the larger female terminal. Close the battery compartment by replacing its cover and snapping it shut.
To check the calibration of the MM1E, remove the protective cap from the top of the meter, taking care not to stab yourself with the two sharp pins beneath the cap. Then turn the cap over and place its two holes over the two pins. If the meter is calibrated, an LED at the 20%, 21% or 22% position on the HIGH scale will illuminate. To measure the moisture level of a material, place the test pins on it. If the material has a moisture level between 16% and 35%, one of the LEDs will light.
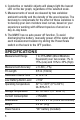
4. Conductive or metallic objects will always light the lowest LED on the bar graph, regardless of the selected scale. 5. Measurements of wood are skewed by two variables: ambient humidity and the density of the wood species. The best way to compensate for the effect of these variables is to develop your own moisture level curves, based on your experience working with different species of wood on a day-to-day basis. 6. The MM1E has no auto power off function.
REPLACEMENT PARTS The only replacement parts available for the MM1E are replacement test pins (Part No. PIND4E). To order, visit www.generaltools.com or call 800-697-8665. WARRANTY POLICY General Tools & Instruments’ (General’s) MM1E Pin-Type LED Bar Graph Moisture Meter is warranted to the original purchaser to be free from defects in material and workmanship for a period of one year.
RETURN FOR REPAIR POLICY Every effort has been made to provide you with a reliable product of superior quality. However, in the event your instrument requires repair, please contact our Customer Service Department. If the product is determined to require repair under the General Tools & Instruments Warranty Policy, you will be issued a Return Goods Authorization.
HIGROMETRO CON FICHA Y BARRA DE GRAFICOS DE DIODO ELECTRO LUMINISCENTE GUIA DEL USUARIO MM1E Por favor lea cuidadosamente esta guía del usuario antes de utilizar éste producto.
CONTENIDO Introducción . . . . . . . . . . . . . . . . . . . . . . 13 – 14 Principales características . . . . . . . . . . . . . . . 14 Contenido del empaque . . . . . . . . . . . . . . . . . 15 Vista general del producto . . . . . . . . . . . . . . . 15 Instrucciones de ajuste . . . . . . . . . . . . . . . . . . 16 Instalación de la batería . . . . . . . . . . . . . . 16 Instrucciones de funcionamiento . . . . . . 16 – 18 Especificaciones . . . . . . . . . . . . . . . . . . . . . . .
INTRODUCCION Gracias por preferir el Higrómetro con ficha y barra de gráficos de diodo electro luminiscente MM1E de General Tools & Instruments. Por favor lea cuidadosamente esta guía del usuario antes de utilizar su higrómetro. El higrómetro MM1E esta diseñado para utilización en madera, materiales de construcción y en la inspección de casas.
no pueden penetrar en un material duro. Para materiales mas suaves como el piso, el papel o polvos, las lecturas van a reflejar el nivel promedio de humedad del material entre la superficie y la profundidad de penetración de las fichas (normalmente no más de 10mm [3/8 de pulgada]). La barra de gráficos frontal del 10LED (diodos electro luminiscentes) del higrómetro MM1E mide el porcentaje WME (Equivalente de humedad de la madera [Wood Moisture Equivalent]) en dos gamas diferentes: De 15%, y de 35%.
CONTENIDO DEL EMPAQUE El higrómetro MM1E viene en un empaque de burbujas de aire en el que se incluye una batería de 9V, una cubierta de protección para las fichas de prueba y ésta guía del usuario. VISTA GENERAL DEL PRODUCTO La siguiente figura muestra los controles e indicadores en el frente y en la parte trasera del higrómetro MM1, así como la ubicación del compartimiento para la batería.
INSTRUCIONES DE AJUSTE INSTALACION DE LA BATERIA Para abrir el compartimiento de la batería, invierta el higrómetro, con su pulgar empuje la pestaña del fondo de la cubierta del compartimiento de la batería. Retire la tapa y colóquela aparte. Introduzca la batería de 9V que se incluye en el soporte dentro del compartimento. Los terminales de la batería y el soporte solo se conectan de una manera, el terminal macho es más pequeño y se inserta en el terminal hembra que es más grande.
Para verificar la calibración del higrómetro MM1E, retire la cubierta de protección de la parte superior del instrumento, teniendo cuidado de no pincharse los dedos con las dos fichas afiladas al retirar la cubierta. Invierta la cubierta e introduzca las fichas del instrumento en los dos orificios de la cubierta. Si el higrómetro esta calibrado, uno de los diodos indicadores de la posición del 20%, 21% o del 22% en la escala ALTA (HIGH) se iluminara.
2. Nunca force las fichas para introducirlas en una superficie dura. 3. Al efectuar mediciones de la humedad del suelo, las lecturas de la superficie serán menores que las lecturas con las fichas introducidas en el suelo. 4. No importa que escala se haya seleccionado, los objetos conductivos o metálicos iluminaran siempre el diodo mas bajo en la barra de gráficos. 5.
ESPECIFICACIONES Gama de medición Precisión de medición Largo de las fichas Punto de verificación de la calibración Nivel de alarma de batería baja Temperatura de funcionamiento Temperatura de almacenamiento Consumo de energía Dimensiones Peso Fuente de alimentación Del 7 al 35% WME (Equivalente de la humedad de la madera [Wood Moisture Equivalent]) en dos escalas: del 7% al 15% (Baja) y del 16% al 35% (Alta) ±1 LED (~1%) 10mm (3/8 de pulgada) 21% ±1% <7.5V De 0° a 60°C (de 32° a 140°F) @<80% R.H.
INFORMACION ACERCA DE LA GARANTIA El higrómetro MM1E con ficha y barra de gráficos de diodos electro luminiscentes de General Tools & Instruments esta garantizado al comprador original contra defectos del material de fabricación o de la mano de obra por un periodo de un año. Bajo ciertas restricciones, General Tools efectuará las reparaciones o reemplazará el producto si, después de un examen, la compañía determina que hay un defecto en el material o en la mano de obra.
PROCEDIMIENTO PARA RETORNO Y RECLAMACION Nos hemos esforzado para proporcionarle un producto fiable de calidad superior.
HUMIDIMÈTRE À POINTES AVEC GRAPHIQUE À BARRES DEL MANUEL DE L’UTILISATEUR MM1E Veuillez lire attentivement tout le manuel avant d’utiliser ce produit.
TABLE DES MATIÈRES Introduction . . . . . . . . . . . . . . . . . . . . . . . 24 – 25 Principales caractéristiques . . . . . . . . . . . . . . 25 Contenu de l’emballage . . . . . . . . . . . . . . . . . 25 Aperçu du produit . . . . . . . . . . . . . . . . . . . . . . 26 Instructions d’assemblage . . . . . . . . . . . . . . . 26 Installation de la pile . . . . . . . . . . . . . . . . . 26 Instructions de fonctionnement . . . . . . . 27 – 29 Caractéristiques techniques . . . . . . . . . . . . . .
INTRODUCTION Merci d’avoir acheté un humidimètre à pointes avec graphique à barres DEL MM1E de General Tools & Instruments. Veuillez lire attentivement tout le manuel avant d’utiliser cet appareil. L’humidimètre MM1E est conçu pour servir pour le travail du bois, la construction de bâtiments et l’inspection de bâtisses.
les lectures vont probablement refléter le degré d’humidité moyen du matériau entre sa surface et la profondeur de pénétration des pointes (normalement bien inférieures à [3/8 po]). Le graphique à barres situé à l’avant du MM1E, doté de 10 DEL, indique le % WME (équivalence en humidité du bois) selon deux échelles différentes : de 7 à 15 % et de 16 à 35 %. L’utilisateur doit choisir quelle échelle choisir selon le matériau à tester.
APERÇU DU PRODUIT La figure ci-dessous montre tous les contrôles et indicateurs présents à l’avant et à l’arrière du MM1E, de même que l’emplacement du compartiment de la pile à l’arrière.
INSTRUCTIONS DE FONCTIONNEMENT Pour mettre en marche l’appareil MM1E, glisser l’interrupteur/ commutateur d’échelle à l’arrière de l’appareil pour qu’il soit en position ÉLEVÉE (HIGH). Ce glissement de l’interrupteur devrait faire allumer quelques DEL ou bien toutes les DEL à l’avant de l’appareil, du bas vers le haut. Si aucune DEL ne s’allume, la pile est probablement à plat et doit être remplacée. Le nombre de DEL allumées correspond à la charge restante de la pile.
Si le degré d’humidité est supérieur à 35 %, la DEL inférieure s’allumera, indiquant ainsi que le degré d’humidité du matériau dépasse la capacité du MM1E. Si le degré d’humidité du matériau est inférieur à 16 %, aucune DEL ne s’allumera. Pour déterminer si le degré d’humidité du matériau se situe entre 16 % et 35 %, glisser l’interrupteur/commutateur d’échelle à l’arrière de l’appareil à la position BASSE (LOW).
6. LE MM1E n’est pas doté d’une fonction d’arrêt automatique. Pour éviter d’épuiser la pile, fermer manuellement l’appareil après chaque session de mesures en glissant l’interrupteur/commutateur d’échelle en position ARRÊT (OFF).
PIÈCES DE REMPLACEMENT Les seules pièces de remplacement pour l’appareil MM1E sont les pointes de test. (pièce n°PIND4E). Pour commander ces pièces, visitez le site www.generaltools.com ou téléphonez au 800-697-8665. INFORMATION SUR LA GARANTIE L’humidimètre à pointes avec graphique à barres DEL MM1E de General Tools & Instruments (General) est garanti pour l’acheteur original contre tout défaut de matériau et de main-d’œuvre pour une période de un an.
POLITIQUE DE RETOUR POUR RÉPARATION Tous les efforts sont faits pour vous offrir un produit fiable de qualité supérieure. Toutefois, si votre instrument nécessite des réparations, veuillez vous adresser à notre service à la clientèle. Si le produit nécessite des réparations en vertu de la politique de garantie de General Tools & Instruments, un numéro d’autorisation de retour sera émis.
GENERAL TOOLS & INSTRUMENTS 80 White Street New York, NY 10013-3567 PHONE (212) 431-6100 FAX (212) 431-6499 TOLL FREE (800) 697-8665 e-mail: sales@generaltools.com www.generaltools.com MM1E User’s Manual Specifications subject to change without notice ©2011 GENERAL TOOLS & INSTRUMENTS NOTICE - WE ARE NOT RESPONSIBLE FOR TYPOGRAPHICAL ERRORS.