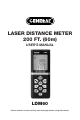
LASER DISTANCE METER 200 FT. (60m) USER’S MANUAL LDM60 Please read this manual carefully and thoroughly before using this product.
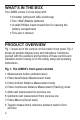
TABLE OF CONTENTS Introduction . . . . . . . . . . . . . . . . . . . . . . . . . . . . . 3 – 5 Key Features . . . . . . . . . . . . . . . . . . . . . . . . . . . . . . . . 6 What’s in the Box . . . . . . . . . . . . . . . . . . . . . . . . . . . . 6 Product Overview . . . . . . . . . . . . . . . . . . . . . . . . . 7 – 9 Safety Instructions . . . . . . . . . . . . . . . . . . . . . . . . . . 10 Setup Instructions . . . . . . . . . . . . . . . . . . . . . . . . . . 10 Install Batteries . . . . . . . . . . .
INTRODUCTION Thank you for purchasing General Tools & Instruments’ (General’s) LDM60 Laser Distance Meter-200 ft. (60m). Please read this user’s manual carefully and thoroughly before using the instrument. The LDM60 is designed to replace a tape measure for professionals such as builders, architects, engineers, surveyors, carpenters, plumbers, painters, electricians, realtors, home inspectors, HVAC system designers and installers, and carpet/flooring installers and salesmen.
• It’s more accurate. Thanks to precision optics, laser devices like the LDM60 can measure the distance between any two points with ±1/16 in. (±1.5mm) accuracy. It’s impossible to get that level of precision from a tape measure that is prone to bending and sagging. What’s more, it’s much easier to read the LDM60’s digital display, which can be held at eye level, than to read a tape measure that needs to be held in a measuring position that makes reading tiny hash marks difficult.
is that the LDM60 can use triangulation to measure the height of a tree or a building without anyone needing to climb it, or the width of a river without anyone needing to cross it. • It’s safer. Because the LDM60 can measure distance from a distance, it takes the risk out of routine but tricky tasks. It’s no longer necessary to stand on a stepladder and reach to measure the height of a ceiling, or to climb a steep and slippery incline to gauge the length of a pipe run.
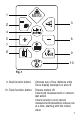
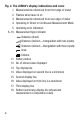
WHAT’S IN THE BOX The LDM60 comes in a box along with: • A holster (soft pouch with a belt loop) • Two “AAA” Alkaline batteries • A small Phillips-head screwdriver for opening the battery compartment • This user’s manual PRODUCT OVERVIEW Fig. 1 shows all of the controls on the meter’s front panel. Fig. 2 shows all possible display icons and indications. Familiarize yourself with the positions and functions of these controls and indicators before moving on to the safety, setup and operating instructions.
MEAS 11 33 22 44 55 66 77 88 99 10 Fig. 1 9. Dual function button: Chooses any of four distance units Turns display backlight on and off 10.
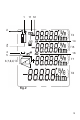
Fig. 2. The LDM60’s display indications and icons 1. Measurements referenced from front edge of meter 2. Flashes when laser is on 3. Measurements referenced from rear edge of meter 4. Operating in Direct or Continuous Measurement Mode 5. Operating error indication 6–10. Measurement type indicator Distance (direct) Distance (indirect—triangulation with two inputs) Distance (indirect—triangulation with three inputs) Area Volume 11. Battery status 12. No. of stored value displayed 13. Top display line 14.
11 12 12 11 11 2 2 28 3 3 4 4 5 5 6,7,8,9,10 6,7,8,9,10 ➤ { u { { { { 13 13 14 14 15 15 16 16 17 17 18 18 Fig.
SAFETY INSTRUCTIONS CAUTION! The meter’s targeting laser is a Class 2M type that emits less than 1 mW of radiation at 660 nanometers. Avoid direct eye contact with the laser, and do not point it at people or animals. Eye protection is normally afforded by the blink reflex. U.S. law prohibits pointing a laser beam at aircraft; doing so is punishable by a fine of up to $10,000 and imprisonment.
While the meter is powered on, any push of any button produces a beep to confirm that some action has taken place (a measurement was made, an operating mode or measurement unit was changed, etc.). The only actions that are not accompanied by a beep are the laser timing out (after 30 seconds of inactivity) for safety reasons and the backlight timing out (after 1 minute of inactivity) to conserve battery charge. The beeper also sounds when the meter automatically powers off after 3 minutes of inactivity.
CHOOSING A MEASUREMENT REFERENCE The LDM60 can reference its measurements from the front edge of the meter or the rear edge. For most distance measurements, choosing the rear edge as the reference produces more-accurate readings. Doing so allows you to hold the bottom of the meter horizontally against one wall of a room, or vertically against the floor, and send the laser beam out the top of the unit toward the opposite wall or the ceiling. However, for continuous distance (tracking) measurements (see p.
CLEARING THE DISPLAY/CANCELLING AN ACTION When pressed briefly, the triple-function button: 1. Works like the “Clear Entry” button on a calculator to clear the last value entered in a calculation sequence 2. Works like the “Undo” command on a computer menu to cancel the last action selected 3. Works like a “Reset” button to “zero-out” individual measurement/calculation values stored in memory (see pp.
MEASURING DISTANCES Direct Measurements To measure the distance to a target: 1. Power on the meter and select a measurement unit, an appropriate measurement reference (in most cases, the rear of the meter) and an appropriate backlight state (on for indoor work, off for outdoor work). 2. If the laser icon (Callout 2 of Fig. 2) is not flashing and the laser pointer is not visible, press the MEAS button to activate the laser.
Fig. 4. A direct distance measurement of 5 feet, 1 and 15/16 inches In direct distance measurement mode, you can display up to four consecutive 15/16 measurements in the order in which they were made. Fig. 5 is a screen shot which shows the values of four direct distance measurements made in top-to-bottom order. Fig. 5.
the wall. The ➤ icon will appear on the display and the meter will sound two beeps and begin to measure the distance from the meter to the wall twice per second. Each measurement will cause the beeper to sound, and the measurements will be shown and continuously updated on the bottom line of the display. At the same time, the second and third display lines continuously update the meter’s minimum and maximum distance from the wall during this measurement session.
Adding and Subtracting Distances The LDM60 has two front-panel buttons that make it easy to add or subtract a distance measurement from an existing measurement, in effect turning the earlier measurement into a baseline. This addition/subtraction function comes in handy when accumulating multiple distance measurements. For example, consider how the meter could speed up the measurements involved in laying out a long brick wall of multiple sections that are not in a straight line.
Fig. 7. A display showing the addition of a 16.325 ft. measurement to a measurement of 2.090 feet ➤ 2.090 16.325 To subtract a measurement from an existing measurement displayed on the bottom line, press the button. The earlier measurement will be moved from the bottom line to the second line and a flashing icon will appear at the left of five dashes (representing the distance value to be subtracted) on the third line.
perpendicular to “B”—one of the distances you can measure. The meter can measure “B” as well as the distance to the top of the building (“C” in the figure), which is the hypotenuse of the right triangle. Once the meter has determined the values of “B” and “C”, it calculates the value of “A” according to Pythagoras’ famous equation: A2 + B2 = C2. C A B Fig. 8. Triangulating a height using two inputs • Triangulation with three inputs.
C1 A1 B1/B2 Fig. 9. Triangulating a height using three inputs C2 A2 A=A1+A2 To measure the height of an object using triangulation with two inputs: 1. First make sure that the line of sight from the meter to the bottom of the object forms a right angle. 2. Use the button to choose the front edge of the meter as the measurement reference. Also make sure the laser is on. 3. Press the button once. A icon will appear on the left side of the display with the hypotenuse flashing. 4.
Fig. 10. A two-input indirect measurement of the height of a tree standing 4.990 meters tall u 7.687 5.846 4.990 To measure the height of an object using triangulation with three inputs: 1. Use the button to choose the front edge of the meter as the measurement reference. Also make sure the laser is on. 2. Press the button twice. A icon will appear on the left side of the display with the upper hypotenuse flashing. 3. Aim the laser at the top of the object and press the MEAS button.
Fig. 11. A three-input indirect measurement of the height of a wall standing 14.27 ft. tall ➤ u 19.54 17.90 19.02 14.27 MEASURING AREAS The LDM60 can calculate the area of a square or rectangular room or space by measuring its length and width and multiplying the two values. To measure an area: 1. Make sure the meter is using its rear edge as the measurement reference and that the laser is on. 2. Press the button once. A icon will appear on the left side of the display with its top line flashing. 3.
Fig. 12. Calculation of the area of a room measuring 16 feet, 3 and 13/16 inches by 9 feet, 6 and 1/2 inches 16 03 9 06 155.65 13/16 1/2 2 MEASURING VOLUMES The LDM60 can calculate the volume of a square or rectangular room or space by measuring its height, depth and width and multiplying the three values. To measure a volume: 1. Make sure the meter is using its rear edge as the measurement reference and that the laser is on. 2. Press the button twice.
5. Move the meter to an adjacent wall of the room or space and hold its rear against that wall. Aim the laser at the opposite wall and press the MEAS button. The distance measured will appear on the third line of the display and the volume of the room or space—in “cubic” units—will appear on the bottom line. The final display will look similar to Fig.13. Fig. 13. Calculation of the volume of a room measuring 3.959 x 2.898 x 5.106 meters 3.959 2.898 5.106 58.
To recall a record, press the button. The value of the first (most recent) measurement or calculation will appear on the bottom line, and a “1” will appear over the icon near the top of the display, below the battery icon. Use the + and — buttons to navigate to the desired record number (Fig. 14). Tip: Pressing the — button when Record #1 is displayed recalls Record #20. 4 Fig. 14. The meter’s fourth most recent measurement or calculation had a value of 6.02 inches 6.
SPECIFICATIONS Measurement Range (indoor) Measurement Accuracy Resolution Display Unit Options Response Time Laser Type, Wavelength, Power Operating Modes Display Memory Splashproof and Dustproof Auto Power Off Auto Laser Off Auto Backlight Off Battery Life Operating Temperature Storage Temperature Power Source Dimensions Weight 26 0.33 to 197 ft. (0.1 to 60m) ±1/16 in. (±1.
OPERATING & MAINTENANCE TIPS Because the laser silently auto powers off after 30 seconds of inactivity while the meter remains powered on, you’ll often find that when you press the MEAS button expecting to make a measurement, all you have done is reactivate the laser. In this case, you have to press the button a second time to take a reading. To minimize the number of times this happens, learn to distinguish the slightly different beeps that accompany making a measurement and activating the laser.
The following errors can be corrected: Code Info 204 Cause Calculation error Info 208/252 Info 220 Info 253 Info 255 Temperature too high Low battery Temperature too low Received signal too weak/ Measurement time too long Received signal too strong (target too reflective) Hardware/uncertainty error Info 256 Error Corrective Measures Repeat the measurement(s) Cool down the meter Change batteries Warm up the meter Use white target plate Use target plate Power the meter off and on Replace the batteries w
WARRANTY INFORMATION General Tools & Instruments’ (General’s) LDM60 Laser Distance Meter 200 ft. (60m) is warranted to the original purchaser to be free from defects in material and workmanship for a period of three years. Subject to certain restrictions, General will repair or replace this product if, after examination, the company determines it to be defective in material or workmanship.
RETURN FOR REPAIR POLICY Every effort has been made to provide you with a reliable product of superior quality.
NOTES ____________________________________________ ____________________________________________ ____________________________________________ ____________________________________________ ____________________________________________ ____________________________________________ ____________________________________________ ____________________________________________ ____________________________________________ ____________________________________________ ____________________________________________ ___________
GENERAL TOOLS & INSTRUMENTS 80 White Street, New York, NY 10013-3567 PHONE (212) 431-6100 FAX (212) 431-6499 TOLL FREE (800) 697-8665 e-mail: sales@generaltools.com www.generaltools.com LDM60 User’s Manual Specifications subject to change without notice ©2012 GENERAL TOOLS & INSTRUMENTS NOTICE - WE ARE NOT RESPONSIBLE FOR TYPOGRAPHICAL ERRORS.