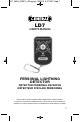
LD7_MAN_092910_4R.qxp:ps 9/29/10 2:47 PM Page 1 LD7 USER’S MANUAL PERSONAL LIGHTNING DETECTOR DETECTOR PERSONAL DE RAYOS DÉTECTEUR D'ÉCLAIR PERSONNEL Please read this manual carefully and thoroughly before using this product. Lea por favor este manual cuidadosamente y a fondo antes de usar este producto. Veuillez lire ce manuel soigneusement et complètement avant d'employer ce produit.
LD7_MAN_092910_4R.qxp:ps 9/29/10 2:47 PM Page 2 CONTENTS Introduction ........................................................ 2 Features .................................................................3 Specifications ...................................................... 3 Instructions ......................................................... 4 Installing the Battery ............................................ 4 Power On ............................................................. 4 Battery Check ....
LD7_MAN_092910_4R.
LD7_MAN_092910_4R.qxp:ps 9/29/10 2:47 PM Page 4 INSTRUCTIONS INSTALLING THE BATTERY: Slide off the back cover to the battery compartment and install two “AA” batteries. POWER ON: To turn the unit on (press and hold the yellow button for 5 seconds) (three beeps indicates that the unit is on). BATTERY CHECK: When first turned on, the detector performs a self battery test. The LED’s will indicate the battery level, with each LED indicating about 20% of battery level.
LD7_MAN_092910_4R.qxp:ps 9/29/10 2:47 PM Page 5 a. One beep (or one second vibrate) and the Green LED being lit up will indicate a strike within the 24 to 40 mile range. b.Two beeps (or a two second vibration) and the Yellow LED being lit up will indicate a strike within the 12 to 24 mile range. c. Three beeps (or a three second vibration) and the Orange LED being lit up will indicate a strike within the 6 to 12 mile range. d.
LD7_MAN_092910_4R.qxp:ps 9/29/10 2:47 PM Page 6 BEEPER / VIBRATION INDICATION: (Press and hold yellow button between 3 to 5 seconds). The detector is always in the “beeper” mode when powered on. To change to “beeper & vibration” mode, press the power button for approximately 3 to 5 seconds until the vibration is felt. Stop pressing button immediately. The unit is now in “beeper & vibration” mode. Power Off: (Press and hold the yellow button greater than 5 seconds.
LD7_MAN_092910_4R.qxp:ps 9/29/10 2:47 PM Page 7 FCC INFORMATION This device complies with part 15 of the FCC Rules. Operation is subject to the following two conditions: (1) this device may not cause harmful interference. (2) this device must accept any interference received, including interference that may cause undesired operation. Changes or modifications not expressly approved by the party responsible for compliance could void the user’s authority to operate the equipment.
LD7_MAN_092910_4R.qxp:ps 9/29/10 2:47 PM Page 8 CONTENIDO Introducción................................................... 8 Características .............................................. 9 Especificaciones ......................................... 10 Instrucciones ............................................... 10 Instalación de la batería .................................... 10 Encendido de la unidad ..................................... 10 Revisión de la batería ..................................
LD7_MAN_092910_4R.
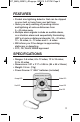
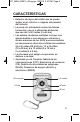
LD7_MAN_092910_4R.qxp:ps 9/29/10 2:47 PM Page 10 ESPECIFICACIONES • Alcance: 0 a 6 millas (0 a 9 km), 6 a 12 millas (9 a 19 km), 12 a 24 millas (19 a 38 km), 24 a 40 millas (38 a 64 km) • Dimensiones: 3,31 x 2,17 x 0,96 pulg. (84 x 55 x 24 mm) • Peso: 2,6 oz (74 g) • Fuente de alimentación: 2 baterías “AAA” (incluidas) INSTRUCCIONES INSTALACIÓN DE LA BATERÍA: Retire la cubierta posterior del compartimiento de la batería e instale dos baterías “AA”.
LD7_MAN_092910_4R.qxp:ps 9/29/10 2:47 PM Page 11 Si sólo 2 LED destellan dos veces, significa que el nivel de la batería es del 40%. Si sólo 1 LED destella dos veces, significa que el nivel de la batería es del 20%; cambie la batería de inmediato. Es altamente recomendable que las baterías se reemplacen cuando el nivel de la carga esté al 40% o por debajo.
LD7_MAN_092910_4R.qxp:ps 9/29/10 2:47 PM Page 12 Mantenga presionado el botón amarillo para ver funciones adicionales: ACTIVIDAD DE LA TORMENTA Mantenga presionado el botón amarillo de 2 a 3 segundos. Se iniciará una lectura de la actividad previa. El detector puede notar cuando la tormenta se está aproximando, alejando, cuando se detiene o cuando no hay actividad alguna. a.
LD7_MAN_092910_4R.qxp:ps 9/29/10 2:47 PM Page 13 APAGADO DE LA UNIDAD: Mantenga presionado el botón por más de 5 segundos. Para apagar la unidad, simplemente mantenga presionado el botón por más de 5 segundos hasta que se detenga la vibración y dos pitidos indicará que la unidad está apagado. La unidad se apagará automáticamente luego de dos horas de haber caído el rayo o luego de un período de inactividad.
LD7_MAN_092910_4R.qxp:ps 9/29/10 2:47 PM Page 14 cualquier tipo de interferencia recibida, incluso las interferencias que podrían originar un funcionamiento no deseado. Los cambios o modificaciones que no estén explícitamente aprobados por la parte responsable en cuanto al cumplimiento, podrían anular la autoridad del usuario para operar el equipo. ¡ADVERTENCIAS! • No exponga el instrumento a la aqua.
LD7_MAN_092910_4R.qxp:ps 9/29/10 2:47 PM Page 15 CONTENU Introduction.................................................. 15 Caractéristiques.......................................... 16 Specifications .............................................. 16 Instructions .................................................. 17 Installation des piles .......................................... 17 Mise en marche ................................................. 17 Vérification des piles ..................................
LD7_MAN_092910_4R.
LD7_MAN_092910_4R.qxp:ps 9/29/10 2:47 PM Page 17 INSTRUCTIONS INSTALLATION DES PILES : Faites glisser le couvercle du compartiment des piles vers l’arrière pour le retirer et insérez deux piles AA. MISE EN MARCHE Pour allumer l'appareil, maintenez le bouton jaune enfoncé pendant 5 secondes (trois bips indique que l’appareil est allumé). VÉRIFICATION DES PILES : Lors de la première mise en marche, le détecteur procèdera à une vérification des piles.
LD7_MAN_092910_4R.qxp:ps 9/29/10 2:47 PM Page 18 FONCTIONNEMENT DÉTECTION D’ÉCLAIRS : Lorsque l’appareil est allumé, la diode bleue clignote en permanence (s’allume pendant deux secondes et s'éteint pendant trois secondes). Lorsqu’un coup de foudre est détecté, le détecteur indique sa distance approximative en allumant la diode luminescente correspondante. (L’utilisateur pourra choisir d’être averti par un bip sonore ou par une vibration). a.
LD7_MAN_092910_4R.qxp:ps 9/29/10 2:47 PM Page 19 ACTIVITÉ DES TEMPÊTES Le détecteur peut indiquer qu’une tempête s’approche, s’éloigne, est stationnaire ou est inactive. Cela initiera une lecture à partir de l’activité précédente. a. Si les diodes s’allument cycliquement de la diode bleue vers les diode orange et jaune (de 6 à 12 / de 12 à 24) de manière symétrique, la tempête est stationnaire ou les données sont insuffisantes pour déterminer la direction de la tempête. b.
LD7_MAN_092910_4R.qxp:ps 9/29/10 2:47 PM Page 20 Arrêt: Pour arrêter l’appareil, vous n’avez qu’à maintenir le bouton enfoncé pendant plus de 5 secondes, jusqu’à ce les vibrations cessent et deux bips indiquent que l’appareil est arrêt. L’appareil s’arrêtera automatiquement deux heures après le dernier coup de foudre ou après deux heures d’inactivité.
LD7_MAN_092910_4R.qxp:ps 9/29/10 2:47 PM Page 21 INFORMATIONS RELATIVES À LA FCC Cet appareil est conforme à la section 15 de la règlementation de la FCC. Son fonctionnement est sujet aux deux conditions suivantes : (1) cet appareil ne doit pas provoquer d’interférence néfastes. (2) cet appareil doit pouvoir recevoir tout type d’interférence, y compris les interférences qui peuvent provoquer un fonctionnement non désiré.
LD7_MAN_092910_4R.
LD7_MAN_092910_4R.
LD7_MAN_092910_4R.qxp:ps 9/29/10 2:47 PM Page 24 GENERAL TOOLS & INSTRUMENTS 80 White Street New York, NY 10013-3567 PHONE (212) 431-6100 FAX (212) 431-6499 TOLL FREE (800) 697-8665 e-mail: sales@generaltools.com www.generaltools.com LD7 User’s Manual Specifications subject to change without notice ©2010 GENERAL TOOLS & INSTRUMENTS NOTICE - WE ARE NOT RESPONSIBLE FOR TYPOGRAPHICAL ERRORS.