HT20 - Manual–FINAL_REV_0316121_awb 3/16/12 4:02 PM Page 1 USB RH/TEMPERATURE DATA LOGGER with LCD DISPLAY USER’S MANUAL HT20 Please read this manual carefully and thoroughly before using this product.
HT20 - Manual–FINAL_REV_0316121_awb 3/16/12 4:02 PM Page 2 TABLE OF CONTENTS Introduction . . . . . . . . . . . . . . . . . . . . . . . . . . . . . . . . . . 3 – 4 Key Features . . . . . . . . . . . . . . . . . . . . . . . . . . . . . . . . . 4 – 5 Safety Instruction . . . . . . . . . . . . . . . . . . . . . . . . . . . . . . . . . 5 What’s in the Blister Pack. . . . . . . . . . . . . . . . . . . . . . . . . . . 5 Product Overview. . . . . . . . . . . . . . . . . . . . . . . . . . . . . .
HT20 - Manual–FINAL_REV_0316121_awb 3/16/12 4:02 PM Page 3 INTRODUCTION Thank you for purchasing General Tools & Instruments’ HT20 USB RH/Temperature Data Logger with LCD Display. Please read this user’s manual carefully and thoroughly before using the instrument. The HT20 is a low-cost, compact, battery-powered thermohygrometer capable of unattended logging (recording) of the ambient temperature and relative humidity (RH) of an environment for days, weeks or months.
HT20 - Manual–FINAL_REV_0316121_awb 3/16/12 4:02 PM Page 4 Applications for the HT20 include: • Water damage restoration—Because the HT20 is designed to be deployed and left in place over the duration of the job, it is always in equilibrium with the environment.
HT20 - Manual–FINAL_REV_0316121_awb 3/16/12 4:02 PM Page 5 • One-click exporting of logs to Excel or Word • Long battery life (up to one year) • Includes USB extension cable • One-year warranty SAFETY INSTRUCTION Do not use the HT20 in the presence of flammable or explosive gases.
HT20 - Manual–FINAL_REV_0316121_awb 3/16/12 4:02 PM Page 6 PRODUCT OVERVIEW Fig. 1a below shows the main components, controls and connectors of the HT20. Fig. 1b (on the facing page) shows all possible indications on the HT20’s display. Familiarize yourself with their names and functions before moving on to the Setup Instructions. E F D C B ,Fig. 1a. The components, controls and connector of the HT20 A. Temperature and humidity sensor window B. Battery compartment (latch is on rear of unit) C.
HT20 - Manual–FINAL_REV_0316121_awb 3/16/12 4:02 PM Page 7 Fig. 1b. All possible display indications on the HT20 Display Legend ▲: indicates reading is higher than high alarm setpoint for that parameter ▼: indicates reading is lower than low alarm setpoint for that parameter %RH: relative humidity unit °C: Celsius temperature unit °F: Fahrenheit temperature unit [-]188.
HT20 - Manual–FINAL_REV_0316121_awb 3/16/12 4:02 PM Page 8 (left photo on previous page). Push back the cover (middle photo), remove the old battery (right photo) and insert a fresh battery in the correct orientation. Then replace the cover, pushing it forward until you feel and hear a click. After you replace the battery, the LCD will “wake up” and begin displaying real-time readings. If the MODE button is not pressed within 60 seconds, the LCD will be automatically powered off.
HT20 - Manual–FINAL_REV_0316121_awb 3/16/12 4:02 PM Page 9 6. The next window advises that the ELUSB application will be installed in your computer’s C:\Program Files folder in a new subfolder named . If you want to install the software elsewhere, click Browse and choose another location. After selecting either the default location or another location, click Next to continue. 7. When the “Ready to install ELUsb” window appears, click Install to continue. 8.
HT20 - Manual–FINAL_REV_0316121_awb 3/16/12 4:02 PM Page 10 CONFIGURE THE UNIT Note that the software installation has added a icon to your desktop. To facilitate access to the program, right-click on the icon and pin it to both your Start button and the Quick Start area at the left of your taskbar. You can now eject the installation mini-disc and store it with your other important software. Plug the HT20 into an available USB port of your computer.
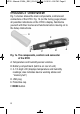
HT20 - Manual–FINAL_REV_0316121_awb 3/16/12 4:02 PM Page 11 Device HT20 is connected! Fig. 2. The three options made available by plugging the HT20 into a USB port Note: If you have already used your HT20 to log data and it is still in recording mode, plugging the unit in will cause the following window to appear. Click Yes to stop recording and import all data recorded to that point in time. Click No to continue to Setup without importing recorded data (meaning it will be lost).
HT20 - Manual–FINAL_REV_0316121_awb 3/16/12 4:02 PM Page 12 You can now use the software to “configure” your HT20. Configuring the device means choosing four key parameters: • Sampling time—How often it makes and stores humidity and temperature measurements. • Temperature unit—degrees Fahrenheit or Celsius (°F or °C). • High and low temperature alarm setpoints • High and low humidity alarm setpoints To begin, click on “Set up the USB Data Logger” in the window shown in the figure above.
HT20 - Manual–FINAL_REV_0316121_awb 3/16/12 4:02 PM Page 13 memory, potentially limiting its capacity to capture important events such as an unexpected excursion of temperature or humidity. Conversely, using the longest sampling time setting of 12 hours will likely cause important events to go undetected. If you are an experienced data logger, you already know how to choose the optimum sampling time for your application.
HT20 - Manual–FINAL_REV_0316121_awb 3/16/12 4:02 PM Page 14 That leaves only two things to be sure of when choosing a place to deploy the HT20: • The temperature and humidity sensor window (Fig. 1a, Callout A) is not covered • The humidity and temperature values at the unit’s location are “representative” of the room The HT20—with its protective cap on—can be deployed either by laying it on a horizontal surface or by hanging it vertically within the included plastic mounting bracket.
HT20 - Manual–FINAL_REV_0316121_awb 3/16/12 4:02 PM Page 15 for uploading (importing) data logs is identical. Just click on the middle selection—Stop the USB Data Logger and download data—to instantly execute both functions. The data will be imported as a .txt file. A “Save As” window will appear, asking you to identify where you want the file to be stored and what you want to name it.
HT20 - Manual–FINAL_REV_0316121_awb 3/16/12 4:02 PM Page 16 There are several features shown in Fig. 4 worth noting: • To mark the position of every recorded data point on the curve, check the “Mark Points” box at the top of the sidebar at right. • To get a higher-resolution view of the data recorded during a specific period of time, scale up and down the curves by dragging the slider at the bottom of the window left and right.
HT20 - Manual–FINAL_REV_0316121_awb 3/16/12 4:02 PM Page 17 pressed within the past 60 seconds. That is the case even when the unit is logging data. In other words, the LCD is normally “asleep”. To wake up the LCD, briefly press the MODE button. This first press of the button will cause the LCD to resume displaying the same indication that was on-screen when the LCD was last put to sleep.
HT20 - Manual–FINAL_REV_0316121_awb 3/16/12 4:02 PM Page 18 SPECIFICATIONS Temperature Measurement Range -4° to 158°F (-20° to 70°C) Temperature Measurement Accuracy ±0.7°F (0.4°C) Temperature Measurement Resolution and Repeatability ±0.2°F (0.1°C) Relative Humidity (RH) Measurement Range 10 to 90% RH Measurement Accuracy ±3% RH Measurement Resolution and Repeatability ±0.
HT20 - Manual–FINAL_REV_0316121_awb 3/16/12 4:02 PM Page 19 MAINTENANCE TIPS • Avoid dropping the unit. Do not subject it to violent shock or vibration or expose it to strong electromagnetic fields (for example, near arc welders or induction heaters). • Keep the unit out of direct sunlight. • Do not use chemicals or abrasive cloth to clean the display window or housing.
HT20 - Manual–FINAL_REV_0316121_awb 3/16/12 4:02 PM Page 20 RETURN FOR REPAIR POLICY Every effort has been made to provide you with a reliable product of superior quality.