CLASS 1 SOUND LEVEL METER WITH EXCEL-FORMATTED DATA LOGGING SD CARD USER’S MANUAL DSM403SD Please read this manual carefully and thoroughly before using this product.
TABLE OF CONTENTS Introduction . . . . . . . . . . . . . . . . . . . . . . . . . . . . . . . . . . . . . . . 3 Key Features . . . . . . . . . . . . . . . . . . . . . . . . . . . . . . . . . . . . . . 3 What's in the Case . . . . . . . . . . . . . . . . . . . . . . . . . . . . . . . . . . 4 Product Overview . . . . . . . . . . . . . . . . . . . . . . . . . . . . . . . . . . 4 Setup Instructions . . . . . . . . . . . . . . . . . . . . . . . . . . . . . . . 5 – 6 Calibrating the Meter . . . . . . . . . . . . .
INTRODUCTION Thank you for purchasing General Tools & Instruments’ DSM403SD Class 1 Sound Level Meter with Excel-formatted Data Logging SD Card. Please read this user’s manual carefully and thoroughly before using the instrument. The DSM403SD is a general-purpose handheld instrument that measures the noise level of an environment or the amplitude of sound produced by a piece of machinery. Using an integrated 0.5 in.
WHAT’S IN THE CASE The DSM403SD comes fully assembled in a hard carrying case along with a sound wind shield ball, a 2 GB SD memory card and this user’s manual. Optional accessories available from General Tools & Instruments include a 94 dB or 94/114 dB sound calibrator and a 9VDC adapter for a 110V power supply. See the Optional Accessories section of this manual on p. 11 for more details.
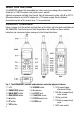
SETUP INSTRUCTIONS 1. Choose the power source. Before using the DSM403SD, be sure it is powered by fresh batteries or an optional 9VDC AC adapter plugged into the bottom jack on its right side (callout 1-13). To remove the battery compartment cover (callout 1-17), remove the two Phillips-head screws holding it in place (callout 1-15). Then install six “AA” batteries in the correct orientation, using the polarity marks on the inside of the compartment as a guide.
5. Enable or disable auto power off (APO). Once the format of decimal point divisions has been set and stored, the display will show the word “yES’ over the term “PoFF”. Press the ▼ or ▲ button until the desired APO management scheme (“yES” for enable; “no” for disable) is displayed. Press the REC/ENTER button to store the selection. If enabled, the APO function shuts off the DSM403SD if no front-panel buttons are pressed for ten minutes. 6. Enable or disable the beeper.
3. Press the SET button on the DSM403SD (callout 1-7 of Fig. 1), which has the term “Fast/Slow” stenciled below it. If the word “FAST” is displayed, move ahead to Step 4. If the word “SLOW” is displayed, press the SET button again to change “SLOW” to “FAST”. 4. Press the ▼ button on the DSM403SD (which has the term “A/C” stenciled above it). If the letter “A” is displayed in the upper left corner, move ahead to Step 5. If the letter “C” is displayed, press the ▼ button again to change it to an “A”. 5.
3. To switch from fast time weighting (the meter’s default setting) to slow time weighting, press the SET button, which has the term “Fast/slow” stenciled below it. Once you have set these three parameters (or kept the meter’s default settings), you are ready to make sound level measurements. 4. To make a sound level measurement, point the condenser microphone at the top of the meter in the direction of the sound source. The display will show its volume, in dB units.
Also be sure that the meter either is running on fresh batteries or is being powered by AC through a 9VDC adapter. 1. To start automatic data logging, press the REC/ENTER button once. The top line of the display will show the term “REC”. Pressing the LOGGER button at this point will make “REC” flash and add the flashing term “LOGGER” at the top right of the display. This indicates that the instrument is sampling measurements at the programmed rate and storing the readings and their time stamps in memory. 2.
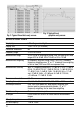
Fig. 2. Typical Excel data-only screen Fig. 3. Typical Excel graphics-only screen SPECIFICATIONS Display type Display size Parameter measured Frequency range Measurement range Measurement weighting Measurement accuracy Measurement resolution Sampling time options Settable parameters Storable readings AC output AC output impedance SD card capacity 10 LCD with green backlight 2.05 x 1.5 in. (52 x 38mm) dB 31.
Operating temperature Operating relative humidity Power source Power consumption Dimensions of meter Weight of meter 32º to 122ºF (0º to 50ºC) 0 to 85% 6 “AA” batteries or optional 9-VDC AC adapter 12 mADC (normal operation, with backlight off and SD card not saving data); 18 mADC with backlight on and card not saving data; 51 mADC with backlight on and card saving data 9.65 x 2.68 x 1.77 in. (245 x 68 x 45mm) 1.08 lb.
RETURN FOR REPAIR POLICY Every effort has been made to provide you with a reliable product of superior quality.