DLM112SD USER’S MANUAL LIGHT METER WITH DATALOGGING SD CARD Please read this manual carefully and thoroughly before using this product.
TABLE OF CONTENTS Introduction . . . . . . . . . . . . . . . . . . . . . . . . . . . . . . . . . 3 Key Features . . . . . . . . . . . . . . . . . . . . . . . . . . . . . . . . 4 Operating Instructions . . . . . . . . . . . . . . . . . . . . . 4 – 11 What’s in the case . . . . . . . . . . . . . . . . . . . . 4 – 5 Setup . . . . . . . . . . . . . . . . . . . . . . . . . . . . . . . 6 – 8 Normal Operation . . . . . . . . . . . . . . . . . . . . . 8 – 9 Holding and Storing Measurements. . . . . . . . . .
INTRODUCTION Thank you for purchasing General Tools & Instruments’ DLM112SD UV Light Meter with Datalogging SD Card. Please read this user’s manual carefully and thoroughly before using the instrument. The DLM112SD is a general-purpose handheld instrument suitable for measuring the intensity of light in commercial, industrial and consumer settings. Applications include photography, videography, construction, engineering and surveillance.
KEY FEATURES • Includes light probe • Measures light intensity within three automatically switched full-scale ranges: 2,000 lux, 20,000 lux and 100,000 lux (200 ft-cd, 2,000 ft-cd and 10,000 ft-cd) • Selectable lux or foot-candle unit • Displays maximum and minimum readings • Performs real-time automatic datalogging at sampling time settable from 1 second to 1 hour • Also supports manual logging and changing of card storage location • Accepts SD memory cards of up to 16 GB capacity • Big (2.5 in.
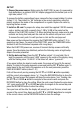
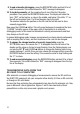
Fig. 1 TOP BOTTOM FRONT RIGHT SIDE 1-1 Liquid-crystal display 1-2 POWER/ESC button 1-3 FUNC.
SETUP 1. Choose the power source. Before using the DLM112SD, be sure it is powered by fresh batteries or an optional 9VDC AC adapter plugged into the bottom jack on its right side (callout 1-12). To remove the battery compartment cover, remove the two screws holding it in place (callout 1-14). Then install six “AA” batteries in the correct orientation, using the polarity marks on the inside of the compartment as a guide. Replace the cover by replacing the two screws. 2. Install an SD card.
4. Choose a decimal point or comma to represent the decimal division between integers and fractions (for example, American-style 20.88 vs. European-style 20,88). Once you have finished setting the time, the display will show the word “bASIC” above the phrase “dEC”. Press the SET ▼ button to make “bASIC” (American style) or “Euro” appear in the upper display, as desired. Press the REC/ENTER button to store the selection. 5. Enable or disable auto power off.
If you choose “yES”, after you press the REC/ENTER button the instrument will prompt you to confirm that decision by displaying the term “Ent” below “yES” and sounding three beeps. To confirm that you want to begin the erasure/formatting procedure, press the REC/ENTER. “Ent” will then flash several times and the instrument will sound another three beeps to confirm that the SD card has been erased and formatted.
To change the unit of measurement, or to configure the instrument for use with a Type J thermocouple probe, press the SET ▼ button to reenter setup mode and perform Step 7 or 8 of the procedure. Along with the measured value, the display also shows the type of thermocouple the DLM112SD is configured for. Whenever the DLM112SD is in measurement mode, you can turn off the backlight (which is on by default) by briefly pressing (but not holding) the POWER/ESC button.
9. To end automatic datalogging, press the REC/ENTER button and hold it for at least two seconds. This action causes the “REC” message to disappear. 10. To log data manually, set the sampling time to zero Step 9 of the setup procedure. Then press the REC/ENTER button once. The display will show the term “REC” on the top line, a value in the middle, and below it the letter “P” on the left and a number from 1 to 99 on the same line to the right.
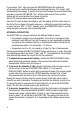
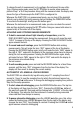
Fig. 2. Typical Excel data-only screen Fig. 3.
SPECIFICATIONS Embedded microcontroller Custom one-chip LSI device Display type Liquid-crystal with green backlight Display size 2.05 x 1.5 in. (52 x 38 mm) Full-scale ranges 0 to 1,999 lux; 1,800 to 19,990 lux; (automatically switched) 18,000 to 99,900 lux (0 to 186 ft-cd; 167 to 1,860 ft-cd; 1,670 to 9,290.7 ft-cd) Measurement accuracy ± 4% of full-scale reading + 2 digits for all lux readings and ft-cd readings at 200 ft-cd full-scale (f.s.); ± 4% of f.s. reading + 2 ft-cd at 2,000 ft-cd f.s.
MAINTENANCE & TROUBLESHOOTING TIPS Keep the light probe clean and its sensor under the protective cap when not in use. When the icon appears in the left corner of the display, it’s time to replace the six “AA” batteries that power the instrument (although measurements will remain valid for several hours after the low-battery indicator first appears). Replacing the batteries requires removing the two screws that hold the battery compartment cover in place, as explained earlier.
RETURN FOR REPAIR POLICY Every effort has been made to provide you with a reliable product of superior quality.
NOTES ______________________________________________________________ ______________________________________________________________ ______________________________________________________________ ______________________________________________________________ ______________________________________________________________ ______________________________________________________________ ______________________________________________________________ ______________________________________________________________ __
GENERAL TOOLS & INSTRUMENTS 80 White Street New York, NY 10013-3567 PHONE (212) 431-6100 FAX (212) 431-6499 TOLL FREE (800) 697-8665 e-mail: sales@generaltools.com www.generaltools.com DLM112SD User’s Manual Specifications subject to change without notice ©2010 GENERAL TOOLS & INSTRUMENTS NOTICE - WE ARE NOT RESPONSIBLE FOR TYPOGRAPHICAL ERRORS.