The SeaScope™660 WATERPROOF RECORDING VIDEO INSPECTION SYSTEM USER’S MANUAL DCS660 Please read this manual carefully and thoroughly before using this product.
TABLE OF CONTENTS Introduction . . . . . . . . . . . . . . . . . . . . . . . . . . . . . . . . . . . . . . . 3 – 4 Key Features . . . . . . . . . . . . . . . . . . . . . . . . . . . . . . . . . . . . . . . . . 4 Safety Instructions . . . . . . . . . . . . . . . . . . . . . . . . . . . . . . . . . . . . . 5 What’s in the Case . . . . . . . . . . . . . . . . . . . . . . . . . . . . . . . . . . . . . 5 Product Overview . . . . . . . . . . . . . . . . . . . . . . . . . . . . . . . . . . .
INTRODUCTION Thank you for purchasing General Tools & Instruments’ DCS660 Waterproof Recording Video Inspection System. Please read this user’s manual carefully and thoroughly before using the instrument. The DCS660 (The SeaScope™660) is one of only two video inspection systems on the market with an IP67 waterproof grip and monitor as well as an IP67 waterproof camera-tipped probe. The other system is General's DCS600 (The SeaScope™600), a non-recording (real-time) version of the SeaScope660.
The SeaScope’s recording functions are controlled by a familiar menu-driven interface. Behind the front-panel MENU button is a hierarchical control structure that lets you: • Enter the current date and time • Choose whether to date- and time-stamp still images and videos as you save them The SeaScope660 and all of its accessories are packaged in a hard plastic protective case along with this user’s manual. The unit is powered by four “AA” batteries, which are not included.
SAFETY INSTRUCTIONS • Do not use the system to inspect environments known or suspected to contain exposed electrical wiring. • Do not use it in the presence of flammable or explosive gases. • Read and understand all of the instructions in this manual before using the system. • Stay alert, watch what you are doing, and use common sense. A moment of distraction can result in serious personal injury. • Do not over-reach. Keep proper footing and balance at all times, especially where water is underfoot.
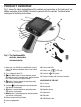
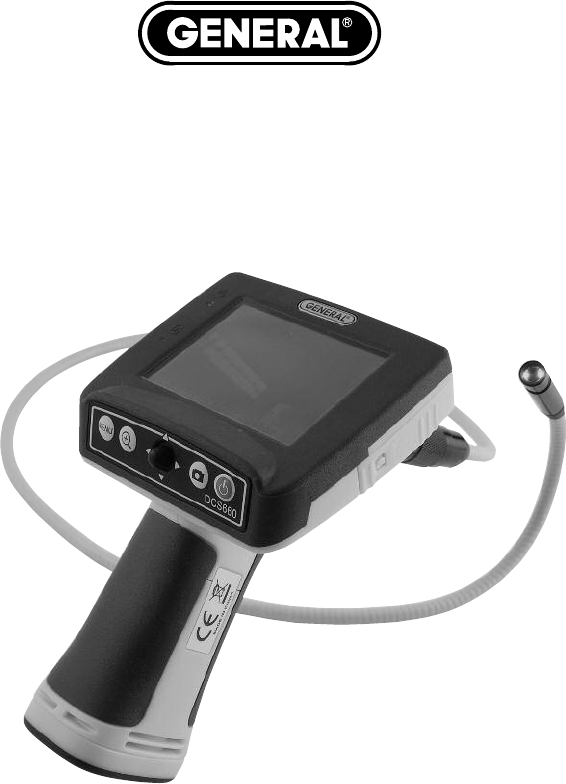
PRODUCT OVERVIEW Fig. 1 shows the labels and positions of the controls and connectors on the front panel, top, bottom and sides of the DCS660. Familiarize yourself with the controls’ functions before moving on to the Setup Instructions. 13 12 2 11 10 1 7 6 5 4 3 9 14 15 17 16 8 18 Fig. 1. The SeaScope660’s controls, connectors and accessories 1. Video jack, mini-B USB jack and MicroSD card slot (see p. 10) (behind waterproof door on right side of monitor) 2. 3.4 in. (diagonal) color LCD 3.
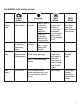
The DCS660's multi-function controls Camera button Real-Time Viewing mode Playback mode Press briefly to take a picture Press and hold to start/stop recording a video Press to pause/resume video playback (Joystick) With zoom off Push and to decrease and increase display brightness Push to invert video vertically and undo inversion With Push ,, zoom on and to pan video in that direction Push , and to navigate saved videos and images Push to exit video being viewed Menu modes [No
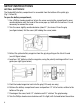
SETUP INSTRUCTIONS INSTALL BATTERIES The Seeker660’s battery compartment is accessible from the bottom of the pistol grip (Fig.1, Callout 8). To open the battery compartment, 1. Use a Phillips-head screwdriver to turn the screw securing the compartment’s cover counterclockwise until the head of the screw pops up, flush with the surface. It is not necessary to remove the screw. 2. Turn the cover slightly counterclockwise (about 2°) to release it from the grip (see figure below).
Notes: 1. Make sure your hands are completely dry before opening the battery compartment. 2. Take extra care to properly secure the cover of the battery compartment after installing batteries. The battery compartment is one of three places where water could enter the SeaScope660, potentially causing permanent damage. The other two places are the connection between the camera-tipped probe and the grip, and the waterproof door protecting the Video out and USB jacks and MicroSD card slot.
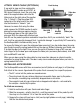
ATTACH VIDEO CABLE (OPTIONAL) Push latch up If you wish to view real-time captured by the SeaScope660’s probe on an NTSC- or Slide door PAL-format television, insert the mini-plug to the end of the supplied video cable into the right Video jack on the right side of the monitor (Fig. 1, Callout 1). Plug the yellow RCA connector at the other end of the cable into the television’s “Video In” jack.
To detach an accessory, 1. Use the nail of your index finger to unhook the clasp, opening it up. 2. Hold the accessory’s metal stem with your thumb and index finger and slide the accessory and clasp past the camera head. 3. Put the accessory back in the Ziploc bag it came in. OPERATING INSTRUCTIONS Before using the scope for the first time, remove the plastic film protecting the LCD. Before using the DCS660 for an inspection session, remove the black rubber ring protecting the probe’s camera head.
To undo video inversion, push the joystick down and hold it for at least one second. Real-time video exported to a TV monitor cannot be "flipped", but it can be zoomed and panned. Because the probe is flexible-obedient, you can maneuver it into various positions to aim at different targets and it will hold its shape. The DCS660 is designed to be powered for up to ten hours by a set of four “AA” batteries.
To set the current date and time, follow the instructions on p. 17. To take a picture, make sure the unit is in Real-Time Viewing mode, with the current date and running clock at the bottom of the display. Press the button briefly. Within less than a second, a yellow icon will appear briefly in the center of the display to indicate that a picture was taken. Simultaneously, a (storage) icon will appear at the bottom right of the display to confirm that the picture was stored (on the MicroSD card).
To play a recorded video, press the button. Once the video starts playing, a running clock will appear at the upper right of the display to track the playback position. A red (pause) icon will also appear, at lower left. To pause the video, press the button. This will cause the red pause icon to change to a green (play) icon. To resume playing the video, press the button again. This will cause the pause icon to reappear. To exit the video being played, push the joystick up.
If you have configured your PC to automatically play external media, plugging in the adapter will open an AutoPlay box that verifies connection of a “Removable Disk”. Clicking on “Open folder to view files” reveals one folder, named “CCTV”, which contains all of the videos and pictures stored on the card. Double-click on the CCTV folder icon to view the subfolders containing the individual video and picture files.
The Advanced Setting menu Submenu name Options Instructions/Comments Movie Size QVGA or D1 (default) Select QVGA to record videos with 320 x 240 pixel resolution; select D1 to record with 720 x 480 pixel resolution.
The Set Time/Date menu Submenu name Options Instructions/Comments Set Time/Date Current date, date format, current time A) Enter current date in default format of DD/MM/YY (day, month, year). 1) Push joystick or until current year is displayed in YY field. 2) Push joystick to enter MM field. 3) Push joystick or until current month is displayed. 4) Push joystick to enter DD field. 5) Push joystick or until current day is displayed. B) Change date format (optional).
The Playback menu Submenu name Options Instructions/Comments File Delete Single, All Files in Folder, All, Cancel Selecting any option (other than Cancel) by pressing the MENU button opens a “Delete Yes or No” screen. Choose Yes to delete either: 1) the movie or photo file currently on-screen; 2) all files in its folder; or 3) all files on the MicroSD memory card.
MAINTENANCE TIPS The SeaScope660 is not shock-resistant. Do not use it as a hammer or drop it. Also, do not use the camera-tipped probe to clear debris If condensation forms inside the lens, let it evaporate before using the system again. Remove the batteries if planning to store the unit for months or longer. Properly dispose of used batteries. Exposure to high temperatures can cause batteries to explode, so do not incinerate them. Some countries regulate battery disposal.
GENERAL TOOLS & INSTRUMENTS 80 White Street New York, NY 10013-3567 PHONE (212) 431-6100 FAX (212) 431-6499 TOLL FREE (800) 697-8665 e-mail: sales@generaltools.com www.generaltools.com DCS660 User’s Manual Specifications subject to change without notice ©2011 GENERAL TOOLS & INSTRUMENTS NOTICE - WE ARE NOT RESPONSIBLE FOR TYPOGRAPHICAL ERRORS.