THE SEEKER 400 SERIES TM WIRELESS VIDEO INSPECTION SYSTEMS GENERAL TOOLS & INSTRUMENTS 80 White Street New York, NY 10013-3567 PHONE (212) 431-6100 FAX (212) 431-6499 TOLL FREE (800) 697-8665 e-mail: sales@generaltools.com www.generaltools.com DCS400/DCS495 User’s Manual Specifications subject to change without notice NOTICE - NOT RESPONSIBLE FOR TYPOGRAPHICAL ERRORS.
CONTENTS NOTES Welcome. . . . . . . . . . . . . . . . . . . . . . . . . . . . . . . . . . . . . . . 3 Features . . . . . . . . . . . . . . . . . . . . . . . . . . . . . . . . . . . . . . . 3 Packing List . . . . . . . . . . . . . . . . . . . . . . . . . . . . . . . . . . . . 4 Structure . . . . . . . . . . . . . . . . . . . . . . . . . . . . . . . . . . . . . . 4 Set-Up and Installation . . . . . . . . . . . . . . . . . . . . . . . . . 5–7 Operation . . . . . . . . . . . . . . . . . . . . . . . . . . . .
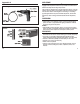
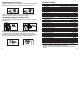
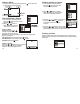
Appendix A WELCOME Thank you for purchasing a SeekerTM 400 Series wireless datalogging video inspection camera scope. Please read this User’s Manual carefully before using this product. Camera Tipped Probe and Base Unit The product is designed as a remote inspection device. It can be used to look into tight or inaccessible areas and wirelessly transmit real time video or still images for monitoring or recording.
PACKING LIST EU Environmental Protection Waste electrical products should not be disposed of with household waste. Please recycle where facilities exist. Check with your Local Authority or retailer for recycling advice.
FCC INFORMATION SET-UP and INSTALLATION This device complies with part 15 of the FCC Rules. Operation is subject to the following two conditions: (1) this device may not cause harmful interference. (2) this device must accept any interference received, including interference that may cause undesired operation. Changes or modifications not expressly approved by the party responsible for compliance could void the user’s authority to operate the equipment.
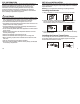
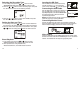
Installing the Accessories SPECIFICATIONS The three accessories include a mirror, a hook and a magnet. All are attached to the probe tip in the same way. Install as follows: Camera Make sure the stem is placed at the side facing from the arrow mark, and tighten to secure the accessory in place. Installing the Monitor for Wired Use The product also supports wired use by connecting the monitor to the base unit.
Selecting the Recording Type Inserting the SD Card 1. In the setting mode, press the or button to select “RECORDER SETTING” then press the “OK” button to enter. 2. Press the or button to select “Recording Type” then press the “OK” button to enter into the following interface: After the SD card was inserted successfully into SD card socket, “ ” icon will appear on the screen; otherwise, “ ” icon will appear. Connecting the USB Cable Use the USB cable to connect the monitor to a PC.
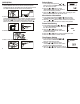
OPERATION Basic Operation 1. Roll the ON/OFF switch to turn ON the camera; the power indicator will light up. The switch then acts as a dimmer for the twin LED’s that surround the camera on the probe’s tip. ON F OF Default Setup 1. In the setting mode, press the or button to select “SYSTEM SETTING” press the “OK” button to enter. 2. Press the or button to select “Default Setup” press the “OK” button to enter into the following interface: 3.
How to enter the Setting Mode In the real time monitoring status, press and hold the button for about 1 to 2 seconds to enter into the “SYSTEM SETTING” interface as indicated: Probe: The flexible probe can be bent into a certain shape. This may help you insert the probe into narrow areas. 5. The accessories can be used to retrieve small items such as dropped rings or screws. Language Setting 1. In the setting mode, press the or button to select “SYSTEM SETTING” then press the “OK” button to enter. 2.
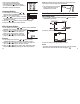
Taking a Photo 1. In the real time monitoring status, press the to photo taking status as follows: Deleting a Video or Picture button to switch 1. In the real time monitoring status, press the button once to enter into the following interface: 2. Press or button to select a folder, then press the “OK” button to enter into the following interface: 2. Press the “OK” button to take a photo. Play Video/View a Picture 1.