
User guide


PRODUCT OVERVIEW
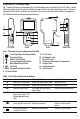
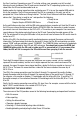
Fig. 1 shows the names and locations of all of the controls, ports and jacks of the H16. Table 1 details
how the function of each front-panel button changes with the console’s operating mode. Familiarize
yourself with the labels, positions and functions of all controls and connectors before moving on to
the Setup Instructions and Operating Instructions.
Fig. 1. The controls, ports and jacks of the H16
Table 1. The H16’s multi-function buttons
Button Label In Preview Mode In Playback Mode In Menu Mode
▲ Switches to Playback mode Selects next-oldest video or photo Moves up one line
▼ Switches to Playback mode Selects next-newest video or photo Moves down one line
OK Switches to Menu mode Offers option to delete selected Executes highlighted command
video or photo
ESC Presssed briefly, enlarges Switches to Preview mode Switches to Preview mode
target by 50% (zooms 1.5X)
Pressed and held, mirrors
video
Takes a picture Recalls next photo or Displays repair data or opens
(stores .jpg photo on SD card) pauses/plays video clip submenu of video attribute
options
Starts/stops recording an Switches to Preview mode Switches to Preview mode
.asf video on SD card
5
11
12
5
4
6
7
2
1
3
14
13
15
8
9
10
LEFT SIDE
FRONT BACK RIGHT SIDE
1 Start/Stop Video Recording Button
2 Snapshot Button
3 Power On/Off Button
4 Previous Video/Photo Button
5 ▼ Next Video/Photo Button
6 OK OK Button
7 ESC Escape/Zoom/Mirror Button
8 SD Card Socket
9 TV Out Jack
10 AC Adapter Jack
11 Mini-USB Jack
12 Brightness Adjustment Thumbwheel
13 Hanger Hole
14 Probe Connector
15 Reset Button