
Installation Manual


Page 6 of 8
www.generalspecialtiesmfg.com
208-265-5244
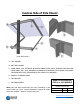
Place 2 channels on a flat surface. Attach 4 brackets as shown using
provided bolts. Leave bolts finger tight for now.
Then bolt top channel with smaller brackets to the top of the post
using U-bolts with washers and nuts. Make sure the holes in the
small brackets on the top channel are UP.
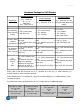
To determine spacing between the 2 channels, use a panel rail to
gauge the distance from the top of the top channel to the bottom of
the bottom channel.
Hold a level on centerline
as shown. Note bubble.
Now move level to outer
end of channel next to
brackets. The bubble on
the level must read the
same. This will ensure
that
the panels are in
plane. If
the channels
are not in plane then you
will have a twist to your
panel(s).
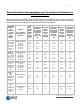
Attach panel rails to solar panel across the width of the panel
as shown. Make sure slotted part of rail “toes-out” toward
ends of
panel. It is important that whiz flange nut bears
against the rail. Insert the bolt from bottom facing out.
(Note: These instructions refer to angle rails with punched
mounting holes. If you have T- slot rails, slide bolt heads into
T-slot then insert
shaft of bolt into holes in back of the panel
frame and tighten with flange nut)
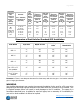
Attach braces to bottom channel brackets as
shown.